


 Working with the App
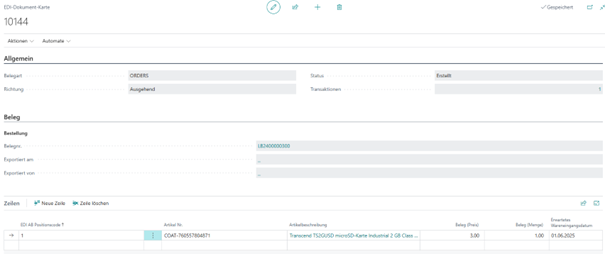 The document is created with the document type "ORDERS" and the status "Created". Additionally, the line information from the purchase order is added.
If the purchase order is reopened, the system checks whether an EDI document with the status "Created" exists. If so, it is deleted and recreated upon release. This ensures the EDI document is always up to date.
In the purchase order, two page actions exist to either create a new EDI document or open the existing one. These actions are only visible after releasing:
The document is created with the document type "ORDERS" and the status "Created". Additionally, the line information from the purchase order is added.
If the purchase order is reopened, the system checks whether an EDI document with the status "Created" exists. If so, it is deleted and recreated upon release. This ensures the EDI document is always up to date.
In the purchase order, two page actions exist to either create a new EDI document or open the existing one. These actions are only visible after releasing:
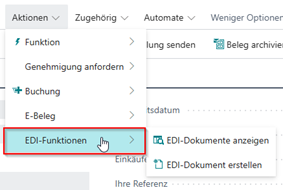 If an EDI document already exists and a new one is to be created, a message with a notice is displayed.
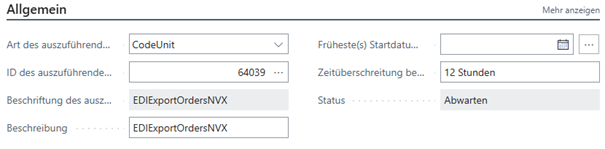
After creating an EDI document, the next step is to run a job queue. The codeunit "EDIExportOrderNVX" must be configured and will export all created EDI documents in the process.
This export uses the EDI interface "EDI Export", providing a web service URL as an endpoint. An XML file is then sent to the configured URL.
If an EDI document already exists and a new one is to be created, a message with a notice is displayed.
After creating an EDI document, the next step is to run a job queue. The codeunit "EDIExportOrderNVX" must be configured and will export all created EDI documents in the process.
This export uses the EDI interface "EDI Export", providing a web service URL as an endpoint. An XML file is then sent to the configured URL.
 After exporting an EDI document, the status is set to "Success". If a problem occurs, the status is set to "Error". Further details can be found in the transactions on the EDI card:

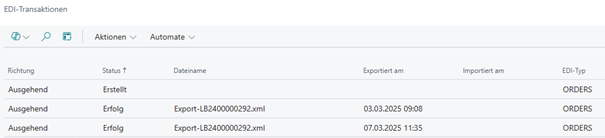 The exported XML file can be downloaded from the transactions and the EDI card:

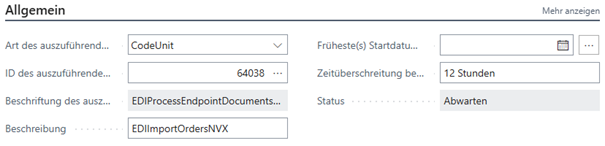 This codeunit checks all documents available at the endpoint URL defined in the "EDI Import" interface.
When an XML file is found in an import directory, it is processed and converted into an EDI document.
Further information is then available on the EDI card for the "ORDERSP":
This codeunit checks all documents available at the endpoint URL defined in the "EDI Import" interface.
When an XML file is found in an import directory, it is processed and converted into an EDI document.
Further information is then available on the EDI card for the "ORDERSP":
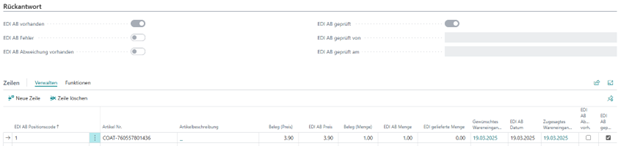 This allows deviations from the sent purchase order to be identified.
If a different quantity or price is confirmed, the flag "EDI Confirmation Deviation Present" is set.
Once all data has been reviewed or no deviation exists, there are two ways to transfer the data to the purchase order:
- The data is manually transferred into the purchase order:
This allows deviations from the sent purchase order to be identified.
If a different quantity or price is confirmed, the flag "EDI Confirmation Deviation Present" is set.
Once all data has been reviewed or no deviation exists, there are two ways to transfer the data to the purchase order:
- The data is manually transferred into the purchase order:
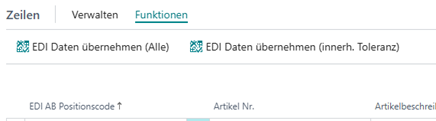 - The data is transferred automatically if enabled in the EDI interface setup:
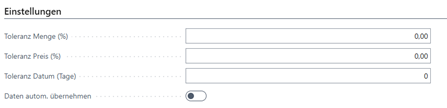 o A tolerance can also be configured here. If the imported data is within this tolerance, it is automatically accepted or offered for acceptance.
The data (quantity, price, date) is transferred to the associated EDI purchase order. Once the data has been transferred, the fields "EDI Confirmation Checked By" and "EDI Confirmation Checked On" are filled with the current user and date.
o A tolerance can also be configured here. If the imported data is within this tolerance, it is automatically accepted or offered for acceptance.
The data (quantity, price, date) is transferred to the associated EDI purchase order. Once the data has been transferred, the fields "EDI Confirmation Checked By" and "EDI Confirmation Checked On" are filled with the current user and date.
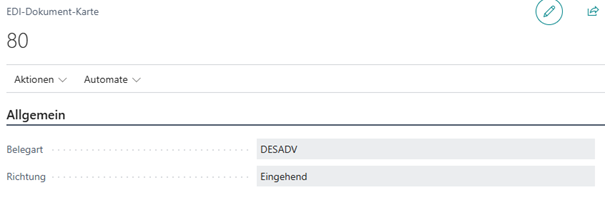 For imported documents, the direction is set to "Inbound".
When importing the DESADV, the sales order is filtered via the purchase order. The following data from the XML file is transferred into the sales order:
- Shipping Agent Code
- Package Tracking Number
Additionally, the field "EDI Delivered Quantity" from the XML file is transferred to the EDI document.
Now, the EDI interface setup is checked. If the field "Automatically Take Over Data" is enabled, the field "Quantity Outstanding" is filled with the delivered quantity from the XML file.
Furthermore, the vendor delivery number is transferred to the purchase order header.
As the last step in the DESADV process, the EDI interface setup is checked again.
If the field "Auto Post Shipment" is enabled:
For imported documents, the direction is set to "Inbound".
When importing the DESADV, the sales order is filtered via the purchase order. The following data from the XML file is transferred into the sales order:
- Shipping Agent Code
- Package Tracking Number
Additionally, the field "EDI Delivered Quantity" from the XML file is transferred to the EDI document.
Now, the EDI interface setup is checked. If the field "Automatically Take Over Data" is enabled, the field "Quantity Outstanding" is filled with the delivered quantity from the XML file.
Furthermore, the vendor delivery number is transferred to the purchase order header.
As the last step in the DESADV process, the EDI interface setup is checked again.
If the field "Auto Post Shipment" is enabled:
 The purchase order is posted automatically, and a sales shipment is created.
| FinanzOnline VAT Reg. No. Validation VAT Reg. No. validation via the Austrian FinanzOnline (FON) service. More information  |


