
EDI Interface
Document exchange of electronic documents between BC and an EDI partner (clearing partner) - e.g. ORDERS, ORDERSP, DESADV, INVOICE.
Manual
Creation date: 2026/04/04
The current version of this manual can be found at:


Docs / Solution / EDI Interface / General
 General
Setting up the EDI interface app enables the export and import of various EDI XML files. The XML files are sent to a defined end point via a web service and then retrieved and processed. The process only takes place in Business Central.
Docs / Solution / EDI Interface / Setup
EDI Interface Setup
The EDI interface is used for export and import as a setup. In this setup, the endpoints for export and import are defined. It also allows configuration for tolerances and processing logic.
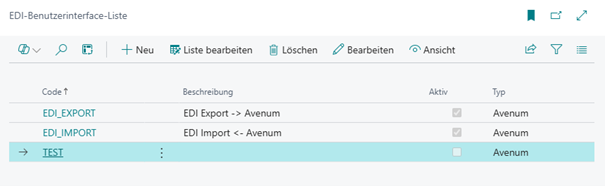
For the EDI import and the EDI export, a separate record is created. The records differ in their URL and the tolerance settings:

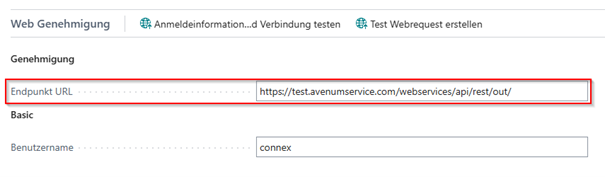
The endpoint specifies where the XML data is stored or retrieved.
In the Web Approval tab, the correct credentials for the web service (user + password) must be entered. This function is provided by the app "Web Utility Library".
The data exchange definition is specified in the EDI Mapping tab and is used to generate the XML file (see table of contents page "Data Exchange Definition"):

Currently, the EDI mapping is mandatory only for the "EDI Export" record.
For the import, additional settings are used to control the processing of the data:

Each field in the setup includes an individual tooltip to help understand its purpose.
GeneralFields
| Code | Specifies the code of the interface. |
| Description | Specifies the description. |
| Active | Specifies whether the interface is activated. |
| Type | Specifies the type of the interface. |
Web ApprovalFields
| Endpoint URL | Specifies the endpoint URL where the data is stored or retrieved. |
| Type | Specifies the type of web service authentication. |
| Username | Specifies the username of the web service. |
| Password | Specifies the password of the web service. |
EDI MappingFields
| Code | Specifies the code of the EDI mapping. |
| Data Exchange Definition Code | Specifies the code of the data exchange definition. |
| Direction | Indicates whether the direction is outgoing or incoming. |
| Document Type | Specifies which document type is used. |
SettingsFields
| Quantity Tolerance (%) | Specifies the quantity tolerance used for imported data. |
| Price Tolerance (%) | Specifies the price tolerance used for imported data. |
| Date Tolerance (Days) | Specifies the date tolerance used for imported data. |
| Auto-apply Data | Specifies whether the data should be automatically applied to the respective documents during import. |
| Auto-trigger Shipment | Specifies whether the order should be automatically shipped after data import. |
| Auto-post Invoice | Specifies whether the invoice should be automatically posted after data import. |
| Job Queue Codeunit | Specifies the job queue that processes or triggers this EDI interface. |
Docs / Solution / EDI Interface / Setup
Job Queue Setup
For the export and import of EDI documents, two codeunits must be set up in the job queues:

These codeunits export and import the stored files at the respective endpoints of the EDI user interfaces. For this to work, both EDI interfaces must be properly configured.
Docs / Solution / EDI Interface / Setup
Data Exchange Definition Setup
The setup is used in the export process and allows you to define and modify the data of the XML file.
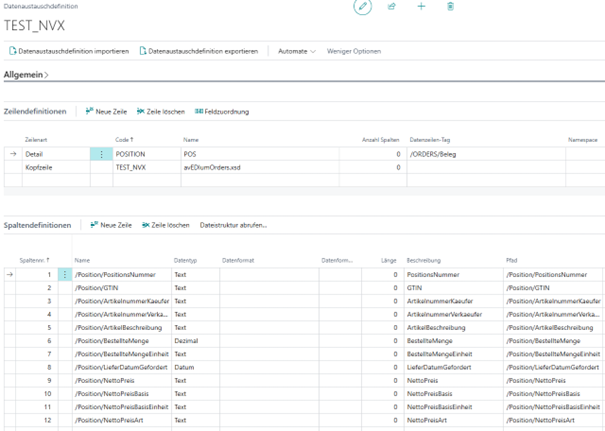
The objects are part of the Base Application and have been adapted and used accordingly.
The configuration can be exported and re-imported via the page action.
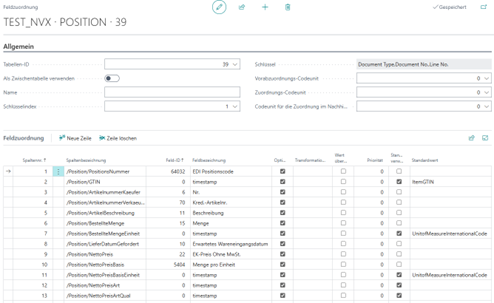
There are field mappings for both the header and the lines where the respective fields are configured:
Once an export is executed in Business Central, the system uses this setup to create the XML file.
The data exchange definition here is based on the purchase header and purchase lines.
Currently, the data exchange definition is configured or specified via the EDI interface:

If a new data exchange definition is needed, it must be configured in the “Export” EDI interface.
In the code, the system filters by the stored code. If no data exchange definition is specified, nothing will happen.
Docs / Solution / EDI Interface / Setup
Vendor Setup
The setup is used in the export process. The vendor must be marked as an "EDI Vendor"; otherwise, no export will be performed for this vendor.

Docs / Solution / EDI Interface / Tasks
Working with the App
The process starts with the export of a purchase order.
Export ORDERS
If the "EDI Vendor" flag is enabled on the vendor, an EDI document is created when the purchase order is released.
The created EDI document contains the following purchase order information:
The document is created with the document type "ORDERS" and the status "Created". Additionally, the line information from the purchase order is added.
If the purchase order is reopened, the system checks whether an EDI document with the status "Created" exists. If so, it is deleted and recreated upon release. This ensures the EDI document is always up to date.
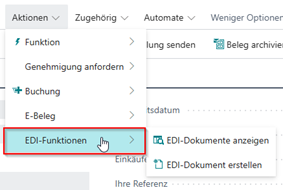
In the purchase order, two page actions exist to either create a new EDI document or open the existing one. These actions are only visible after releasing:
If an EDI document already exists and a new one is to be created, a message with a notice is displayed.
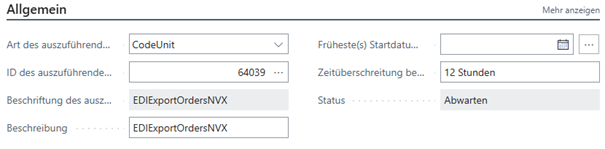
After creating an EDI document, the next step is to run a job queue. The codeunit "EDIExportOrderNVX" must be configured and will export all created EDI documents in the process.
This export uses the EDI interface "EDI Export", providing a web service URL as an endpoint. An XML file is then sent to the configured URL.
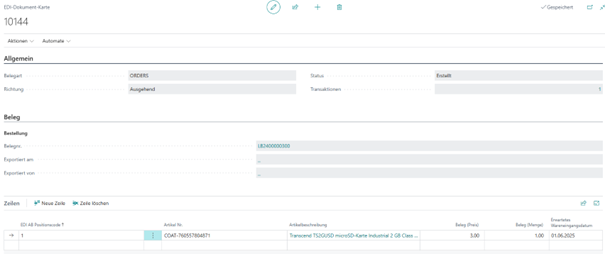
After exporting an EDI document, the status is set to "Success". If a problem occurs, the status is set to "Error". Further details can be found in the transactions on the EDI card:

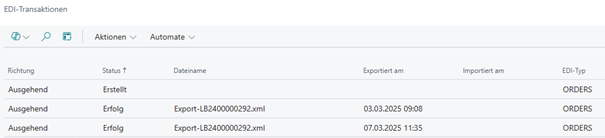
The exported XML file can be downloaded from the transactions and the EDI card:

Import ORDERSP
A separate EDI document is created for each export and import.
After a purchase order has been released and the created EDI document was successfully sent, the next step is importing an "ORDERSP". This document type is a purchase order confirmation.
A specific codeunit is used for the import of EDI documents, which must be set up in the job queues:
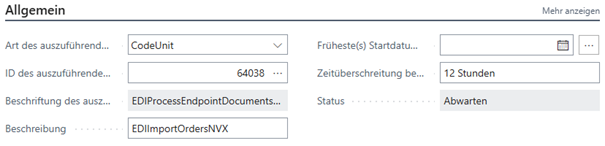
This codeunit checks all documents available at the endpoint URL defined in the "EDI Import" interface.
When an XML file is found in an import directory, it is processed and converted into an EDI document.
Further information is then available on the EDI card for the "ORDERSP":
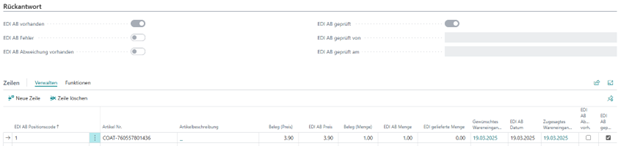
This allows deviations from the sent purchase order to be identified.
If a different quantity or price is confirmed, the flag "EDI Confirmation Deviation Present" is set.
Once all data has been reviewed or no deviation exists, there are two ways to transfer the data to the purchase order:
- The data is manually transferred into the purchase order:
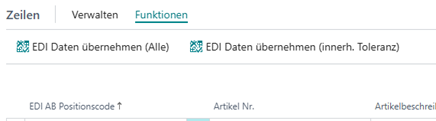
- The data is transferred automatically if enabled in the EDI interface setup:
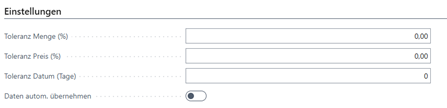
o A tolerance can also be configured here. If the imported data is within this tolerance, it is automatically accepted or offered for acceptance.
The data (quantity, price, date) is transferred to the associated EDI purchase order. Once the data has been transferred, the fields "EDI Confirmation Checked By" and "EDI Confirmation Checked On" are filled with the current user and date.
Import DESADV
Another document type is "DESADV", representing the delivery note.
The data in this file confirms the actual delivered or used information.
This allows Business Central to receive, for example, the vendor delivery number or tracking link.
For this import, an EDI document with the document type "DESADV" is created:
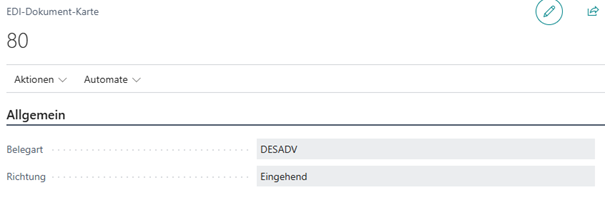
For imported documents, the direction is set to "Inbound".
When importing the DESADV, the sales order is filtered via the purchase order. The following data from the XML file is transferred into the sales order:
- Shipping Agent Code
- Package Tracking Number
Additionally, the field "EDI Delivered Quantity" from the XML file is transferred to the EDI document.
Now, the EDI interface setup is checked. If the field "Automatically Take Over Data" is enabled, the field "Quantity Outstanding" is filled with the delivered quantity from the XML file.
Furthermore, the vendor delivery number is transferred to the purchase order header.
As the last step in the DESADV process, the EDI interface setup is checked again.
If the field "Auto Post Shipment" is enabled:

The purchase order is posted automatically, and a sales shipment is created.
Import INVOIC
This import is not yet fully implemented.
Docs / Solution / EDI Interface / Appendix
Release Notes
Would you like to know what has changed in the extension?
Below you'll find an overview of the new features and changes made in the updates.
EDI 1.0.0.0

