Contracts for automated invoice creation and billing.
Current Version: 26.3.2.0as of Business Central 26. AppSource Name: NAVAX Recurring Contracts
Manual
Creation date: 2026/06/17 The current version of this manual can be found at:
☰ Contents
General
NAVAX Recurring Contracts NAVAX Recurring Contracts adds contracts to Microsoft Dynamics 365 Business Central for automated invoice creation and billing...
Working With The App
Contract Creation
Customer Contract
Vendor Contract
Billing
Customer Contract Click the Create Sales Invoice button at the Contract header or in the Contract overview...
Vendor Contract Unlike sales invoices from Contracts, purchase invoices are not collected from the Contract...
Automated Deferral Revenues relating to future periods can be accrued automatically...
Dimensions
Dimension Setup By default, both shortcut dimensions are displayed in the Contract line. Additionally, all other dimensions can be activated in the NAVAX Recurring Contracts setup...
Dimensions in Contract For line-level actions that cause the Payment Plan to be regenerated, dimension value changes can be entered directly in the associated input mask...
Payment Plan
Working With Payment Plan The Payment Plan defines when and how much will be invoiced...
Payment Plan and Start of Period The default Day of Period Start is defined in the NAVAX Recurring Contracts setup and is transferred from there to the Contract header and thus also to the Contract lines...
One-Time Payment
Working With One-Time Payments To process one-off contract components, lines can be marked as one-time payments which result in the line being marked as completed as soon as the sales invoice has been posted...
Indexing
Indexing Setup In the Contract setup in the Indexing tab, an index status must be entered, as well as the rounding precision...
Working With Indexing The index fields must be maintained in the Contract header or Contract line, and the index values must be maintained in the corresponding index code in the starting month and year and in the comparison month and year...
Working With Retrospective Indexing
Cancellation
Working With Cancellation Cancellation of a Contract or a Contract line takes place at the customer's request and must happen within deadlines defined at the Contract header...
Extension
Working With Manual Extension Contracts can be extended by a defined interval...
Working With Auto. Extension Contracts or contract lines that are not cancelled before expiry of the deadline can also be extended automatically. The renewal can be based on either the Latest Allowed Cancellation Date or the End Date...
End Contract
Working With Auto. Ending Once a Contract line has been fully invoiced and is no longer to be extended, the status can be set to Ended via a Job queue entry, thus marking the Contract line as closed...
Job Integration
Job Setup Activate Job integration to create Jobs for Contracts...
Working With Job Use the Create Project action to create a project for a Contract. The project number is then entered in the corresponding field at the Contract header as well as the Contract lines...
Working With Job And Contract You can connect a Customer Contract and a Vendor Contract using a Job, thereby comparing the actual values from the purchase invoices and sales invoices. To do this, first create the Customer Contract and create a Job...
Prepayment
Prepayment Setup To manage Prepayment, you must enable Job Integration in the NAVAX Recurring Contracts Setup...
Working With Prepayment
Consumption Based
Consumption Based Setup To be able to invoice at cost, you must activate Job Integration in the NAVAX Recurring Contracts Setup...
Working With Consumption Based
Scheduled Change
Scheduled Change Setup To use Scheduled Changes, you must enable them in the NAVAX Recurring Contracts Setup...
Working With Qty. Increase An increase in quantity, for a period already invoiced, results in a sales invoice for one or more periods...
Working With Price Increase An increase in the price, for a period already invoiced, results in a sales invoice for one or more periods...
Working With Qty. Decrease A decrease in quantity, for a period already invoiced, results in a sales credit to one or more periods...
Working With Price Decrease A decrease in the price, for a period already invoiced, results in a sales credit memo to one or more periods...
Working With Qty. Change in Future Periods A change does not result in the creation of documents it only adjusts the payment schedule...
Working With Price Change in Future Periods A change does not result in the creation of documents it only adjusts the payment schedule...
Working With Date Change There is the possibility to change the start and end date of a Contract line afterwards. To do this, open Functions > Scheduled Date Changes on the Contract line. You can then enter a new start or end date...
Working With Proration Using the Schedule Change Contract action, new quantities can be entered simultaneously for multiple existing contract lines...
Working With Immediate Cancellation Under the function Action/Cancel Contract, there is a new field Immediate Cancellation. When this is checked, the contract can be canceled on the chosen cancellation date...
Bundles
Working With Bundles To use Bundles, you must enable them in the NAVAX Recurring Contracts Setup. This will cause two new fields to appear in the Contract lines as well as sales invoice lines...
Setup
NAVAX Recurring Contracts Setup Here you can specify the general settings and defaults for the NAVAX Recurring Contracts...
Appendix
NAVAX License Management The NAVAX License Management page (in older versions NAVAX License Overview or NCEX License Overview) displays the current license status of the NAVAX extensions...
NAVAX Recurring Contracts adds contracts to Microsoft Dynamics 365 Business Central for automated invoice creation and billing.
Navigation
The NAVAX Recurring Contracts is integrated into its own Contract Processor roles.
Fields, actions, pages and reports originating from the NAVAX Recurring Contracts extension are identified by the abbreviation NCRC. This additional labeling makes them clearly distinguishable from other extensions (which may use similar names and designations).
The search terms "nvxrc", "ncrc" and "navax" are also recognized by "Tell me what you want to do". This allows very fast access to the individual areas of NAVAX Recurring Contracts.
Note
The NAVAX Recurring Contracts was developed with the prefix NCRC resp. NVXRC.
NCRC resp. NVXRC stands for NAVAX Consulting resp. NAVAXRecurring Contracts.
Permission Sets
The following permission sets are available for NAVAX Recurring Contracts:
Name
Description
NVXRC
NAVAX Recurring Contracts
You need these permissions to use NAVAX Recurring Contracts.
NVXRC Setup
NCRC Setup Recurring Contracts
You need these permissions to set up NAVAX Recurring Contracts.
For more information, see Setup, NAVAX Recurring Contracts Setup.
Docs / App / NAVAX Recurring Contracts / Working With The App / Contract Creation Customer Contract
Creating A New Contract
Open the page Contract List and click on New.
The following values should be entered at the Contract header:
Field
Description
Starting Date
Defines the start date of the entire Contract The value entered here is transferred to the Contract lines, but can be changed per Contract line.
Ending Date
Defines the end date of the entire Contract The value entered here is transferred to the Contract lines, but can be changed per Contract line.
Billing Type
Defines how often to invoice (monthly, quarterly, annually, etc.)
Source Type
Customer
No.
Customer No.
For more information, see Contract Card.
In addition, define default values for the Contract lines for the Cancellation and Indexing sections.
As soon as the Contract number, the origin number and the Customer number have been entered in the Contract header, you can enter the Contract line.
The status in the Contract line cannot be edited. When a new Contract is created, the default status from the NAVAX Recurring Contracts Setup is automatically applied. Status changes can only be made using the associated feature.
Select the type and No. of the object (Item, G/L Account, Resource) you want to invoice your Customer and enter the quantity as well as the price per invoicing period.
All other values are taken from the Contract header and can be adjusted per Contract line.
Create new Contract from Sales Quote/Sales Order
In the sales quote/sales order, under Actions > Function > NAVAX Recurring Contracts > Create New Contract, select to create a new Contract.
A new page then opens where you can enter Contract-specific information. The values are then transferred to the Contract header and automatically applied to the Contract lines.
The sales offer or sales order can then be deleted (or archived).
In the newly created Contract, the values from the offer or order lines are automatically transferred to the Contract lines, whereby the quantity in the offer/order then corresponds to the quantity to be invoiced per period.
Change the status, to the Active status defined in the NAVAX Recurring Contracts Setup, to generate invoices from your Contract.
Adding Sales Offer/Sales Order Lines to existing Contract
If a Contract already exists for a customer, you can also add offer or order lines to it. To do this, use Actions > Function > NAVAX Recurring Contracts > Add lines to existing Contract.
A selection list of all Contracts will then open for the Customer and the desired Contract can be selected. The sales line is then created as a new line in the Contract.
Further Stepts see Billing
Docs / App / NAVAX Recurring Contracts / Working With The App / Contract Creation Vendor Contract
Create new Contract
Vendor Contracts must be compulsorily created from purchase requests or purchase orders.
For the creation as well as the correct posting of purchase invoices to Vendor Contracts from purchase inquiries or purchase orders, it is mandatory to activate the archiving of inquiries/purchase orders.
Enter a purchase request or purchase order. To convert it into a Contract, choose Actions > Function > NAVAX Recurring Contracts > Create New Contract.
A new page then opens where you can enter Contract-specific information. The values are then transferred to the Contract header and automatically applied to the Contract lines.
The purchase request or purchase order can then be deleted (or archived).
In the newly created Contract, the values from the inquiry or order line are automatically transferred to the Contract line, whereby the quantity in the offer/order then corresponds to the quantity to be invoiced per period.
Change the status to the Active status defined in the NAVAX Recurring Contracts Setup to assign purchase invoices to the Contract.
Adding Request/Order Lines To Existing Contract
If a Contract already exists for a Vendor, you can also add request or order lines to it. To do this, use Actions > Function > NAVAX Recurring Contracts > Add lines to existing Contract.
A selection list of all Contracts will then open for the Vendor and the desired Contract can be selected. The purchase line is then created as a new line in the Contract.
Further Stepts see Billing
Docs / App / NAVAX Recurring Contracts / Working With The App / Billing Customer Contract
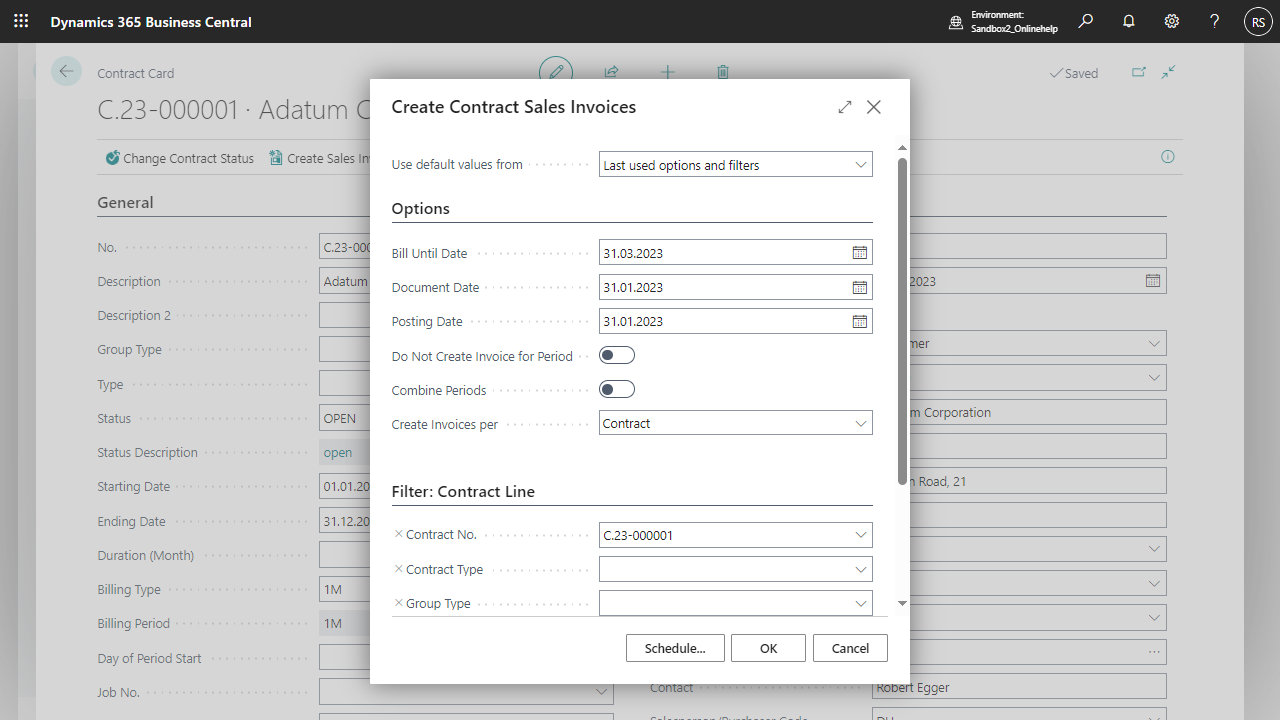
Click the Create Sales Invoice button at the Contract header or in the Contract overview.
Options
Bill Until Date
Specify the date up to which the invoices should be created
Document Date
Specify the document date of the sales invoice to be created
Posting Date
Specify the posting date of the sales invoice to be created. By specifically setting the posting date, you can control an allocation in advance or in retrospect.
Do Not Create Invoice for Period
If enabled, all periods up to the Settlement to date will be marked as Invoiced in the payment schedule without creating an actual document.
Combine Periods
Defines whether you want to create one invoice per period to be charged, or one invoice for all periods.
Create Invoices per
Defines at which level the invoice will be created:
Contract Line
Contract
Customer (Requires the "Combine invoices" indicator to be set in the required contracts).
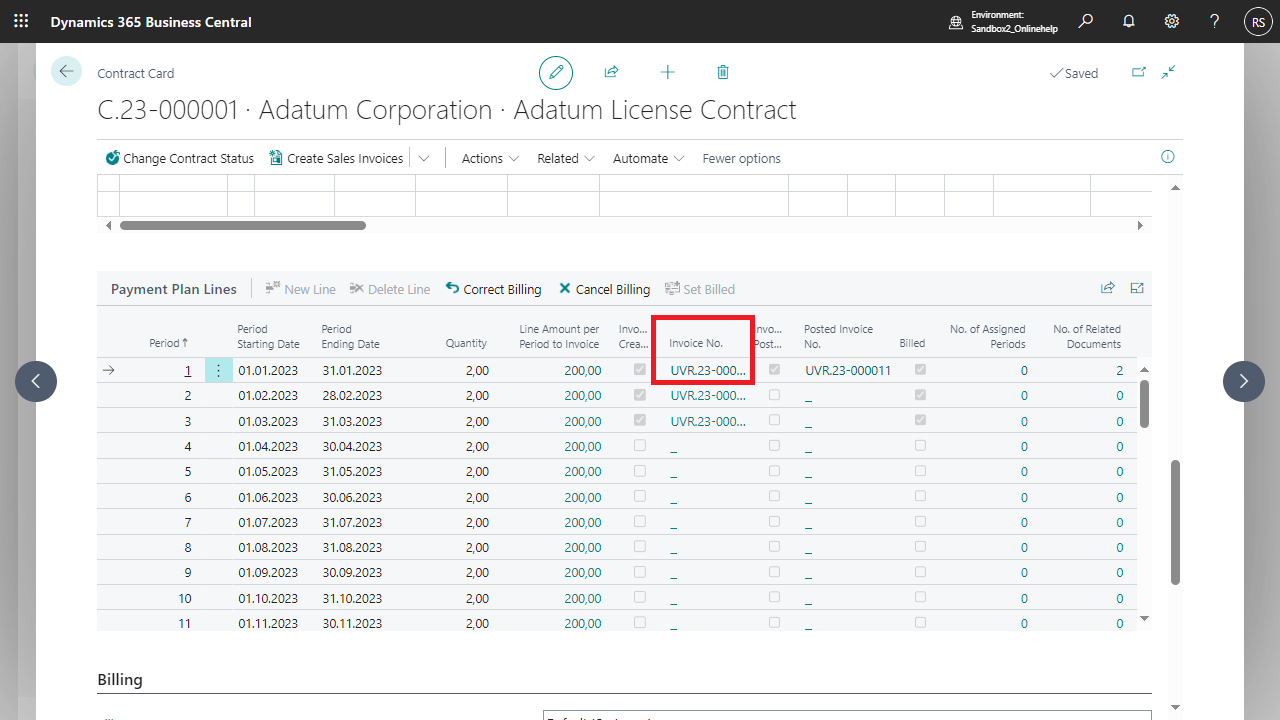
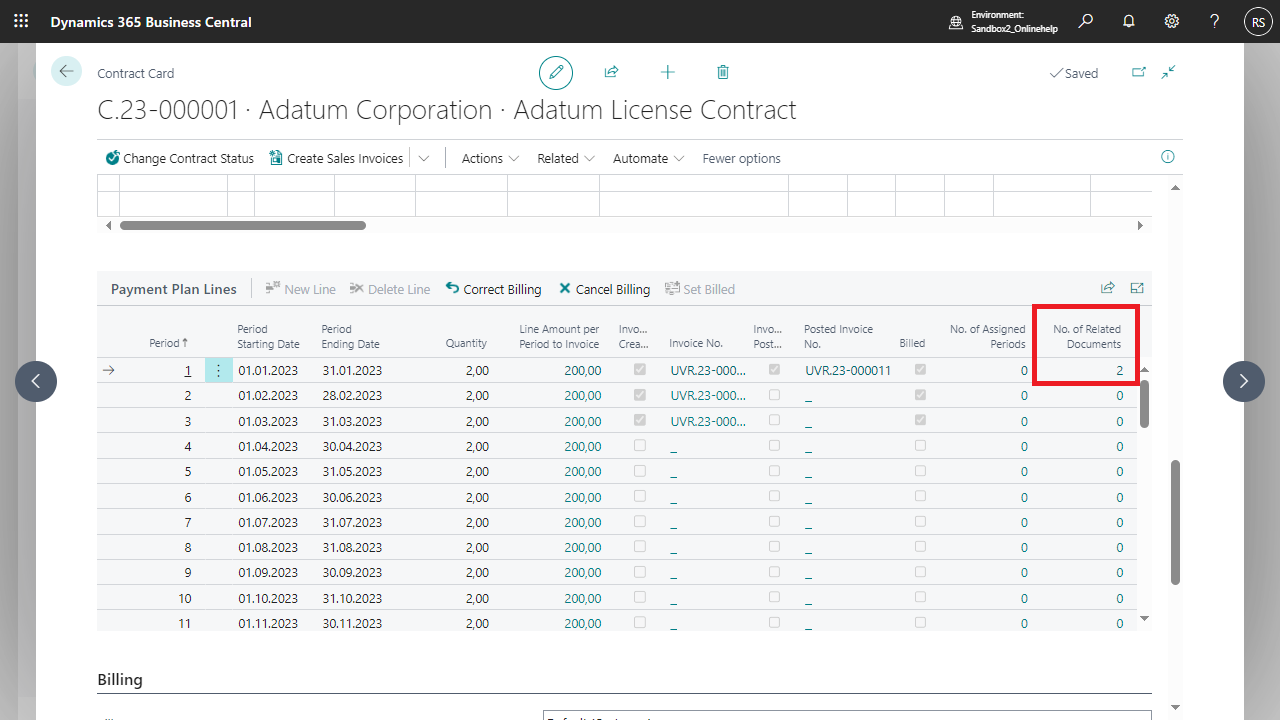
The created, unposted sales invoice is visible in the Payment Plan and can be accessed from here.
If you want to delete the unposted invoice, you can either run the Correct Billing feature in the Payment Plan or open the invoice and delete it there.
The period is then marked again in the Payment Plan as not invoiced and can be offset.
To post the invoice, open the document and click Post.
In the Payment Plan the posted invoice No. will be entered. If you need to cancel the posted invoice, use either the associated function in the Payment Plan or the standard functions (Cancel Sales Invoice, Correct Sales Invoice) in the sales invoice. This will then post a sales credit memo and allow you to recreate the sales invoice.
The original sales invoice as well as the created sales credit memo are attached in the payment schedule as Assigned documents of the period.
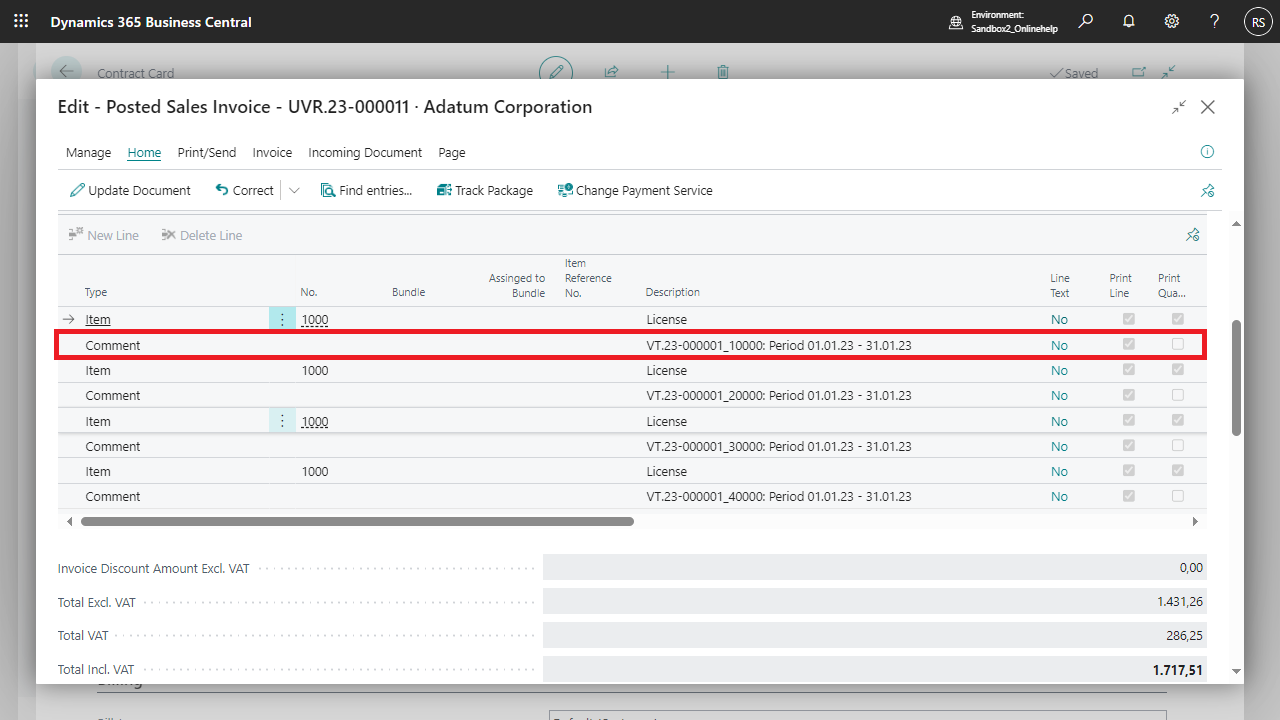
For each sales invoice line, which is created from a Contract, a remark line is created which gives conclusions about the Contract number and Contract line number, as well as the period.
In the NAVAX Recurring Contracts Setup you can define if only the period, excl. the Contract number/Contract line number should be printed.
Docs / App / NAVAX Recurring Contracts / Working With The App / Billing Vendor Contract
Unlike sales invoices from Contracts, purchase invoices are not collected from the Contract.
Docs / App / NAVAX Recurring Contracts / Working With The App / Billing Automatisierte Abgrenzung
Revenues relating to future periods can be accrued automatically.
To do this, create a deferral template and activate Deferral for Contracts.
As a result, the following fields can no longer be edited:
Deferral %
Calc. Method
No. of Periods
Start Date
The deferral template can be stored directly in the NCRC contract type in order to transfer it automatically to the contract lines.
In the sales invoice line, the deferral plan is filled as follows:
Amount to Defer: Invoice line amount
Calc. Method: Straight-Line
No. of Periods: Sum of the periods that lie after the posting period
Posting date: Posting date
Start date Calc. Method: Start of contract line period
Start Date: First day of the period of the posting date
Docs / App / NAVAX Recurring Contracts / Working With The App / Dimensions Dimension Setup
By default, both shortcut dimensions are displayed in the Contract line. Additionally, all other dimensions can be activated in the NAVAX Recurring Contracts setup.
Upon activation, the fields are automatically displayed in the line and can be filled.
Important
The dimensions will ONLY be included in the Payment Plan and not any receipts that may be created in conjunction with the Contract.
Docs / App / NAVAX Recurring Contracts / Working With The App / Dimensions Dimensions in Contract
For line-level actions that cause the Payment Plan to be regenerated, dimension value changes can be entered directly in the associated input mask.
To do this, Change Dimensions must be activated. The dimension fields defined in the NAVAX Recurring Contracts Setup will then be displayed and can be filled.
Dimension values are only visible in the Contract Payment Plan card via Related > Contract > Active Payment Plan.
Docs / App / NAVAX Recurring Contracts / Working With The App / Payment Plan Working With Payment Plan
The Payment Plan defines when and how much will be invoiced.
It is clearly assigned to a Contract line. The active Payment Plan for the respective Contract line is displayed directly below the Contract line or can be reached via Related > Payment Plan.
The Payment Plan is built for the entire Contract line period (start date - end date) based on the Contract line details (Quantity, Unit Price, Billing Period).
The first Payment Plan is created at initial activation (Active status per NAVAX Recurring Contracts Setup).
In case the values of the Contract line change or another action is executed which influences the Payment Plan, a new Payment Plan version will be created and activated.
Example 1: monthly billingExample 2: half-yearly billingExample 3: yearly billing
For more information, see Working With The App, Payment Plan, Payment Plan and Start of Period.
Docs / App / NAVAX Recurring Contracts / Working With The App / Payment Plan Payment Plan and Start of Period
The default Day of Period Start is defined in the NAVAX Recurring Contracts setup and is transferred from there to the Contract header and thus also to the Contract lines.
Day of Period Start = 1 means that, regardless of the start date of the Contract line, invoicing is always from 01 to the following 01. Started periods will be partially invoiced.
Set Day of Period Start to Starting Date defines whether the start date of the period should be automatically adjusted to the start date for Contract lines with a different start date.
Example Day of Period Start: 01
Billing interval: 1M (no different start of period set in billing interval)
Price per period: 100 €
Start date in the Contract line: 05.01.2023
End date in the Contract line: 04.01.2024
Important
Only complete periods can be charged in a Contract period, i.e. the first partial period and the last partial period must result in a complete period.
Result:
In the Payment Plan, 13 periods are created, with the first period having a term from 05.01.2023 to 31.01.2023 (period start 01).
Subsequently, all complete periods are invoiced, whereby these always start on day 1. The last period is again not a complete period. The price is calculated as follows.
price per period – value of the first partial period = value of the last partial period
100 – 90 = 10
Example Day of Period Start: 15, deviating Contract period
Billing interval: 1M (Different start of period set in billing interval)
Price per period: 100 €
Start date in the Contract line: 01.01.2023
End date in the Contract line: 31.12.2023
Important
Only complete periods can be charged in a Contract period, i.e. the first partial period and the last partial period must result in a complete period.
Result
In the Payment Plan, 13 periods are created, with the first period having a term from 01.01.2023 to 14.01.2023 (period start 15).
Subsequently, all complete periods are invoiced, whereby these always start on day 15. The last period is again not a complete period. The price is calculated as follows.
price per period – value of the first partial period = value of the last partial period
100 – 46,67 = 53,33
Example Day of Period Start: 05, identical Contract period
Billing interval: 1M (Different start of period set in billing interval)
Price per period: 100 €
Start date in the Contract line: 05.01.2023
End date in the Contract line: 04.01.2024
Important
Only complete periods can be charged in a Contract period, i.e. the first partial period and the last partial period must result in a complete period.
Result
In the Payment Plan 12 periods are created and all periods are identical.
Docs / App / NAVAX Recurring Contracts / Working With The App / One-Time Payment Working With One-Time Payments
To process one-off contract components, lines can be marked as one-time payments which result in the line being marked as completed as soon as the sales invoice has been posted.
Creation of one-time payments
To invoice a line once, the corresponding field must be ticked. This can be set either directly in the line or in the line details in the One-time payment area.
When activated, the content of the following fields is removed:
billing type
starting date
extension
extension type
cancellation
cancellation type
One-time payments are invoicing using the existing invoicing functions.
For more information, see Working With The App, Billing, Customer Contract.
In contrast to recurring contract lines, one-time contract lines do not have an associated payment plan. Created sales invoices are displayed in the line details in the Invoice no. or posted invoice no. field.
In addition, one-time payments do not receive an automatic comment in the associated invoice line.
When posting the associated invoice, the one-time payment line is automatically marked as completed.
Docs / App / NAVAX Recurring Contracts / Working With The App / Indexing Indexing Setup
In the Contract setup in the Indexing tab, an index status must be entered, as well as the rounding precision.
It is recommended to enter 0.01 for the rounding precision to avoid error messages.
In the index list, index codes are entered, which are then also assigned to a Contract, or a Contract line.
Index values can be entered for each index code.
For more information, see Working With The App, Indexing, Working With Indexing.
Docs / App / NAVAX Recurring Contracts / Working With The App / Indexing Working With Indexing
The index fields must be maintained in the Contract header or Contract line, and the index values must be maintained in the corresponding index code in the starting month and year and in the comparison month and year:
Indexing can be performed for one Contract line, one Contract or several or all Contracts. To do this, click Actions > Indexing.
After the indexing has been performed, the new prices are transferred directly to the Contract line.
Via the indexing log, which can be found under Related > History > Indexing Log, the calculated values can be printed.
There is an additional option to inform Customers about the index adjustment via an additional text in the sales invoice.
Set Printed is then set in the indexing log.
After the indexing has been performed successfully, the new index values (month/year) are adjusted in the Contract line. At the Contract header the original values remain.
For more information, see Working With The App, Indexing, Working With Retrospective Indexing.
Docs / App / NAVAX Recurring Contracts / Working With The App / Indexing Working With Retrospective Indexing
Docs / App / NAVAX Recurring Contracts / Working With The App / Cancellation Working With Cancellation
Cancellation of a Contract or a Contract line takes place at the customer's request and must happen within deadlines defined at the Contract header.
The period is defined by the values from the Cancellation Type & Cancellation Allowed fields.
Example 1:
Cancellation Period: 1M
Allowed Cancellation: Till end of contract
Thus, the termination must be submitted no later than 1 month before the end date of the Contract or Contract line to be valid.
Example 2:
Cancellation Period: 1M
Allowed Cancellation: Till end of a year
The cancellation must be submitted at least 1 month before the end of the year, i.e. 30.11.XX, in order to be valid.
Example 3:
Cancellation Period: -
Allowed Cancellation: Till end of the month
The notice of cancellation can thus be submitted monthly.
In case of the cancellation periods, which have a reference to the current date (Till end of a year, Till end year quarter, Till end of the month), there is an additional task queue item, which updates the date.
For day-accurate calculation of the allowed cancellation date, the Job queue entry should be run daily.
If a cancellation is not submitted in time, the Contract may be automatically extended.
For more information, see Working With The App, Extension, Working With Auto. Extension.
When a cancellation is entered into the system, the cancellation status defined in the NAVAX Recurring Contracts Setup is set.
The status must have the "Billable" boolean enabled, as invoices can still be created from a terminated Contract.
A cancellation can be executed either for a Contract line only or for an entire Contract.
Cancelling a Contract line
If only one line is cancelled, but the Contract remains valid, the line action can be executed under Functions > Cancel Contract Line.
Only Contract lines that are marked as Billable can be cancelled.
For more information, see NCRC Contract Status.
An input mask then opens, which is preset with values from the associated Contract line
Options
Cancellation Reason
selection of a predefined cancellation reason in the NCRC Cancellation Reason table.
Cancellation Date
The calculated date based on the entry of the "Allowed Cancellation" field (Contract end date, year-end date, quarter end date, month end date).
Latest Allowed Cancellation Date
The calculated date based on the entry of the "Allowed Cancellation" field (Contract end date, year-end date, quarter end date, month end date) minus the cancellation period.
Cancellation Received At
The Business Central work date
Upon successful execution of the cancellation, the following will be executed:
The status changes to the defined cancellation status
The Contract line is no longer marked as to be extended
The recorded cancellation values are recorded in the Contract line
Important
The cancellation has NO effect on the end date of the Contract line. If the end date is to be brought forward by the cancellation, this must happen manually.
In case an entire Contract is cancelled, the action can be executed at the Contract header under Actions > Cancel Contract.
Only Contract lines that are marked as billable can be cancelled.
For more information, see NCRC Contract Status.
The same input mask opens as for the cancellation on line level. This will be filled with values from the Contract lines, if they are identical. If the cancellation date and consequently also the latest permissible cancellation date in the affected Contract lines are different, no default values are displayed.
The entry of the cancellation data is identical to the cancellation at line level.
Only those Contract lines are then marked as cancelled for which the cancellation was received before the deadline.
Revoke Cancellation
To reverse a cancellation, only the status must be changed. The recorded cancellation values are then automatically deleted.
Docs / App / NAVAX Recurring Contracts / Working With The App / Extension Working With Manual Extension
Contracts can be extended by a defined interval.
To do this, check the Extension box in the Contract line and define the extension type.
Extension Types/Periods are maintained in the Contract Periods table.
For more information, see NCRC Contract Periods.
It is also possible to enter the extension type at the Contract type. The defined extension type is then automatically set in all Contract lines.
This interval is then used to calculate the new end date of the Contract line.
Contracts can be extended under Actions > Extend Contract. Then - independent of the time of the execution of this function - the end date of all Contract lines will be set back by the respective defined interval and a new Payment Plan will be created.
The status of the Contract line briefly changes to the Extension status defined in the NAVAX Recurring Contracts Setup.
The status change can then be tracked at header and line level under History > Status Change Log.
The Payment Plan will then use the price and quantity of the original last Payment Plan line for all newly created Payment Plan lines.
Docs / App / NAVAX Recurring Contracts / Working With The App / Extension Working With Auto. Extension
Contracts or contract lines that are not cancelled before expiry of the deadline can also be extended automatically. The renewal can be based on either the Latest Allowed Cancellation Date or the End Date.
To cancel contracts or contract lines, the desired type must be selected, and the cancellation activated. This automatically creates a job queue entry, which automatically extends contract lines.
A Contract line is automatically extended when:
Status = Active
End Date > Work Date
Extension = enabled
Docs / App / NAVAX Recurring Contracts / Working With The App / End Contract Working With Auto. Ending
Once a Contract line has been fully invoiced and is no longer to be extended, the status can be set to Ended via a Job queue entry, thus marking the Contract line as closed.
A Contract line is set to the Ended status defined in the NAVAX Recurring Contracts Setup when:
Status = Active/Cancelled
End Date > Work Date
Extension = Disabled
Payment Plan = Completly Billed
Docs / App / NAVAX Recurring Contracts / Working With The App / Job Integration Job Setup
Activate Job integration to create Jobs for Contracts.
Jobs for Contracts offer versatile advantages; for example, Customer and Vendor Contracts can be linked to calculate the actual profit of a Contract line.
Important
Jobs are also required to use Prepayments or to invoice at cost.
Open the NAVAX Recurring Contracts Setup and enable Project Integration.
In the Job No. for Contracts field, select the number series to be used when creating Jobs from Contracts & define a Default Job.
Only after activating the Job Integration, the corresponding fields & actions will be displayed in the Contract.
For more information, see Working With The App, Job Integration, Working With Job.
Docs / App / NAVAX Recurring Contracts / Working With The App / Job Integration Working With Job
Use the Create Project action to create a project for a Contract. The project number is then entered in the corresponding field at the Contract header as well as the Contract lines.
Important
The lines must not be Active or Ended, otherwise the Job No. cannot be entered in the line.
Provided you have enabled Create Job Task and Planning Lines in the NAVAX Recurring Contracts Setup, when enabled, a Job task and planning line will be created and assigned to the Contract line.
The assignment of Job, Job Task & Job Planning Line can also be done manually.
A Job is created for each Contract line. The Job Task No. is assigned based on the Start No. in the NAVAX Recurring Contracts Setup. The description corresponds to the description of the Contract line.
In addition, a Job Planning Line is created for each Contract line.
Field
Value
Planning Date
Start date of the Contract line
Line Type
Budget
Document No.
Contract No.
Type
Contract line type
No.
Contract line No.
Description
Contract line description
Quantity
Total quantity for the complete duration of the Contract line
Unit Cost
Cost price of the Contract line - if filled
Unit Price
Sales price of the Contract line - if filled
Job Planning Lines that are linked to a Contract cannot be changed or posted or invoiced from within the Job.
Please use the corresponding functions in the Contract.
As soon as a Contract linked to a Job creates a sales invoice, a billable Job Planning Line is created, and it is invoiced. This creates a Job item of type sales on the Job, and the actual values end up on the Job.
For more information, see Working With The App, Job Integration, Working With Job And Contract.
Docs / App / NAVAX Recurring Contracts / Working With The App / Job Integration Working With Job And Contract
You can connect a Customer Contract and a Vendor Contract using a Job, thereby comparing the actual values from the purchase invoices and sales invoices. To do this, first create the Customer Contract and create a Job.
Then create a Vendor Contract and select the Job number of the previously created Customer Contract.
If there is a 1:1 mapping between Customer Contract line and Vendor Contract line; select the Job Task No. of the Customer Contract line.
The Job is then populated with the budget cost amount and the actual costs from the Vendor Contract and the budget sales amount and the invoiced value from the Customer Contract.
Docs / App / NAVAX Recurring Contracts / Working With The App / Prepayment Prepayment Setup
To manage Prepayment, you must enable Job Integration in the NAVAX Recurring Contracts Setup.
Also define the Prepayment Job Journal Name, the Prepayment Job Journal Batch Name and the Prepayment Journal Document No. to be used for posting Prepayments.
For more information, see Working With The App, Prepayment, Working With Prepayment.
Docs / App / NAVAX Recurring Contracts / Working With The App / Prepayment Working With Prepayment
Enter Prepayment line
Prepayments are fixed defined amounts/quantities which you charge your Customer in full and from which they can then call.
To enter a new Prepayment, create a new Contract line and enter the No. as well as the quantity and price.
Since a Prepayment is invoiced once and not continuously, the billing type must be removed in Prepayment lines. A Contract line of the Prepayment type therefore also has no Payment Plan.
Check the Prepayment box and define the Prepayment type.
Prepayment Type
Description
Quantity
It is called from a defined quantity, regardless of the amount that is consumed
Amount
It is called off from a defined amount, regardless of the actual amount called off
You can also define whether Business Central allows overbooking of the defined quantity or amount by enabling or disabling Overbooking Not Allowed. Before you can activate a Contract with a contingency line, you must link the Contract or Contract line to a Job.
Invoicing Prepayments
Prepayment invoices are usually issued at the beginning of the Contract.
To create a Prepayment invoice, select the desired Contract line. Click on Line > Prepayment > Invoice Prepayment. An unposted invoice will be created which you can access and post via Line > Prepayment > Sales Invoice/Credit Memos....
In the Prepayment area in the info box, you can see if and what has been invoiced from your Prepayment.
Retrieve Prepayment in Contract
The actual consumed values can be entered either manually, or via Excel import.
To enter the consumptions manually, select the desired Contract line and click Line > Prepayments > Use Prepayment. Then enter the consumption date and the quantity or value consumed.
In the Prepayment area in the info box, you can see the retrieved values.
If you have activated Overbooking not Allowed, the system checks that the quantity to be called off does not exceed the remaining quantity and issues an error message if necessary.
Retrieve Prepayment via Excel import
To be able to enter consumptions via Excel, you must create the associated data exchange definition.
To do this, run the associated Create Default Data Exchange Definition action for Prepayments in the NAVAX Recurring Contracts setup.
A data exchange definition is then created in which it is defined how the Excel file must be structured for the import.
Based on the default setup, the import file must be structured as follows:
Contract ID
Description 2
Quantity
C.23-000019_10000
additional description
1
The Contract ID consists of Contract number_line number
additional import-specific description
quantity retrieved
Seperator: Semicolon
Headline: Yes
Invoke the Import Contract lines from Data Exchange Definition function.
Select the data exchange definition CONTRACT COST (= default data exchange definition)
Select the posting type Consumption Based.
Select the posting date for the line items.
Activate reverse signs to create negative items. This can be used to reverse items that have already been imported and posted.
Click OK and import the .csv file.
Docs / App / NAVAX Recurring Contracts / Working With The App / Consumption Based Consumption Based Setup
To be able to invoice at cost, you must activate Job Integration in the NAVAX Recurring Contracts Setup.
Also, define the Default Job Journal and the Job Journal Name to be used for posting the expenses.
Activate Automatically Get Consumptions if you want recorded expenses to be transferred directly to the Payment Plan.
For more information, see Working With The App, Consumption Based, Working With Consumption Based.
Docs / App / NAVAX Recurring Contracts / Working With The App / Consumption Based Working With Consumption Based
Activate Contract line for Consumption Based
Create a new Contract line, leaving the quantity blank, and enable Consumption Based.
Before you can activate a Contract with a Contract line that is billed at cost, you must link the Contract or Contract line to a Job.
In the created Payment Plan, the quantity and the line amount are then initially 0.00 in all periods.
Get Costs in the Contract
The actual consumed values can be entered either manually, or via Excel import.
To enter the consumptions manually, select the desired Contract line and click Line > Consumption > Add Consumptions. Then enter the Posting Date and the Quantity To Transfer To Journal.
Get Costs via Excel import
To be able to enter consumptions via Excel, you must create the associated data exchange definition.
To do this, run the associated Create Default Data Exchange Definition for Consumption Based action in the NAVAX Recurring Contracts Setup.
A data exchange definition is then created in which it is defined how the Excel file must be structured for the import.
Based on the default setup, the import file must be structured as follows:
Contract ID
Description 2
Quantity
C.23-000019_10000
additional description
1
The Contract ID consists of Contract number_line number
additional import-specific description
quantity retrieved
Seperator: Semicolon
Headline: Yes
Invoke the Import Contract lines from Data Exchange Definition function.
Select the data exchange definition CONTRACT COST (= default data exchange definition)
Select the posting type Consumption Based.
Select the posting date for the line items.
Activate reverse signs to create negative items. This can be used to reverse items that have already been imported and posted.
Click OK and import the .csv file.
Docs / App / NAVAX Recurring Contracts / Working With The App / Scheduled Change Scheduled Change Setup
To use Scheduled Changes, you must enable them in the NAVAX Recurring Contracts Setup.
By activating it, two new Contract line actions will be displayed.
This allows Scheduled Changes to be created for past and future periods.
Scheduled Changes can only be made at the Contract line level, not at the Contract header level, and may result in sales invoices or sales credit memos, if applicable.
If you activate Scheduled Changes, you can only make changes using the associated functions. If you try to change the quantity, the price or the start and end date of the line, an error message will be displayed.
Caution
Scheduled changes cannot be executed for Contract lines of type Prepayment or Consumption Based.
When a scheduled change is executed, the status is briefly set to the defined change status and the change entered via the input mask is executed.
This means that changes that have been made can also be tracked retrospectively via the Status Change Log.
Important
Documents which are created by scheduled changes must be posted and cannot be cancelled.
If you want to cancel a document created from a scheduled change or undo the change, you must make an additional scheduled change.
Docs / App / NAVAX Recurring Contracts / Working With The App / Scheduled Change Working With Qty. Increase
An increase in quantity, for a period already invoiced, results in a sales invoice for one or more periods.
Example:
Initial situation:
Quantity in the Contract line: 2
Price in the Contract line: 100,00
Start date: 01.01.23
End date: 31.12.23
Billed Until: 31.03.23
Input:
New Quantity: 3 – the quantity is increased from 2 to 3
New Unit Price: 0,00 – the Unit Cost in the Contract line doesn’t change
Date for Change: 01.02.23 – the period from which the change comes into force
Posting Date: 01.02.23 – the posting date of the sales invoice
Status for Change: the status that is set briefly to execute the change
Combine Periods: If activated, sales invoices which concern several periods are summarized on one invoice.
Change Dimensions: see Working With The App, Dimensions, Dimensions in ContractResult:
However, the quantity was increased from 2 to 3 in period 2, which leads to an increase in the line amount and thus triggers a sales invoice.
The sales invoice is created but not posted and can be seen in the relevant Payment Plan lines in the additional table No. of Related Documents.
Click on the number to open all the documents that are assigned to the Payment Plan line. You can also see by which function the document was created.
Click Source Document to open and post the sales invoice.
The quantity in the Contract line has also been increased as the new quantity affects the next billing interval.
Docs / App / NAVAX Recurring Contracts / Working With The App / Scheduled Change Working With Price Increase
An increase in the price, for a period already invoiced, results in a sales invoice for one or more periods.
Example:
Initial situation:
Quantity in the Contract line: 3
Price in the Contract line: 100,00
Start date: 01.01.23
End date: 31.12.23
Billed Until: 31.03.23
Input:
New Quantity: 0 – the quantity remains the same
New Unit Price: 200,00 – the Unit Cost in the Contract line increases from 100,00€ to 200,00€
Date for Change: 01.02.23 – the period from which the change comes into force
Posting Date: 01.02.23 – the posting date of the sales invoice
Status for Change: the status that is set briefly to execute the change
Combine Periods: If activated, sales invoices which concern several periods are summarized on one invoice.
Change Dimensions: see Working With The App, Dimensions, Dimensions in ContractResult:
The unit price has been increased from 100 to 200 in period 2, which results in an increase in the line amount and thus triggers a sales invoice.
The sales invoice is created but not posted and is visible in the relevant Payment Plan lines in the additional table No. of Related Documents and can be posted.
The Unit Price in the Contract line has also been increased as the new price affects the next billing interval.
Docs / App / NAVAX Recurring Contracts / Working With The App / Scheduled Change Working With Qty. Decrease
A decrease in quantity, for a period already invoiced, results in a sales credit to one or more periods.
Example:
Initial situation:
Quantity in the Contract line: 3
Price in the Contract line: 200,00
Start date: 01.01.23
End date: 31.12.23
Billed Until: 31.03.23
Input:
New Quantity: 2 – the quantity is reduced from 3 to 2
New Unit Price: 0,00 – the Unit Cost remains the same
Date for Change: 01.02.23 – the period from which the change comes into force
Posting Date: 01.02.23 – the posting date of the sales invoice
Status for Change: the status that is set briefly to execute the change
Combine Periods: If activated, sales invoices which concern several periods are summarized on one invoice.
Change Dimensions: see Working With The App, Dimensions, Dimensions in ContractResult:
However, the quantity has been reduced from 2 to 1 in period 2, which results in a reduction of the line amount and thus triggers a sales credit memo.
The sales credit memo is created but not posted and is visible in the relevant Payment Plan lines in the additional table No. of Related Documents and can be posted there.
The quantity in the Contract line has also been increased as the new quantity affects the next billing interval.
Docs / App / NAVAX Recurring Contracts / Working With The App / Scheduled Change Working With Price Decrease
A decrease in the price, for a period already invoiced, results in a sales credit memo to one or more periods.
Example:
Initial situation:
Quantity in the Contract line: 2
Price in the Contract line: 200,00
Start date: 01.01.23
End date: 31.12.23
Billed Until: 31.03.23
Input:
New Quantity: 0 – the quantity remains the same
New Unit Price: 100,00 – the unit cost decreases from 200 to 100
Date for Change: 01.02.23 – the period from which the change comes into force
Posting Date: 01.02.23 – the posting date of the sales invoice
Status for Change: the status that is set briefly to execute the change
Combine Periods: If activated, sales invoices which concern several periods are summarized on one invoice.
Change Dimensions: see Working With The App, Dimensions, Dimensions in Contract
Caution
For scheduled changes in periods that have already been billed, a posting date must be specified, otherwise the resulting document cannot be posted.
Result:
However, the unit price has been reduced from 200 to 100 in period 2, which results in a reduction of the line amount and thus triggers a sales credit memo.
The sales credit memo is created but not posted and can be seen in the relevant Payment Plan lines in the additional table Number of Assigned Documents and can be posted there.
The unit price in the Contract line has also been increased as the new price affects the next billing interval.
Docs / App / NAVAX Recurring Contracts / Working With The App / Scheduled Change Working With Qty. Change in Future Periods
A change does not result in the creation of documents it only adjusts the payment schedule.
Example:
Initial situation:
Quantity in the Contract line: 2
Price in the Contract line: 100,00
Start date: 01.01.23
End date: 31.12.23
Billed Until: 31.03.23
Input:
New Quantity: 3 – the Quantity increases from 2 to 3
New Unit Price: 0,00 – the Unit Price remains the same
Date for Change: 01.05.23 – the period from which the change comes into force
Posting Date: can be left blank as this entry does not trigger a sales document
Status for Change: the status that is set briefly to execute the change
Combine Periods: If activated, sales invoices which concern several periods are summarized on one invoice.
Change Dimensions: see Working With The App, Dimensions, Dimensions in ContractResult:
The quantity has been increased from 1 to 2 starting from period 5, which results in an increase of the line amount but no additional document.
The quantity in the Contract line has not been increased because the new quantity does not yet affect the next billing interval.
Only when the new quantity affects the next billing interval, the new quantity is automatically transferred to the Contract line.
Docs / App / NAVAX Recurring Contracts / Working With The App / Scheduled Change Working With Price Change in Future Periods
A change does not result in the creation of documents it only adjusts the payment schedule.
Example:
Initial situation:
Quantity in the Contract line: 1
Price in the Contract line: 100,00
Start date: 01.01.23
End date: 31.12.23
Billed Until: 31.03.23
Input:
New Quantity: 0 – the Quantity remains the same
New Unit Price: 50,00 – the Unit Price is decreased to 50,00
Date for Change: 01.05.23 – the period from which the change comes into force
Posting Date: can be left blank as this entry does not trigger a sales document
Status for Change: the status that is set briefly to execute the change
Combine Periods: If activated, sales invoices which concern several periods are summarized on one invoice.
Change Dimensions: see Working With The App, Dimensions, Dimensions in ContractResult:
The unit price has been reduced from 100 to 50 starting from period 5, resulting in a reduction of the line amount but no additional document.
The unit price in the Contract line has not been changed, because the new price does not affect the next billing interval yet.
Only when the price affects the next billing interval, it will be automatically transferred to the Contract line.
Docs / App / NAVAX Recurring Contracts / Working With The App / Scheduled Change Working With Date Change
There is the possibility to change the start and end date of a Contract line afterwards. To do this, open Functions > Scheduled Date Changes on the Contract line. You can then enter a new start or end date.
If you set the start date later and the first period has already been invoiced, a sales credit note will be created for it.
However, the original first period is no longer included in the new Payment Plan, and can therefore only be accessed and posted via the previous version of the Payment Plan.
Docs / App / NAVAX Recurring Contracts / Working With The App / Scheduled Change Working With Proration
Using the Schedule Change Contract action, new quantities can be entered simultaneously for multiple existing contract lines.
You can find this action in the contract under Actions – Schedule Change Contract.
If the Change Date differs from the start of a billing schedule period, a one-time charge is created for the difference between the old and new quantity for the period between the change date and the start of the period line.
Options
Change Date
Specifies the date from which the change takes effect.
Posting Date
Specifies the document date of the created invoice(s)/credit memo(s).
Change Status
Specifies the status that will be set for the change on the line.
Comment
Specifies a note that will be displayed in the change history.
Combine Periods
Indicates whether an invoice is created for each period or whether multiple periods are combined into one invoice.
Change Dimensions
Indicates whether dimensions can be changed. If activated, Shortcut Dimension 1 and 2 are displayed.
No changes are allowed in the General tab.
In the Lines tab, all existing active contract lines are listed.
The new quantity can be entered in the New Quantity field for each line.
You can also change only selected lines by entering a new quantity for those lines only.
(New Quantity = 0 will be ignored.)
Confirmation with “OK” – What is created?
Confirming with OK generates the following data depending on the change:
Date-based changes (including derived adjustments to the billing schedule)
One-time charges (to prorate partial periods around the change date)
Sales documents
Sales invoice or
Sales credit memo
Change Date in the Past vs. Future
Change in the Past
A sales document is created immediately.
All affected full periods and one-time charges are invoiced or credited together in one document.
Change in the Future
No additional sales documents are created initially.
Only future one-time charges and changes to the billing schedule (for future periods) are created.
Examples
Example: Future Quantity Increase
Initial situation
Start date: 01/01/25
End date: 12/31/25
Previous quantity: 1
Invoiced until: –
Recorded change
New quantity: 5
Change date: 02/15/25
Result (current behavior)
New quantity applies from: 03/01/25
Additionally, a one-time payment is created for 02/15/25 – 02/28/25.
Example: Future Quantity Decrease
Initial situation
Start date: 01/01/25
End date: 12/31/25
Previous quantity: 5
Invoiced until: –
Recorded change
New quantity: 1
Change date: 03/18/25
Result
New quantity applies from: 04/01/25
Additionally, a one-time charge is created for 03/18/25 – 03/31/25.
In the billing schedule, the field Number of Date-Based Changes indicates whether a date-based change
has been performed for a given date and which one-time charge lines belong to which period.
Example: Past Quantity Increase
Initial situation
Start date: 01/01/25
End date: 12/31/25
Previous quantity: 1
Invoiced until: 06/30/25
Recorded change
New quantity: 5
Change date: 03/18/25
Result
New quantity applies from: 04/01/25
Affected full periods: April, May, June
Additionally, a one-time charge is created for 03/18/25 – 03/31/25.
A sales document is created immediately, invoicing all full periods and one-time charges in one document.
Example: Past Quantity Decrease
Initial situation
Start date: 01/01/25
End date: 12/31/25
Previous quantity: 5
Invoiced until: 06/30/25
Recorded change
New quantity: 1
Change date: 03/18/25
Result
New quantity applies from: 04/01/25
Affected full periods: April, May, June
If the change results in a credit, a corresponding sales document is created.
Additionally, a one-time charge is created for 03/18/25 – 03/31/25.
A sales document is created immediately, crediting all full periods and one-time charges in one document.
Special Case: Bundle
Through these functions, component lines can now also include the type one-time charge.
One-time charges are not printed like normal components.
One-time charge lines in bundles can only be created through date-based value changes – not manually.
Docs / App / NAVAX Recurring Contracts / Working With The App / Scheduled Change Immediate Cancellation
Under the function Action/Cancel Contract, there is a new field "Immediate Cancellation". When this is checked, the contract can be canceled on the chosen cancellation date.
If canceled on a specific date, the end date is automatically updated, and the payment plan is versioned accordingly.
Depending on the cancellation date, there are different scenarios:
If the cancellation date is after a fully invoiced period, the end date is updated, and the line is canceled.
If the cancellation date is after an invoiced period but includes a partial period, the end date is set to the end of the next period after the cancellation date, and a one-time payment for the difference is created. This is calculated on a daily basis and can then be invoiced.
If the cancellation date is in an already invoiced period, a posting date must also be specified. When the action is executed, a one-time payment with a linked sales credit is created. The end date is also set to the end of the next period after the cancellation date.
If all lines with "Immediate Cancellation" are canceled, the end date of the contract header is set to the last end date.
Special Case: Period-Based One-Time Payment
If the period-based one-time payment is enabled in the NCRC setup, the one-time payment is not calculated on a daily basis but based on monthly periods.
This calculation occurs when the cancellation date is set to the end of a monthly period.
Docs / App / NAVAX Recurring Contracts / Working With The App / Bundles Working With Bundles
To use Bundles, you must enable them in the NAVAX Recurring Contracts Setup. This will cause two new fields to appear in the Contract lines as well as sales invoice lines:
Bundle
Belongs To Bundle
Print Line
Print Quantity
Print Price
In the Bundle field, select the Bundle value to enter the Bundle creation screen and create your Bundle there.
Bundles consist of a text line as a header and one or more item lines and are created for each Contract.
You can create the Bundle description as a default text and select it in the No. field, the components will be added individually.
Certain values, such as the term and extension and termination type, are maintained at the Bundle header level and automatically copied to all component lines.
By clicking OK, the Bundle will be added to the Contract.
The Bundle line (=Bundle header) is a remark line and is displayed in bold, the component lines are assigned to the Bundle header line via the respective line ID in the Belongs to Bundle field.
By default, the text, the quantity and the price are printed for the Bundle line. Printing is disabled for the component lines, but can be enabled for each individual component.
Important
The print logic can only be used in conjunction with RDLC documents that have implemented this logic.
The quantities and prices of the component lines are taken from the Bundle entry. The Bundle line receives the value 1 by default, the line amount corresponds to the sum of the line amounts of the associated components.
If the quantity in the Bundle is changed, the Bundle's unit price is automatically adjusted so that the line amount per billing interval continues to equal the sum of the components.
Values which must remain the same for the entire Bundle (e.g. Billing Type, Cancellation Type, etc.) cannot be changed in the Contract line. If these values must be edited afterwards, the Bundle entry mask can be called via Functions > Open Bundle.
All components of a Bundle must always have the same status. If you change the Contract line status of a component line, the status of all component line is automatically changed.
Payment Plans are created for the respective component lines, just as for normal Contract lines, and can then also be transferred to a sales invoice.
The print options from the Contract line are transferred to the invoice.
Here you can specify the general settings and defaults for the NAVAX Recurring Contracts.
General, Fields
Default Status
Specifies the default status used when creating the contract.
Active Status
Specifies the active status used to set a contract to a billable status.
Cancellation Status
Specifies the Cancellation status used for the Cancellation.
Extension Status
Specifies the Extension status used for the Cancellation.
Ending Status
Specifies the Ending status used for the Ending of a contract.
Set Day of Period Start to Starting Date
Specifies by default whether the day of the period start should be automatically adjusted to the start date for Contract lines with different start date.
Default Day of Period Start
Specifies the default value of the Day of Period Start.
Default Reason Code
Specifies the default value of the Reason Code.
Contract Dimension Code
Specifies the contract dimension code. When a new Contract is created, a new dimension value consisting of Contract No. and Contract Description is automatically created.
TODO_"Autom. Approval Request at Invoicecreation"
Specifies that the approval request is created automatically if sales invoice approval is enabled.
TODO_"Limit Amount for Contract Invoice"
Specifies the minimum value that a sales invoice created from a Contract must show. Invoices below this amount are not generated and the period is marked as invoiced.
Default Source Type
Specifies the default value of the Source Type.
Print Only Period On Invoice
Specifies whether the remark line in the sales invoice contains only information about the period (excl. Contract data).
Enable Bundles
Specifies whether the bundle functionality has been enabled.
Line Text For Bundles
Specifies whether only one remark line should be printed for a Bundle or one remark line per component.
Cash Flow Date
Defines whether the payment plan interval start date or interval end date should be used as the cash flow date for NCRC contracts.
Do not close OTP lines automatically
When the end date of a contract line with the "One-time payment" flag is reached, the line is set to "Closed" as part of the automatic ending process and not after the invoice is posted.
If there is still an unposted invoice/credit memo, the line will not be set to "Closed" when the "Automatically End" task queue item is running.
If the end date of the duration has not been exceeded, the line will not be set to "Closed" when the "Automatically End" task queue item is running.
Activate Line Discount
Specifies whether the line discount functionality is activated. Cannot be activated together with scheduled changes.
Numbering, Fields
TODO_"Contract Nos"
Specifies the code of the number series used to assign numbers to Contracts.
Contract Invoice Nos.
Specifies the code of the number series used to assign numbers to Contract Invoices.
TODO_"Contract Cr.Memo Nos."
Specifies the code of the number series used to assign numbers to Contract Cr. Memos.
Posted Contract Invoice Nos
Specifies the code of the number series used to assign numbers to Posted Contract Invoices.
Posted Contract Cr. Memo Nos.
Specifies the code of the number series used to assign numbers to Posted Contract Cr. Memos.
Dimensions, Fields
Enable Shorcut Dimension 3
Specifies whether the shortcut dimension code 3 should be displayed.
Enable Shorcut Dimension 4
Specifies whether the shortcut dimension code 4 should be displayed.
Enable Shorcut Dimension 5
Specifies whether the shortcut dimension code 5 should be displayed.
Enable Shorcut Dimension 6
Specifies whether the shortcut dimension code 6 should be displayed.
Enable Shorcut Dimension 7
Specifies whether the shortcut dimension code 7 should be displayed.
Enable Shorcut Dimension 8
Specifies whether the shortcut dimension code 8 should be displayed.
Role Center, Fields
Date Fromula for expiring Contracts
Specifies the Date Formula for the Cue No. of expiring Contract Lines.
Scheduled Changes, Fields
Disable Manual Changes on Contract Line
Specifies whether manual changes to the contract line have been deactivated. Changes can then only be made via the scheduled change functionality.
Retrospective Indexing
Specifies whether past periods are also taken into account during indexing. A difference invoice/cr. memo is then created for periods that have already been invoiced.
Change Status
Specifies the change status that will be set for the scheduled changes.
Period-Based One-Time Payment
If this function is activated, one-time payments that occur during proration or immediate termination are not calculated on a daily basis but on a monthly basis.
Indexing, Fields
Indexing Status
Specifies the Indexing status used for the Indexing.
Indexing Unit Cost Rounding
Specifies the rounding of the unit code field after an indexing
Indexing Unit Price Rounding
Specifies the rounding of the unit price field after an indexing
Job (Prepayment/Consumption), Fields
Enable Job Integration
Specifies whether job integration has been activated. Integration must be activated to record Prepayments/consumption.
Default Job
Specifies the Job number that will be used as a template from the Contract, when Create Job is executed.
Job Nos. for Contracts
Specifies the code of the number series used to assign numbers to Jobs from Contracts.
Create Job Task and Planning Lines
Specifies whether to automatically create the job tasks and planning lines for the contract lines.
Job Task No. Start No.
Specifies the start number of the Job tasks and is always incremented by 1.
Prepayment, Fields
Prepayment Job Jnl. Document Nos.
Specifies the Job journal document number used to post when getting Prepayment.
Prepayment Job Jnl. Name
Specifies the Job journal template used to post when getting Prepayment.
Prepayment Job Jnl. Batch Name
Specifies the Job journal batch name used to post when getting Prepayment.
Consumption, Fields
Consumption Job Jnl. Name
Specifies the Job journal template used to post consumption.
TODO_"Consumption Job Jnl. Batch Name"
Specifies the Job journal batch name used to post consumption.
Automatically Get Consumptions
Specifies whether entered or imported consumptions are automatically transferred to the Payment Plan.
Sales, Fields
Sales Release Needed at Contract Creation
Specifies whether a sales quote or sales order must be in Released status for a contract to be created.
The NAVAX License Management page (in older versions "NAVAX License Overview" or "NCEX License Overview") displays the current license status of the NAVAX extensions.
Fields
Name
Specifies the name of the Extension.
License Status
Specifies the current license status of the Extension.
Serial No.
Specifies the serial number of the Extension.
Version
Specifies the currently installed version of the Extension.
Trial Version
A NAVAX extension can be tested or used free of charge for 30 days after installation. After that, the extension can only be used with a valid license.
Request License
The license can be requested or checked via the Current Status action. This opens a new page.
The following example shows the NAVAX extension Excel Report Builder.
Fill in the fields in the page and then click Send License Request. Please note that the licensing process may take some time. In the next few days you will receive an email with further information.
Note
For licensing, calling the online help and performing some actions, access to https://www.navax.app must be granted.
Public IP from www.navax.app for setting firewall access: 94.136.22.236, Port: TCP/443
Checking the connection to https://www.navax.app using PS: Test-NetConnection navax.app -port 443 (PS must be performed with the M-Tier service user)
CRL Servers In addition, the following CRL Servers must also be accessible for the certificate check: https://certificates.godaddy.com/* http://crl.godaddy.com/* or their IP: 192.124.249.36
Activate/Update License
As soon as the licensing has been completed, you will receive an email and the license can be activated via the Update License action. The license is company independent. So it does not matter in which company the action is called.
Note
The licence must be updated once a year via the Update License action.
The update is only possible or necessary within the last 30 days before the license expires, or afterwards. Within the last 30 days before the license expires, notes are displayed.
If the Automatic License Renewal is enabled, the Update License action is called automatically before the license expires. During this process, all licenses for which automatic license renewal is enabled are checked and updated if necessary. If automatic renewal is not successful, notifications will be displayed within the last 15 days before the license expires. Note that the setting is only active after the license has been activated.
This action can be used to open the Microsoft AppSource ratings page for the extension. We would be very happy if you submit your rating and let us know about your experience with the Extension.
The following Granules are required for an On-Premises installation:
70714830 NAVAX Recurring Contracts
1010860 NAVAX Extension Base
70714775 NAVAX Document Text
External Addresses
https://www.navax.app
For licensing, calling the online help and performing some actions, access to https://www.navax.app must be granted.
Public IP from www.navax.app for setting firewall access: 94.136.22.236, Port: TCP/443
Checking the connection to https://www.navax.app using PS: Test-NetConnection navax.app -port 443 (PS must be performed with the M-Tier service user)
CRL Servers In addition, the following CRL Servers must also be accessible for the certificate check: https://certificates.godaddy.com/* http://crl.godaddy.com/* or their IP: 192.124.249.36
On the NAVAX Recurring Contracts Setup page, the field Period-Based One-Time Payment has been added.
If this function is activated, one-time payments that occur during proration or immediate termination are not calculated on a daily basis but on a monthly basis.
For more information, see Setup, NAVAX Recurring Contracts Setup.
The deferral logic now also works for sales credit memos. When the "Correct" or "Cancel" function is executed, the contract information from the original invoice is adopted, and the deferral schedule is recalculated.
For more information, see Working With The App, Billing, Automated Deferral.
The report Update Bundle Price has been added. This updates the price of the bundle to correct any discrepancies.
During the action "Cancel Billing" in the Contract Lines Subform, you can now adjust the posting date.
New field Completed in the contract line (set when the status is set to Ended).
New action Hide Completed Lines on the NAVAX Recurring Contracts page, which allows hiding/showing completed lines.
New routine 70161447 - Update Completed Lines, sets the Completed field based on the status of the line.
Version 26.3.0.1
as of Business Central 26 2026/03/17
Modifications
You now cannot create new contract lines via the NCRC Contract Lines page.
Corrections
Contract lines without a contract header can now be deleted.
Version 26.3.0.0
as of Business Central 26 2026/03/11
New Product Name
The extension NCRC Recurring Contracts has been renamed to NAVAX Recurring Contracts.
Improvements
The field Activate Linediscount has been added to the NAVAX Recurring Contracts Setup page.
The line discount functionality allows maintaining discounts on contract lines.
For more information, see Setup, NAVAX Recurring Contracts Setup.
Bundles can now be created as one-time payments.
The field Line Amount per Billing Interval has been added to the Bundle page.
If the payment method or payment terms are not maintained in a sales order, the default values from the customer are automatically used when converting to a contract.
Version 26.2.6.1
as of Business Central 26 2026/03/05
Corrections
A bug in the deferral of contract lines has been fixed.
Version 26.2.6.0
as of Business Central 26 2026/03/04
Improvements
Performance improvements when deleting unposted sales invoices.
The field Do not automatically end one-time payments with duration has been added to the NAVAX Recurring Contracts setup page.
For more information, see Setup, NAVAX Recurring Contracts Setup.
Corrections
The bundle calculation method Top - Down is now calculated correctly.
The extension of contract lines now correctly considers half periods.
Updating the Dimensions for Contract Lines, now also updates the Line-Values instead of only updating the Dimension-Set.
Version 21.1.3.1
as of Business Central 21 2024/11/07
Modifications
The Amount per month field on the contract card in the Invoice details tab has been renamed to Amount per month and the calculation has been adjusted accordingly.
The page Contract PP Line Details is no longer editable.
Corrections
You can now change the Bundle Quantity for the following documents after copying them:
Sales Invoice
Sales Credit Memo
Posted Sales Invoice
Posted Sales Credit Memo
If you change the Bundle Quantity, the unit price is recalculated.
Version 21.1.3.0
as of Business Central 21 2024/10/29
Improvements
It is possible to add a comment to scheduled changes.
The Contract Change Log is extended by following fields:
Quantity
Unit Price
Starting Date
Ending Date
Extension
The Request Page for scheduled changes got extended by following fields:
Initial Quantity
Initial Unit Price
The Request Page for scheduled date-changes got extended by following fields:
Initial Starting Date
Initial Ending Date
Corrections
When creating projects with foreign currency from the contract, the currency code is now transferred correctly.
The error message when changing the start date of an active contract line has been adjusted.
Version 21.1.2.2
as of Business Central 21 2024/06/27
Corrections
When using bundles in contract lines, the description from the bundle lines is transferred to the contract line.
The combine periods option in the Create contract sales invoice action in connection with various one-time-payments on the contract now behaves correctly.
Modifications
The status of the contract is now set based on the status of the lines; the following rules apply:
Active: At least 1 line in the contract with "Active" status
Default: No line in the contract on "Active" and at least one line in the contract on "Standard status"
Cancellation: No line in the contract on "Active" or "Standard status" and at least one line in the contract on "Cancellation status"
Finished: No line in the contract on "Active", "Standard" or "Cancellation" and at least one line in the contract on "Finished status"
If the status of the lines cannot be clearly determined, the "Default" status is set
Version 21.1.2.1
as of Business Central 21 2024/05/29
Corrections
One-time payments do not have to be taken into account for automatic ending.
Version 21.1.2.0
as of Business Central 21 2024/05/27
Improvements
Contract line details for a better overview of entered values per contract line
One Time Payments in Contracts
New Functionality Release / Reset Status on the Contract Header
New Contract Period Multi-Annually
Modifications
Contract lines with a Sales/Purchase Order No. associated can be deleted, as long as no documents have been created.
Improved contract period checks when activating a contract line, entering a scheduled change or adding an extension period
Sales Orders can now be added to an existing contract with a different contact
Corrections
Rounding is deactivated as soon as a scheduled change has been made
Version 21.1.1.1
as of Business Central 21 2024/04/10
Modifications
Power BI Factboxes that are no longer supported have been replaced.
Version 21.1.1.0
as of Business Central 21 2023/10/27
Modifications
Changed the caption of Quota and Bill At Cost for language code EN to Prepayment and Consumption Based.
Corrections
When extending a contract line then payment plan was created incorretly.


 If you want to delete the unposted invoice, you can either run the Correct Billing feature in the Payment Plan or open the invoice and delete it there.
The period is then marked again in the Payment Plan as not invoiced and can be offset.
To post the invoice, open the document and click Post.
In the Payment Plan the posted invoice No. will be entered. If you need to cancel the posted invoice, use either the associated function in the Payment Plan or the standard functions (Cancel Sales Invoice, Correct Sales Invoice) in the sales invoice. This will then post a sales credit memo and allow you to recreate the sales invoice.
The original sales invoice as well as the created sales credit memo are attached in the payment schedule as Assigned documents of the period.
If you want to delete the unposted invoice, you can either run the Correct Billing feature in the Payment Plan or open the invoice and delete it there.
The period is then marked again in the Payment Plan as not invoiced and can be offset.
To post the invoice, open the document and click Post.
In the Payment Plan the posted invoice No. will be entered. If you need to cancel the posted invoice, use either the associated function in the Payment Plan or the standard functions (Cancel Sales Invoice, Correct Sales Invoice) in the sales invoice. This will then post a sales credit memo and allow you to recreate the sales invoice.
The original sales invoice as well as the created sales credit memo are attached in the payment schedule as Assigned documents of the period.
 For each sales invoice line, which is created from a Contract, a remark line is created which gives conclusions about the Contract number and Contract line number, as well as the period.
 In the NAVAX Recurring Contracts Setup you can define if only the period, excl. the Contract number/Contract line number should be printed.

 Upon activation, the fields are automatically displayed in the line and can be filled.
 Dimension values are only visible in the Contract Payment Plan card via Related > Contract > Active Payment Plan.
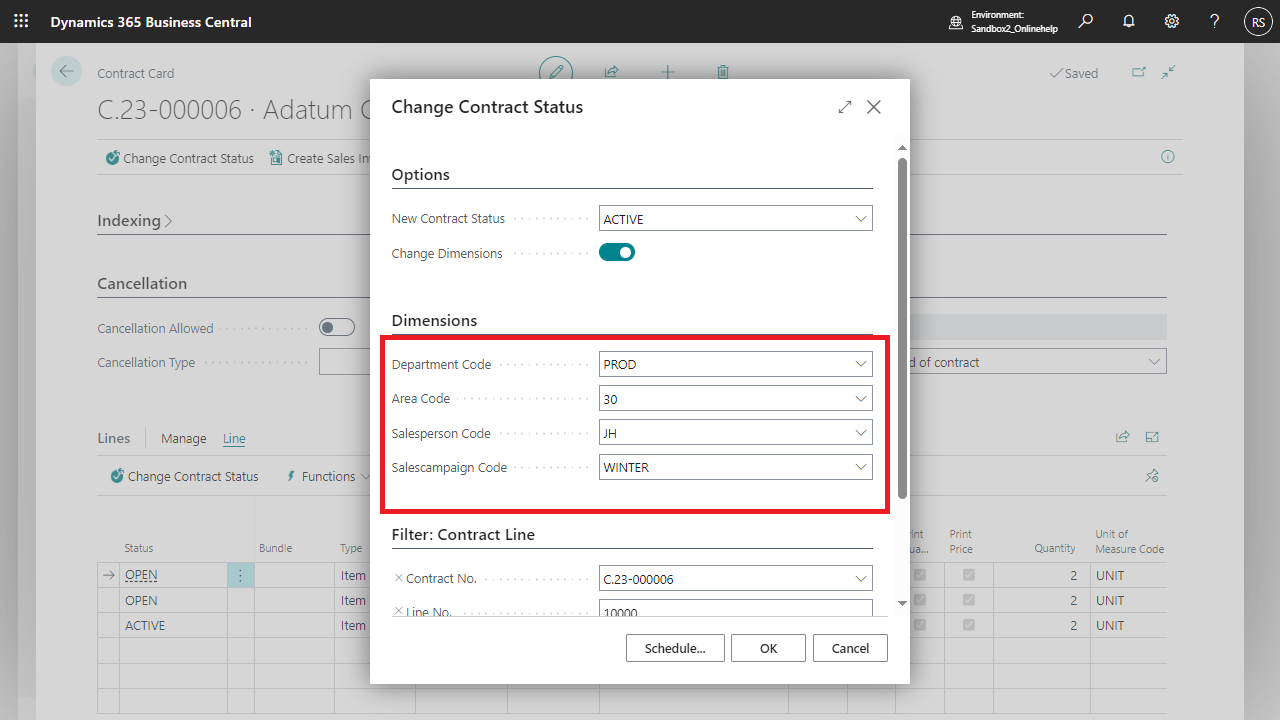
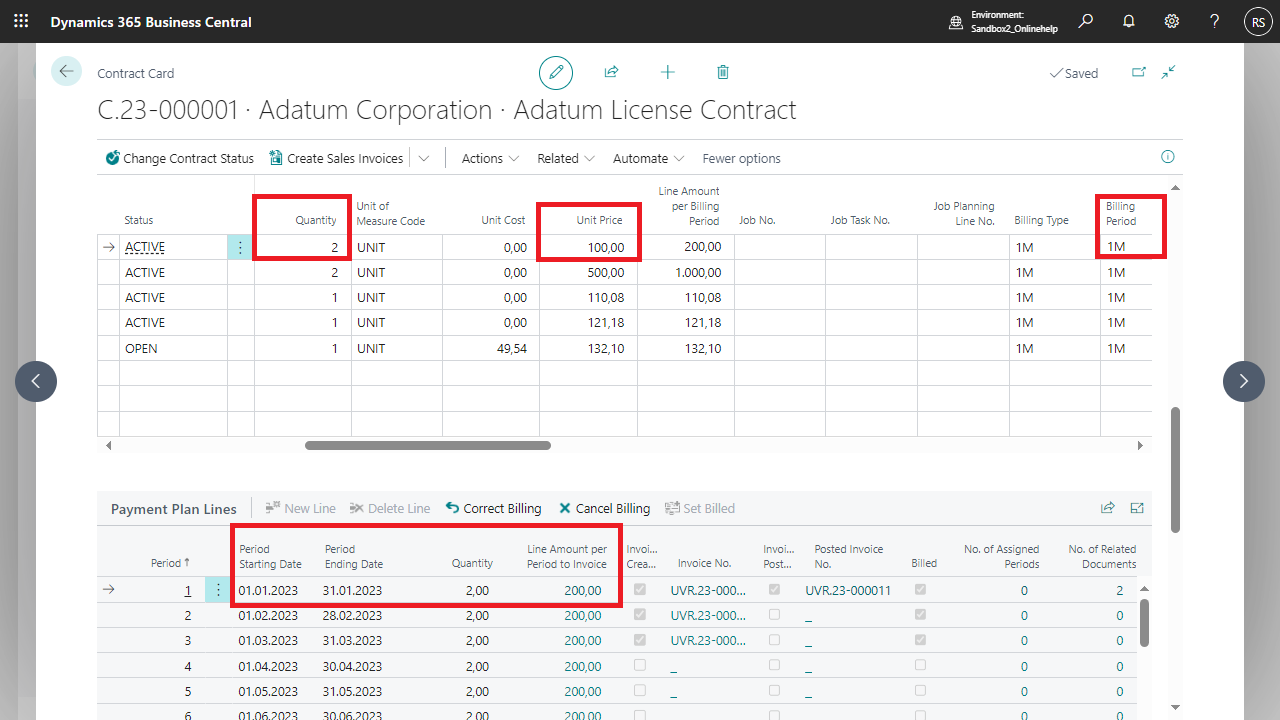 Example 2: half-yearly billing
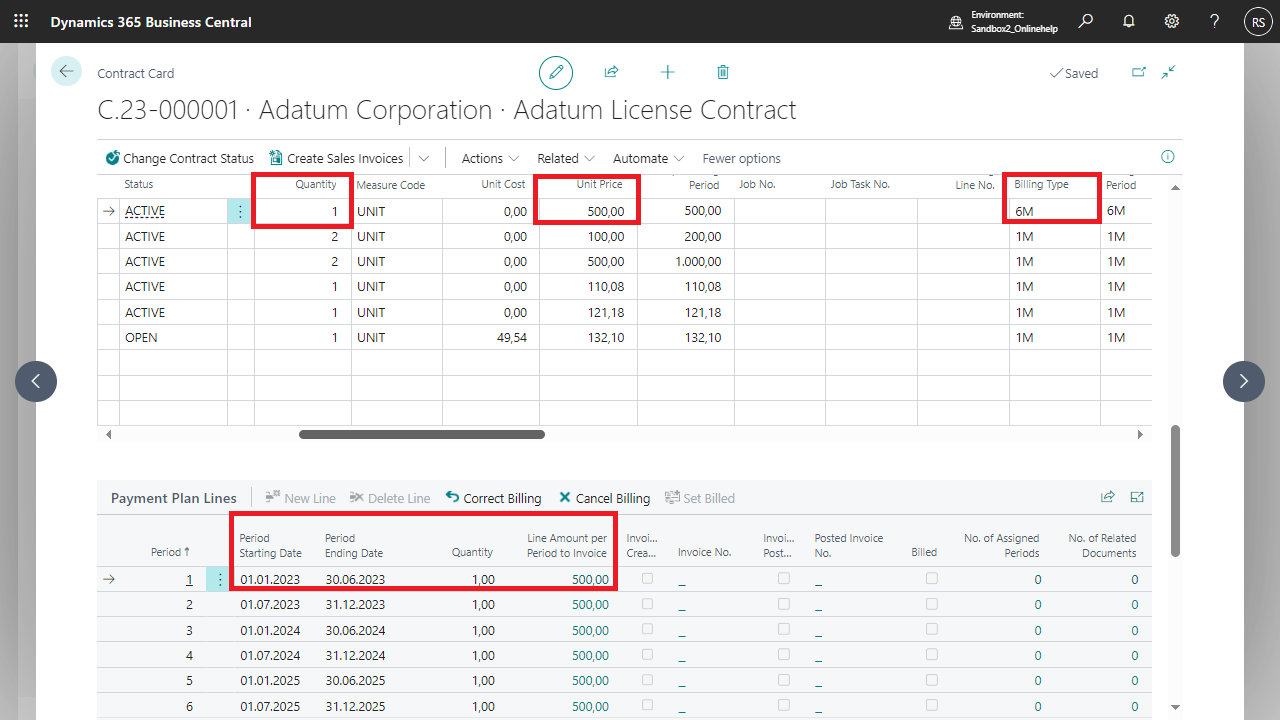 Example 3: yearly billing
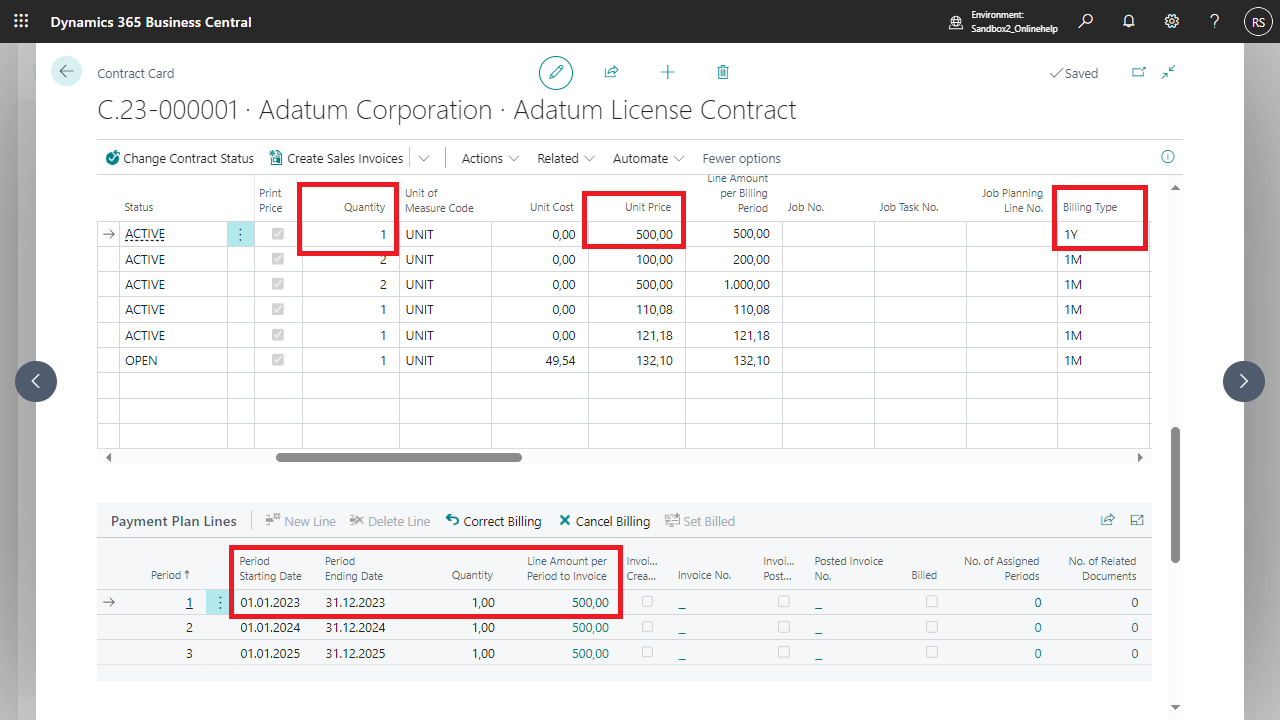 For more information, see Working With The App, Payment Plan, Payment Plan and Start of Period.
 Day of Period Start = 1 means that, regardless of the start date of the Contract line, invoicing is always from 01 to the following 01. Started periods will be partially invoiced.
Set Day of Period Start to Starting Date defines whether the start date of the period should be automatically adjusted to the start date for Contract lines with a different start date.
Day of Period Start = 1 means that, regardless of the start date of the Contract line, invoicing is always from 01 to the following 01. Started periods will be partially invoiced.
Set Day of Period Start to Starting Date defines whether the start date of the period should be automatically adjusted to the start date for Contract lines with a different start date.
 Subsequently, all complete periods are invoiced, whereby these always start on day 1. The last period is again not a complete period. The price is calculated as follows.
price per period – value of the first partial period = value of the last partial period
100 – 90 = 10
Subsequently, all complete periods are invoiced, whereby these always start on day 1. The last period is again not a complete period. The price is calculated as follows.
price per period – value of the first partial period = value of the last partial period
100 – 90 = 10
 Subsequently, all complete periods are invoiced, whereby these always start on day 15. The last period is again not a complete period. The price is calculated as follows.
price per period – value of the first partial period = value of the last partial period
100 – 46,67 = 53,33
Subsequently, all complete periods are invoiced, whereby these always start on day 15. The last period is again not a complete period. The price is calculated as follows.
price per period – value of the first partial period = value of the last partial period
100 – 46,67 = 53,33

 One-time payments are invoicing using the existing invoicing functions.
For more information, see Working With The App, Billing, Customer Contract.
In contrast to recurring contract lines, one-time contract lines do not have an associated payment plan. Created sales invoices are displayed in the line details in the Invoice no. or posted invoice no. field.
In addition, one-time payments do not receive an automatic comment in the associated invoice line.
One-time payments are invoicing using the existing invoicing functions.
For more information, see Working With The App, Billing, Customer Contract.
In contrast to recurring contract lines, one-time contract lines do not have an associated payment plan. Created sales invoices are displayed in the line details in the Invoice no. or posted invoice no. field.
In addition, one-time payments do not receive an automatic comment in the associated invoice line.
 When posting the associated invoice, the one-time payment line is automatically marked as completed.
 In the index list, index codes are entered, which are then also assigned to a Contract, or a Contract line.
Index values can be entered for each index code.
In the index list, index codes are entered, which are then also assigned to a Contract, or a Contract line.
Index values can be entered for each index code.
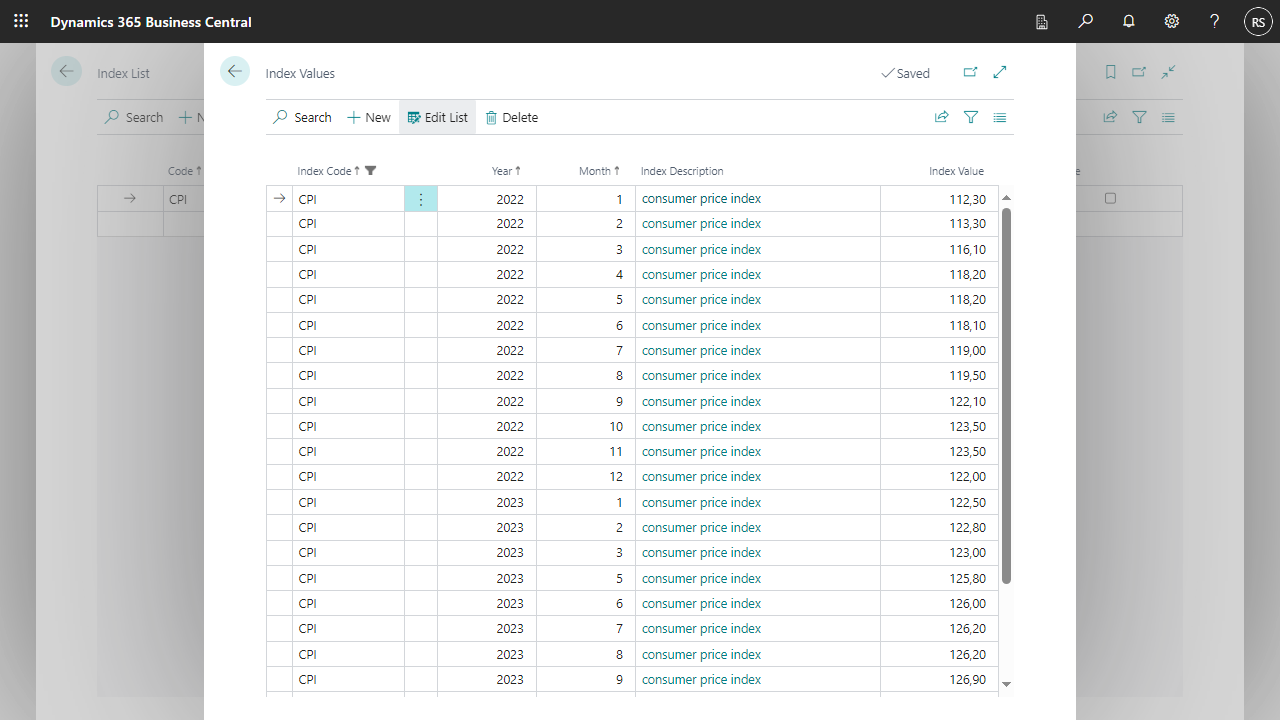 For more information, see Working With The App, Indexing, Working With Indexing.
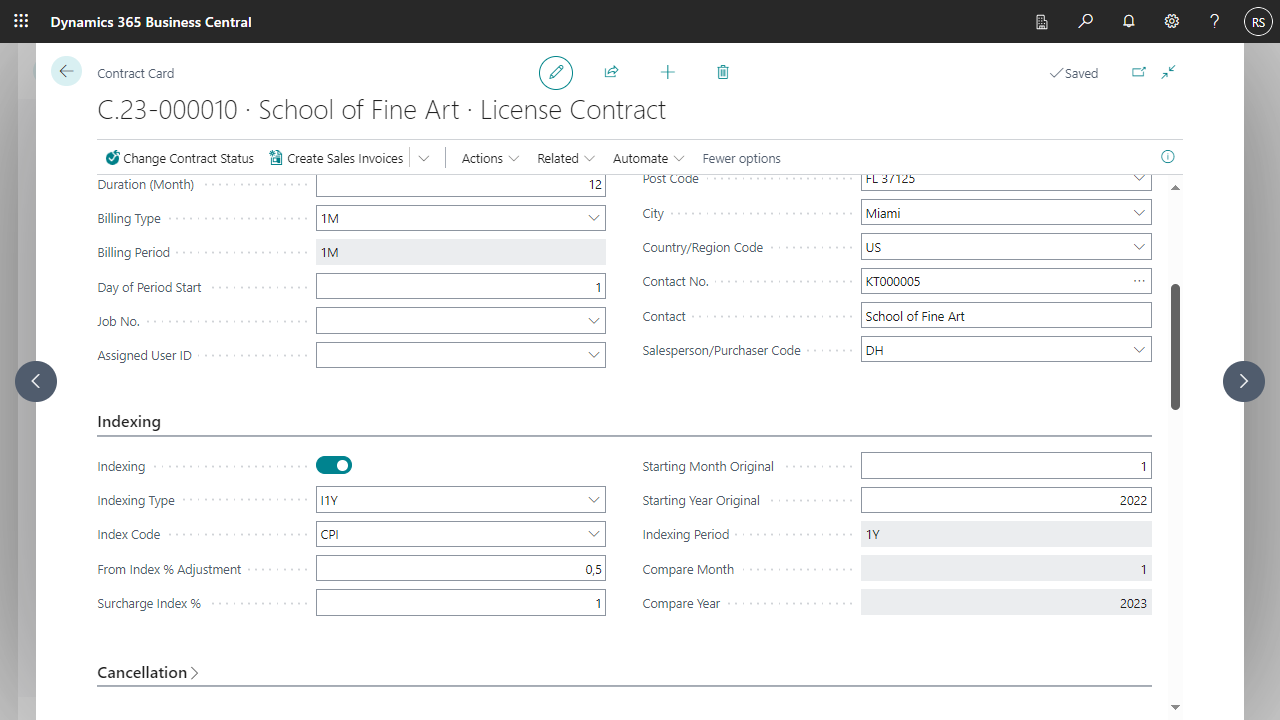 Indexing can be performed for one Contract line, one Contract or several or all Contracts. To do this, click Actions > Indexing.
After the indexing has been performed, the new prices are transferred directly to the Contract line.
Indexing can be performed for one Contract line, one Contract or several or all Contracts. To do this, click Actions > Indexing.
After the indexing has been performed, the new prices are transferred directly to the Contract line.
 Via the indexing log, which can be found under Related > History > Indexing Log, the calculated values can be printed.
There is an additional option to inform Customers about the index adjustment via an additional text in the sales invoice.
Set Printed is then set in the indexing log.
After the indexing has been performed successfully, the new index values (month/year) are adjusted in the Contract line. At the Contract header the original values remain.
Via the indexing log, which can be found under Related > History > Indexing Log, the calculated values can be printed.
There is an additional option to inform Customers about the index adjustment via an additional text in the sales invoice.
Set Printed is then set in the indexing log.
After the indexing has been performed successfully, the new index values (month/year) are adjusted in the Contract line. At the Contract header the original values remain.
 For more information, see Working With The App, Indexing, Working With Retrospective Indexing.

 In case of the cancellation periods, which have a reference to the current date (Till end of a year, Till end year quarter, Till end of the month), there is an additional task queue item, which updates the date.
 For day-accurate calculation of the allowed cancellation date, the Job queue entry should be run daily.
If a cancellation is not submitted in time, the Contract may be automatically extended.
For more information, see Working With The App, Extension, Working With Auto. Extension.
When a cancellation is entered into the system, the cancellation status defined in the NAVAX Recurring Contracts Setup is set.
The status must have the "Billable" boolean enabled, as invoices can still be created from a terminated Contract.
For day-accurate calculation of the allowed cancellation date, the Job queue entry should be run daily.
If a cancellation is not submitted in time, the Contract may be automatically extended.
For more information, see Working With The App, Extension, Working With Auto. Extension.
When a cancellation is entered into the system, the cancellation status defined in the NAVAX Recurring Contracts Setup is set.
The status must have the "Billable" boolean enabled, as invoices can still be created from a terminated Contract.
 A cancellation can be executed either for a Contract line only or for an entire Contract.


 Only those Contract lines are then marked as cancelled for which the cancellation was received before the deadline.

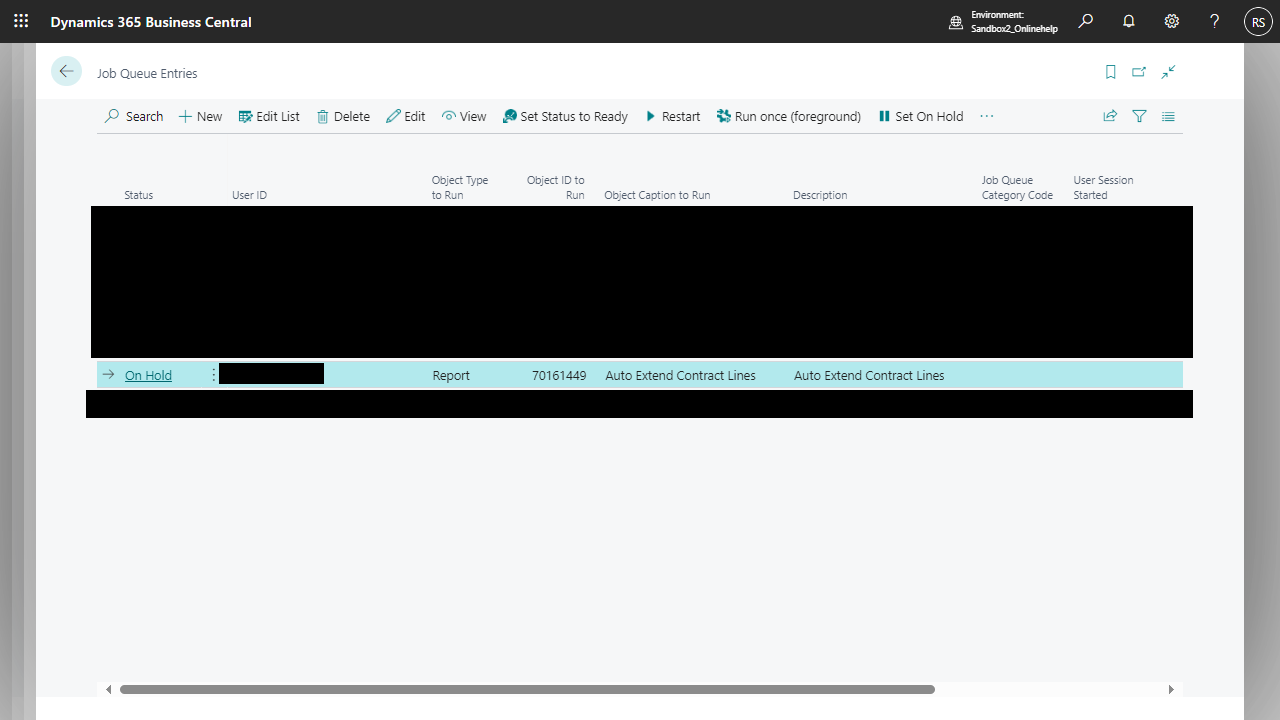 It is also possible to enter the extension type at the Contract type. The defined extension type is then automatically set in all Contract lines.
This interval is then used to calculate the new end date of the Contract line.
Contracts can be extended under Actions > Extend Contract. Then - independent of the time of the execution of this function - the end date of all Contract lines will be set back by the respective defined interval and a new Payment Plan will be created.
The status of the Contract line briefly changes to the Extension status defined in the NAVAX Recurring Contracts Setup.
The status change can then be tracked at header and line level under History > Status Change Log.
The Payment Plan will then use the price and quantity of the original last Payment Plan line for all newly created Payment Plan lines.
It is also possible to enter the extension type at the Contract type. The defined extension type is then automatically set in all Contract lines.
This interval is then used to calculate the new end date of the Contract line.
Contracts can be extended under Actions > Extend Contract. Then - independent of the time of the execution of this function - the end date of all Contract lines will be set back by the respective defined interval and a new Payment Plan will be created.
The status of the Contract line briefly changes to the Extension status defined in the NAVAX Recurring Contracts Setup.
The status change can then be tracked at header and line level under History > Status Change Log.
The Payment Plan will then use the price and quantity of the original last Payment Plan line for all newly created Payment Plan lines.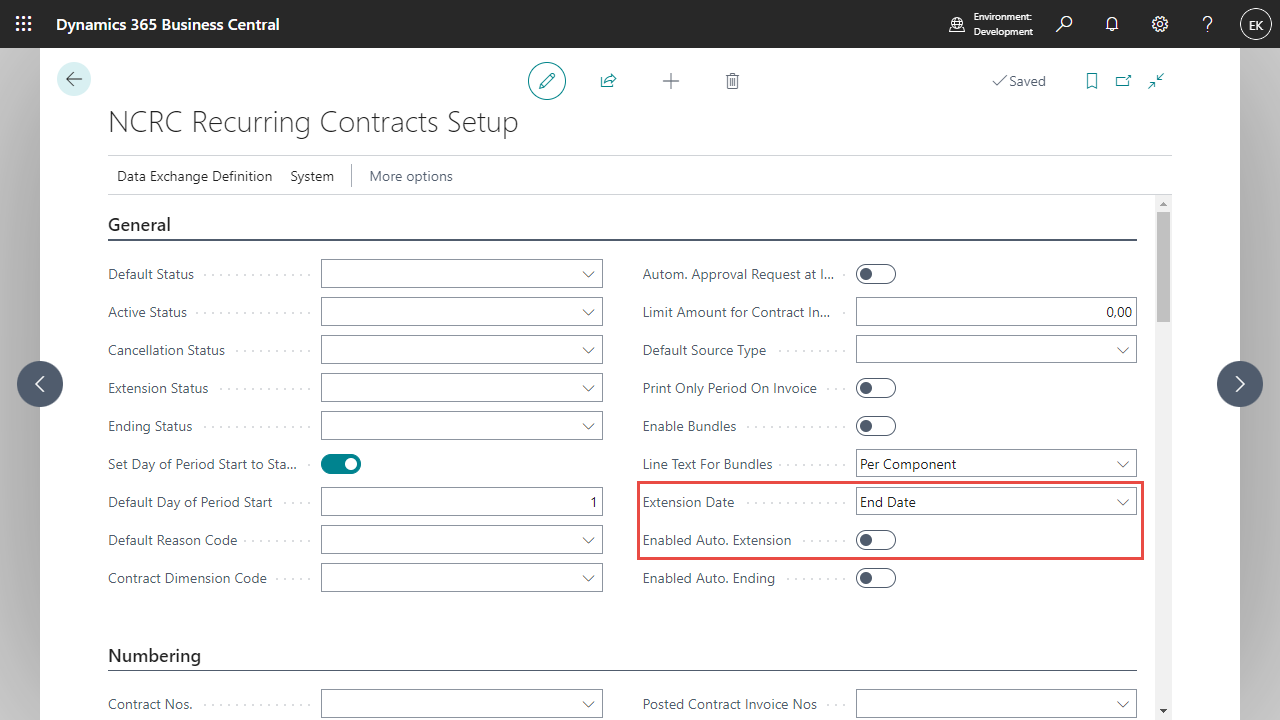
 A Contract line is automatically extended when:
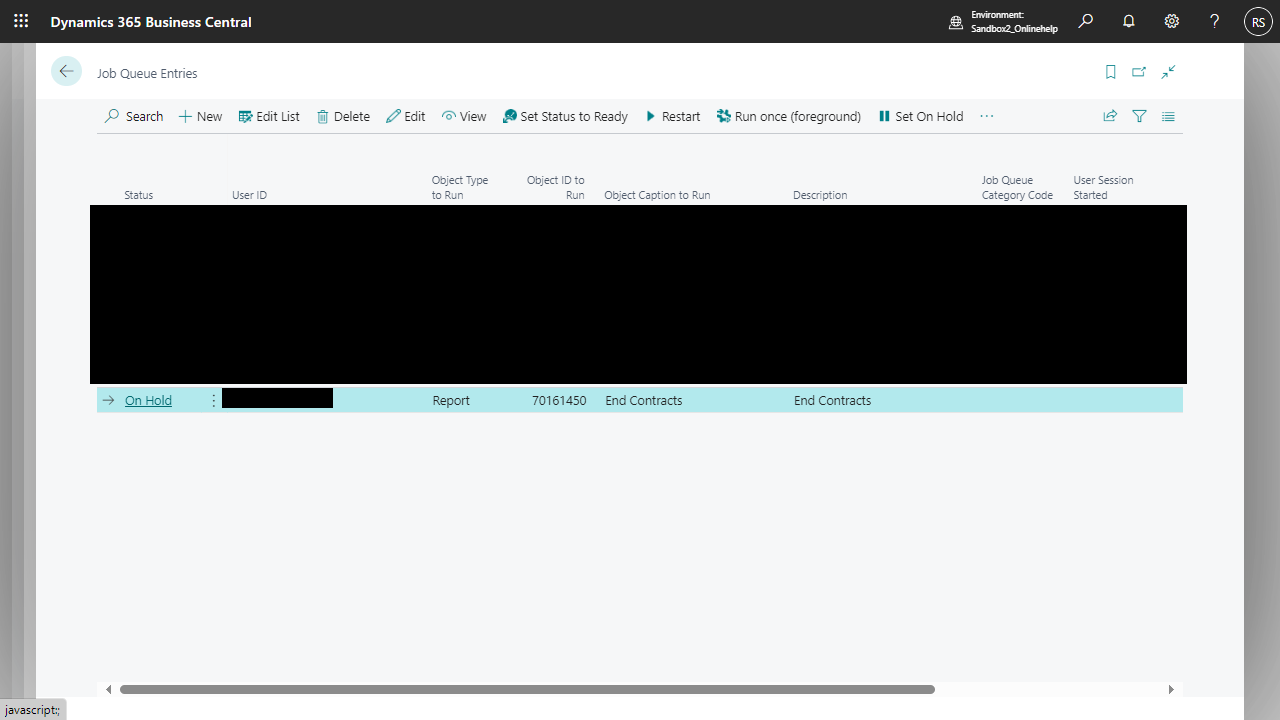 A Contract line is set to the Ended status defined in the NAVAX Recurring Contracts Setup when:
 Only after activating the Job Integration, the corresponding fields & actions will be displayed in the Contract.
 For more information, see Working With The App, Job Integration, Working With Job.
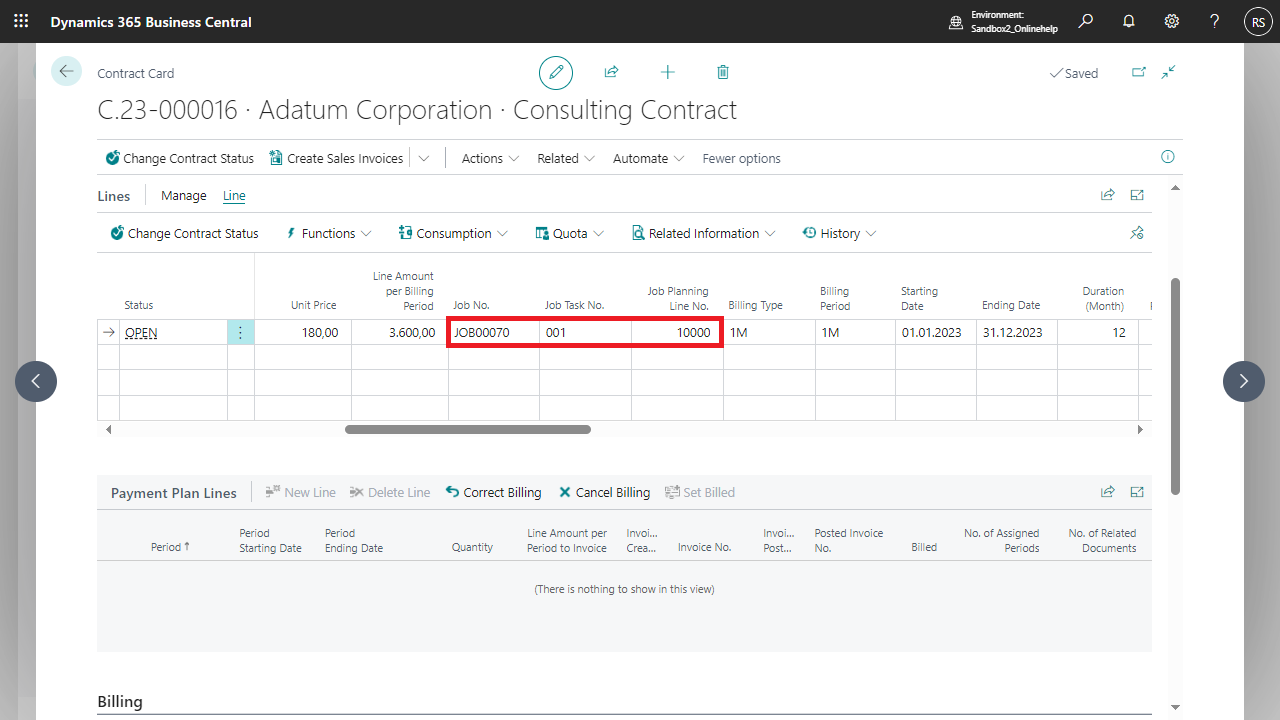 The assignment of Job, Job Task & Job Planning Line can also be done manually.
A Job is created for each Contract line. The Job Task No. is assigned based on the Start No. in the NAVAX Recurring Contracts Setup. The description corresponds to the description of the Contract line.
The assignment of Job, Job Task & Job Planning Line can also be done manually.
A Job is created for each Contract line. The Job Task No. is assigned based on the Start No. in the NAVAX Recurring Contracts Setup. The description corresponds to the description of the Contract line.
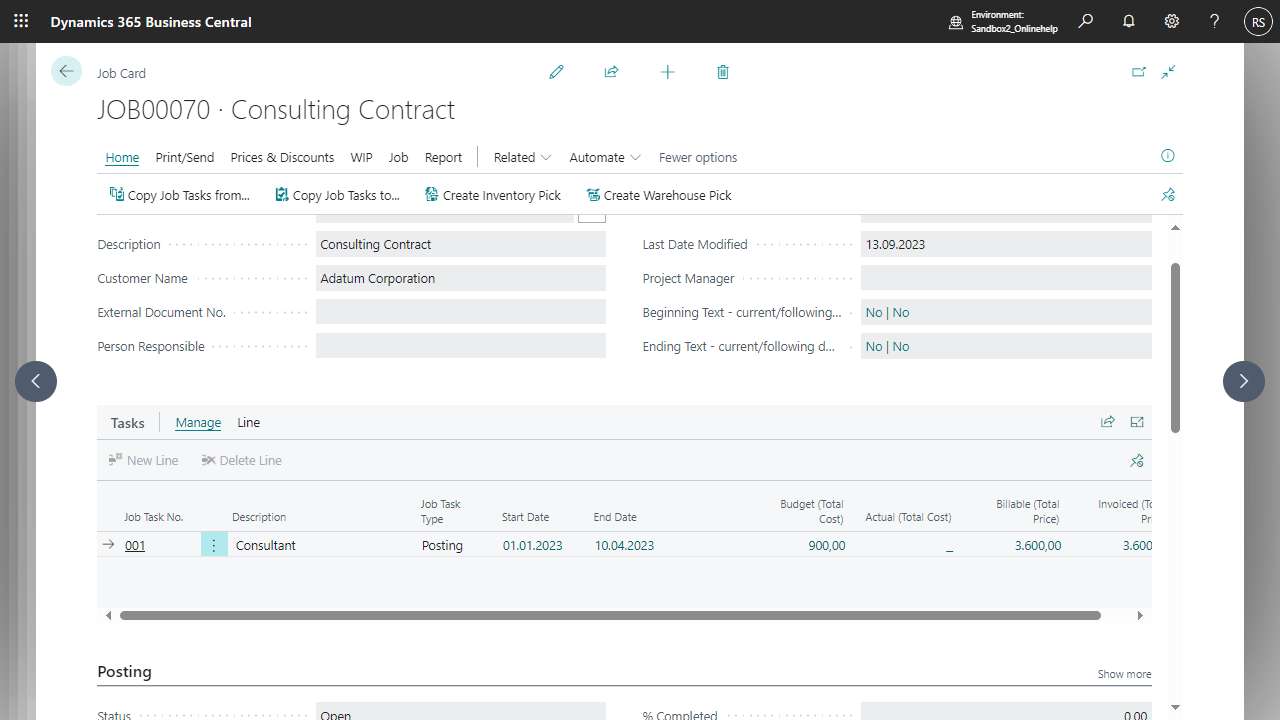 In addition, a Job Planning Line is created for each Contract line.

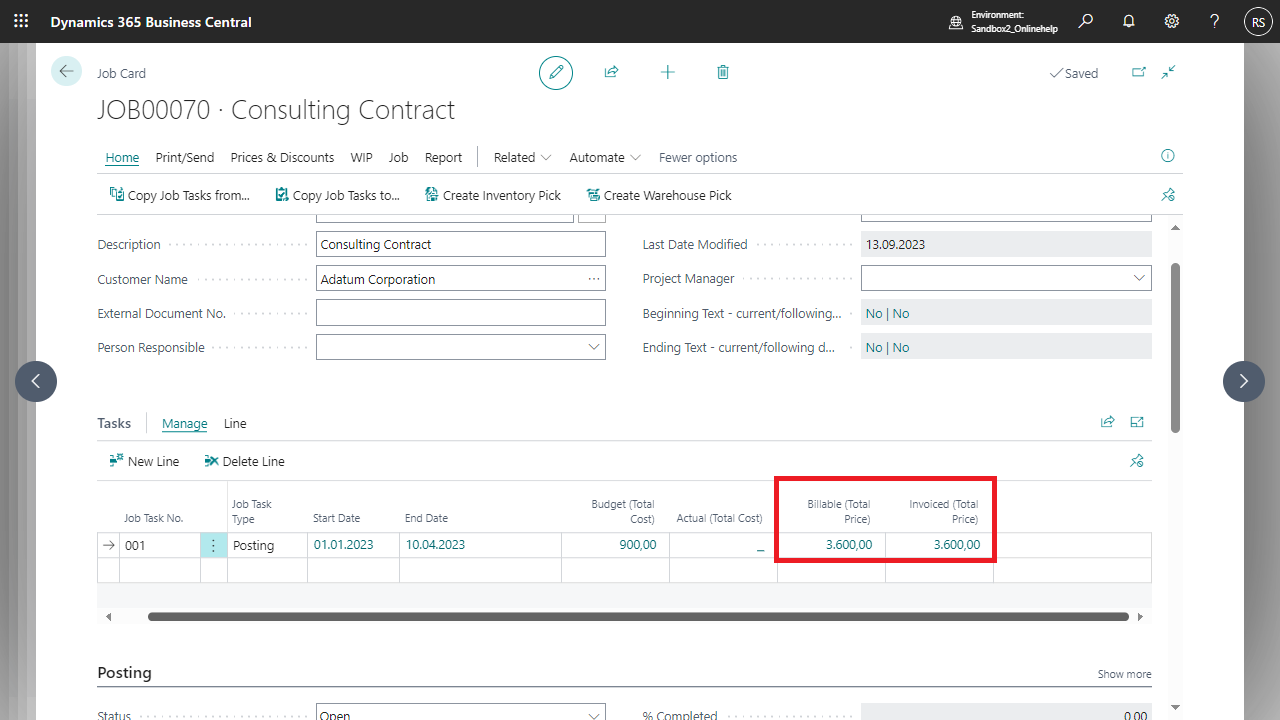 For more information, see Working With The App, Job Integration, Working With Job And Contract.
 The Job is then populated with the budget cost amount and the actual costs from the Vendor Contract and the budget sales amount and the invoiced value from the Customer Contract.

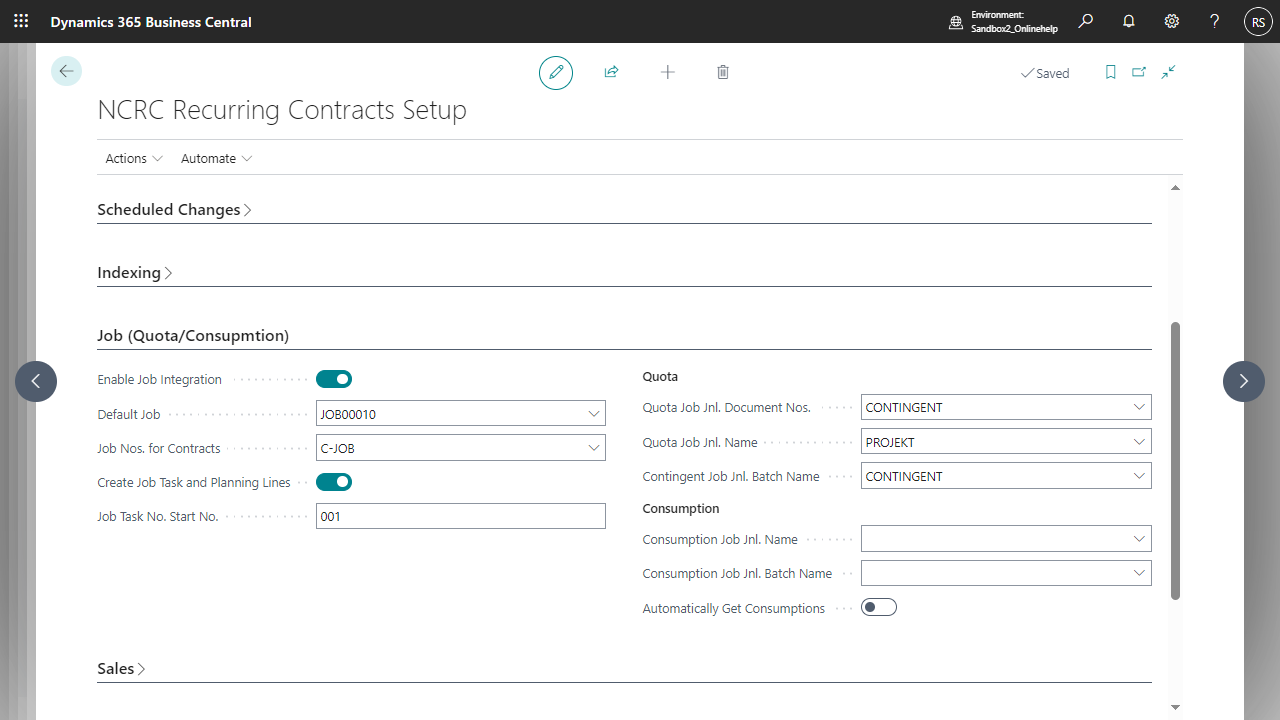 Also define the Prepayment Job Journal Name, the Prepayment Job Journal Batch Name and the Prepayment Journal Document No. to be used for posting Prepayments.
For more information, see Working With The App, Prepayment, Working With Prepayment.
Also define the Prepayment Job Journal Name, the Prepayment Job Journal Batch Name and the Prepayment Journal Document No. to be used for posting Prepayments.
For more information, see Working With The App, Prepayment, Working With Prepayment.
 If you have activated Overbooking not Allowed, the system checks that the quantity to be called off does not exceed the remaining quantity and issues an error message if necessary.

 For more information, see Working With The App, Consumption Based, Working With Consumption Based.
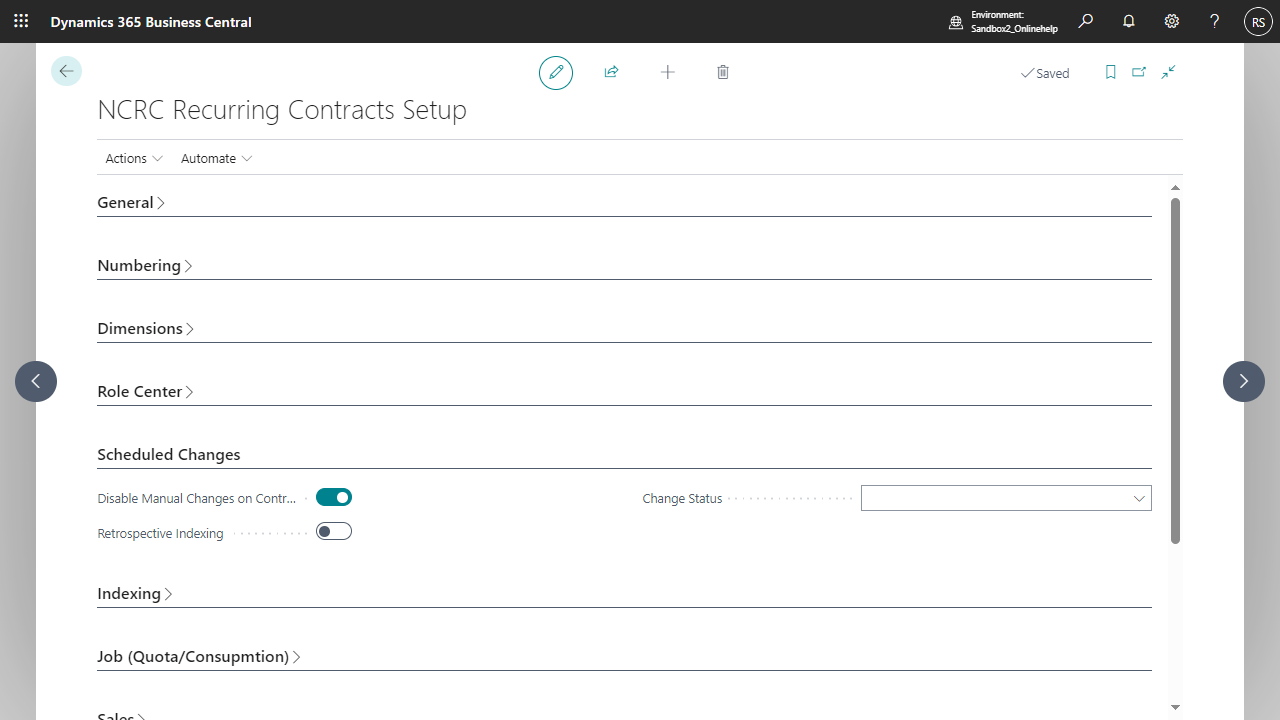 By activating it, two new Contract line actions will be displayed.
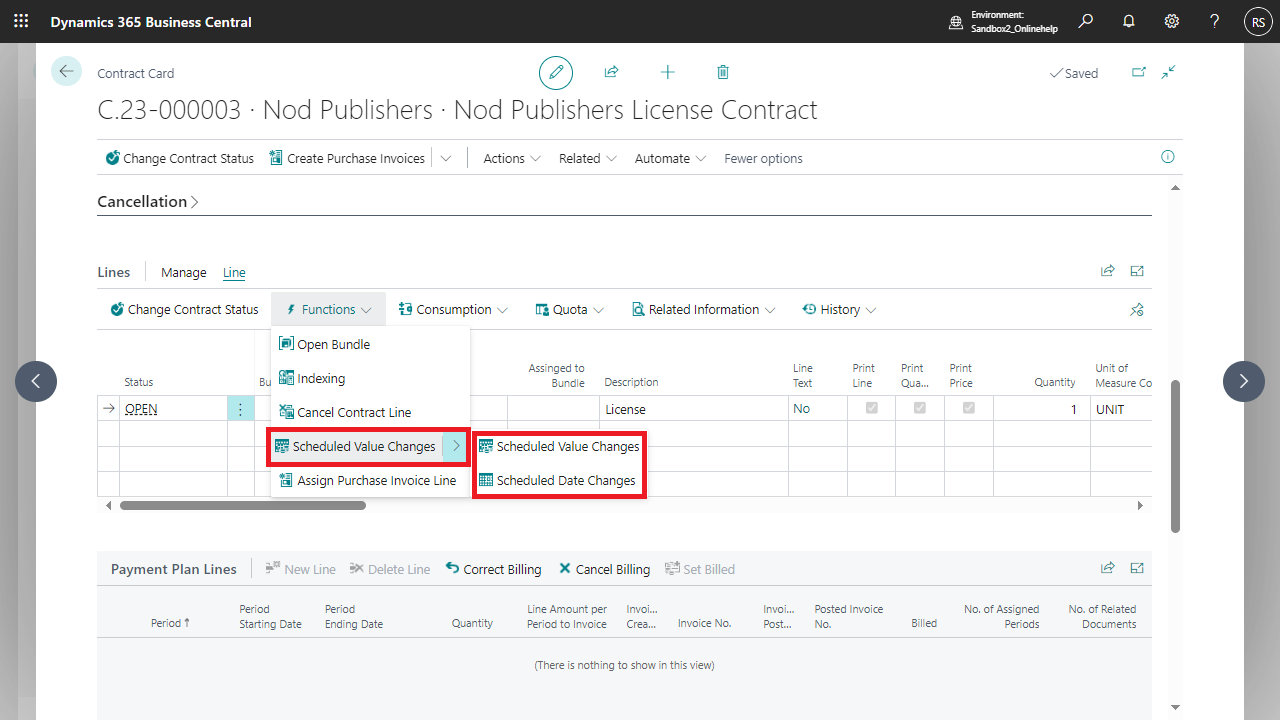 This allows Scheduled Changes to be created for past and future periods.
Scheduled Changes can only be made at the Contract line level, not at the Contract header level, and may result in sales invoices or sales credit memos, if applicable.
If you activate Scheduled Changes, you can only make changes using the associated functions. If you try to change the quantity, the price or the start and end date of the line, an error message will be displayed.
This allows Scheduled Changes to be created for past and future periods.
Scheduled Changes can only be made at the Contract line level, not at the Contract header level, and may result in sales invoices or sales credit memos, if applicable.
If you activate Scheduled Changes, you can only make changes using the associated functions. If you try to change the quantity, the price or the start and end date of the line, an error message will be displayed.


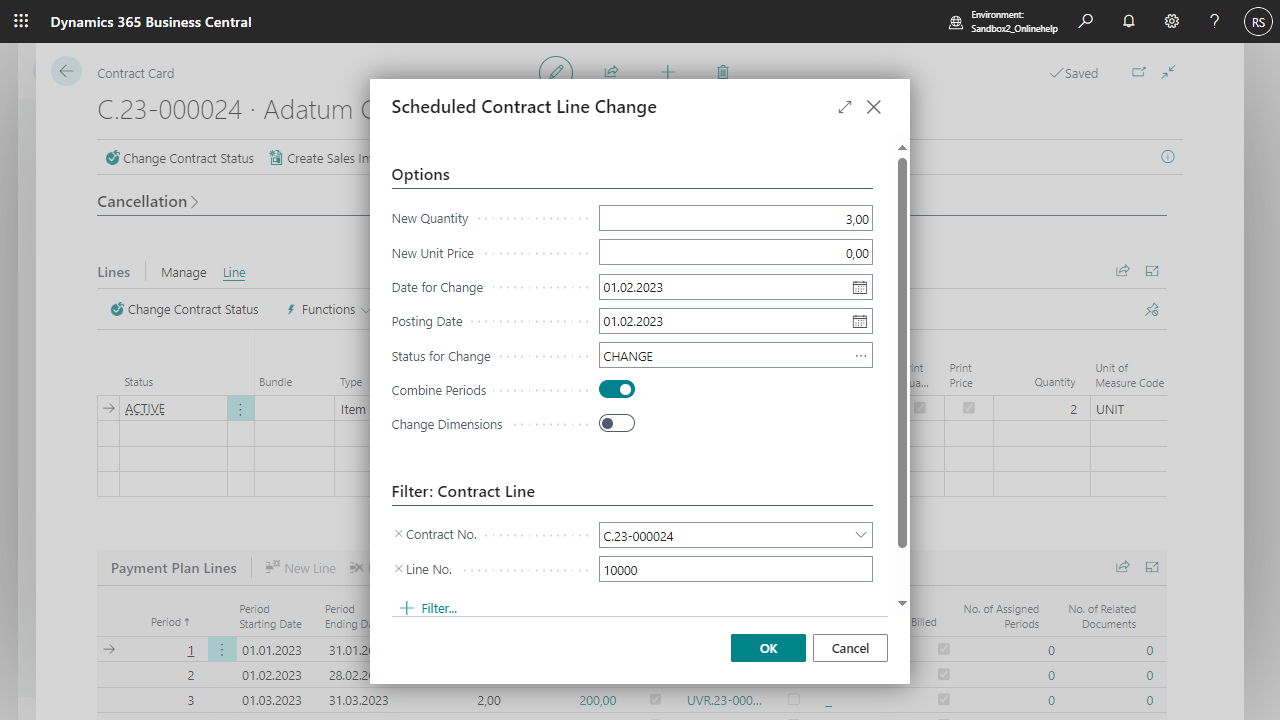 New Quantity: 3 – the quantity is increased from 2 to 3
New Unit Price: 0,00 – the Unit Cost in the Contract line doesn’t change
Date for Change: 01.02.23 – the period from which the change comes into force
Posting Date: 01.02.23 – the posting date of the sales invoice
Status for Change: the status that is set briefly to execute the change
Combine Periods: If activated, sales invoices which concern several periods are summarized on one invoice.
Change Dimensions: see Working With The App, Dimensions, Dimensions in Contract
Result:
New Quantity: 3 – the quantity is increased from 2 to 3
New Unit Price: 0,00 – the Unit Cost in the Contract line doesn’t change
Date for Change: 01.02.23 – the period from which the change comes into force
Posting Date: 01.02.23 – the posting date of the sales invoice
Status for Change: the status that is set briefly to execute the change
Combine Periods: If activated, sales invoices which concern several periods are summarized on one invoice.
Change Dimensions: see Working With The App, Dimensions, Dimensions in Contract
Result:
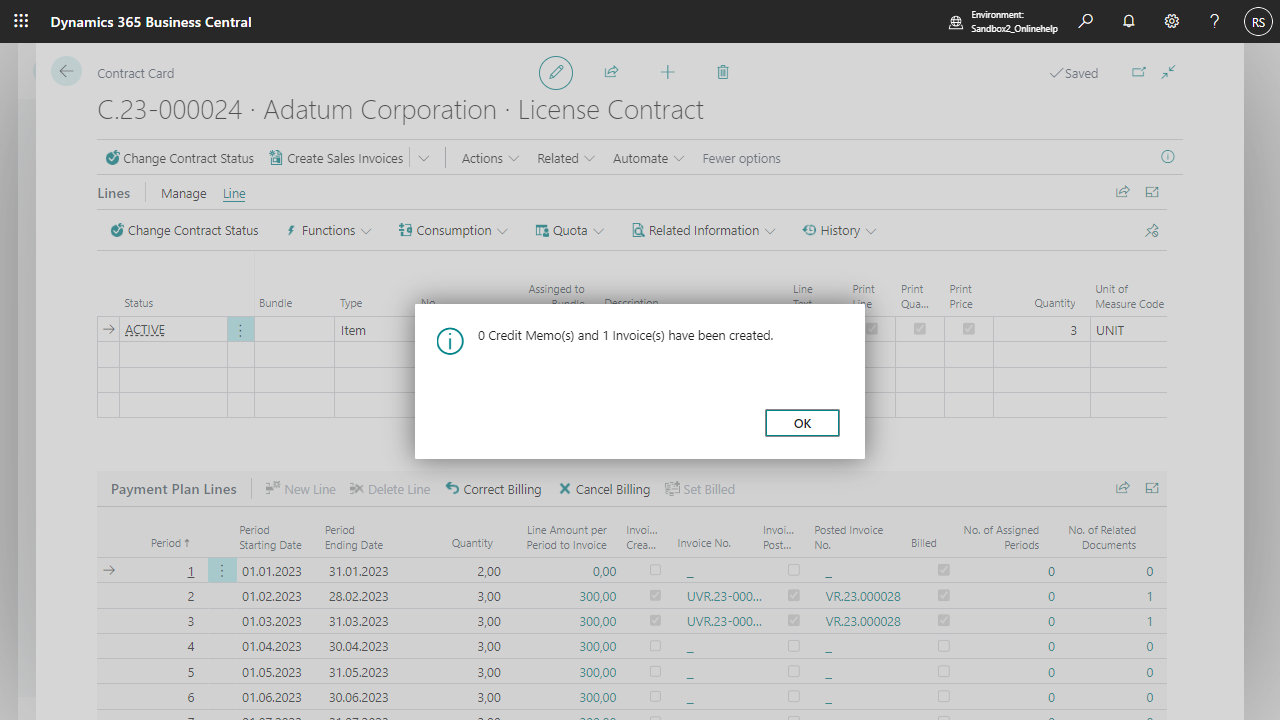 However, the quantity was increased from 2 to 3 in period 2, which leads to an increase in the line amount and thus triggers a sales invoice.
The sales invoice is created but not posted and can be seen in the relevant Payment Plan lines in the additional table No. of Related Documents.
However, the quantity was increased from 2 to 3 in period 2, which leads to an increase in the line amount and thus triggers a sales invoice.
The sales invoice is created but not posted and can be seen in the relevant Payment Plan lines in the additional table No. of Related Documents.
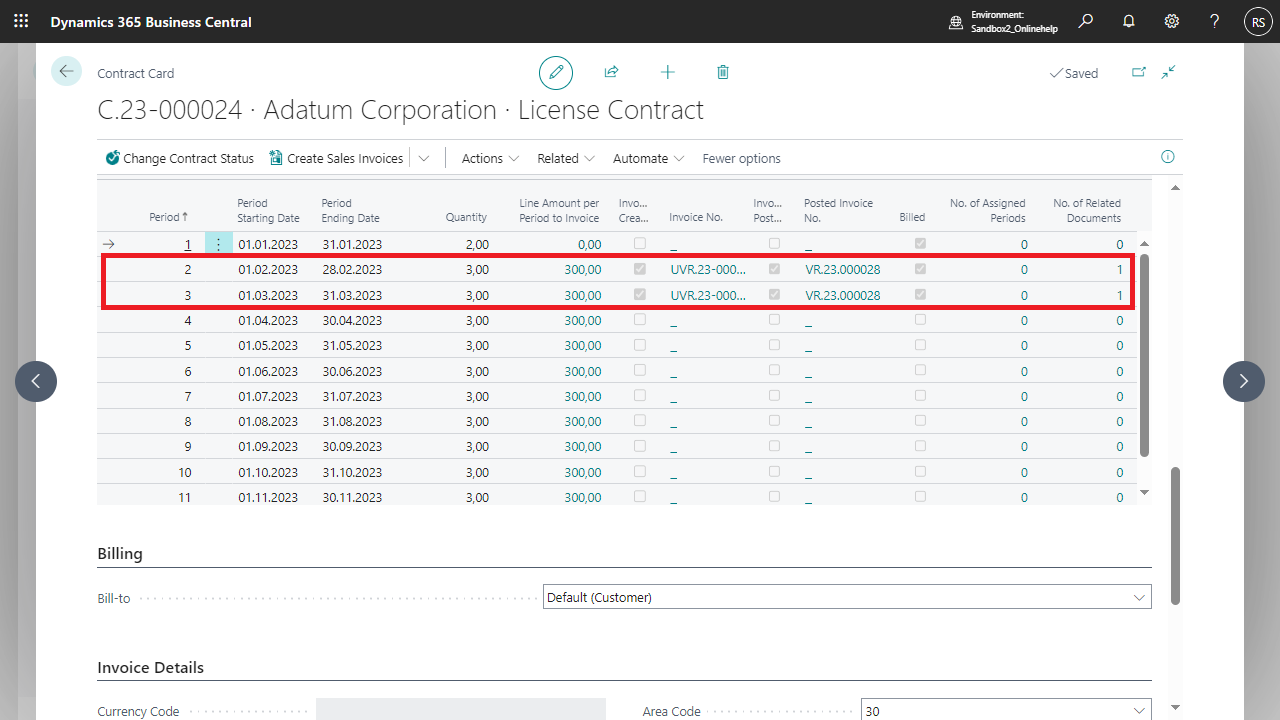 Click on the number to open all the documents that are assigned to the Payment Plan line. You can also see by which function the document was created.
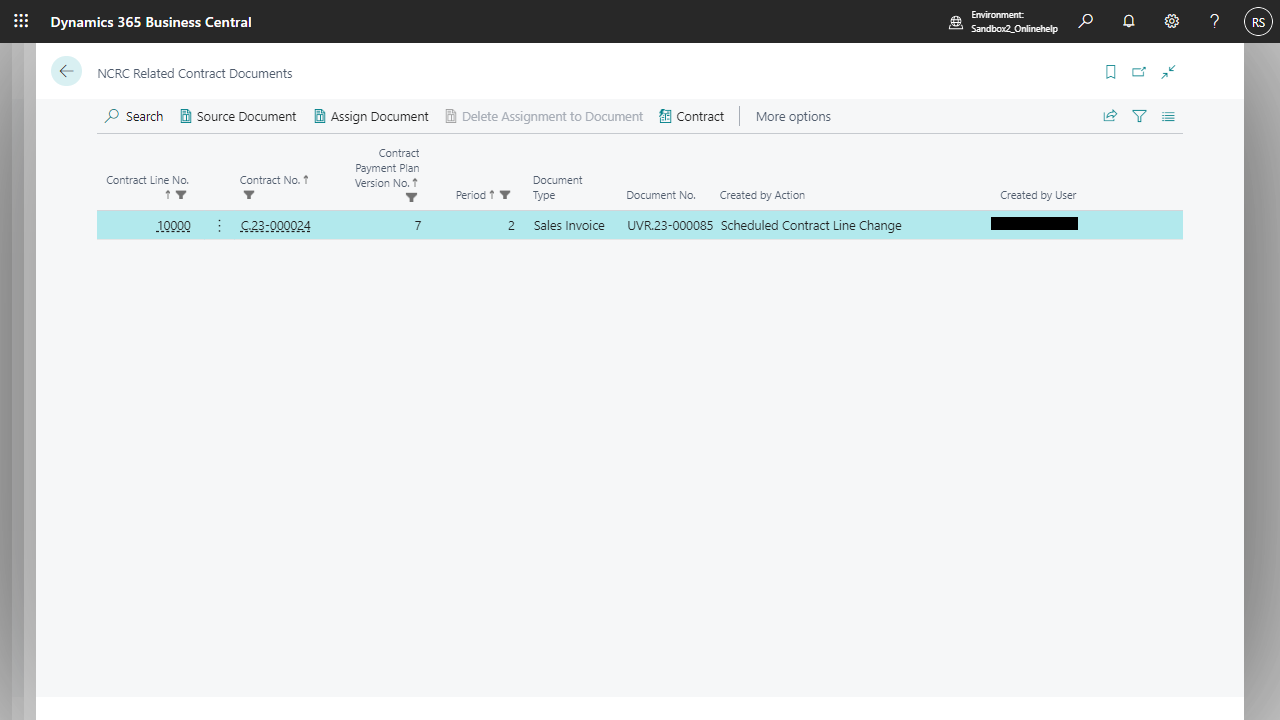 Click Source Document to open and post the sales invoice.
The quantity in the Contract line has also been increased as the new quantity affects the next billing interval.
Click Source Document to open and post the sales invoice.
The quantity in the Contract line has also been increased as the new quantity affects the next billing interval.
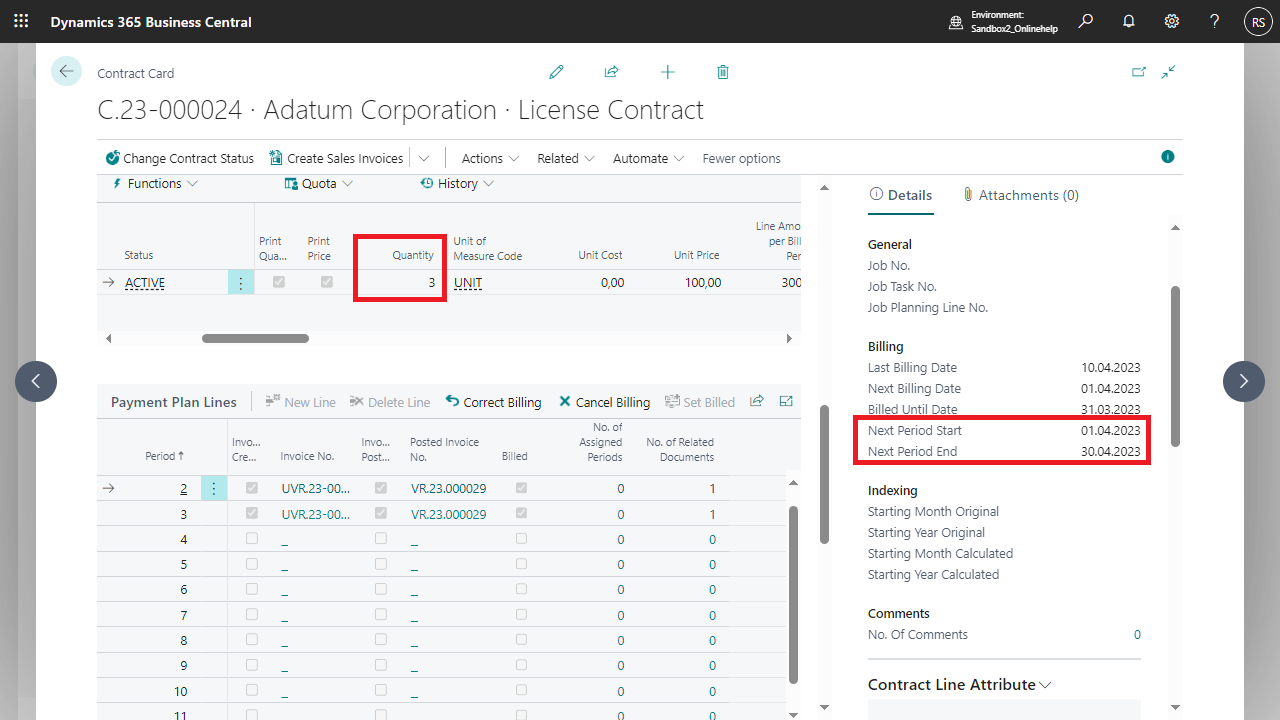
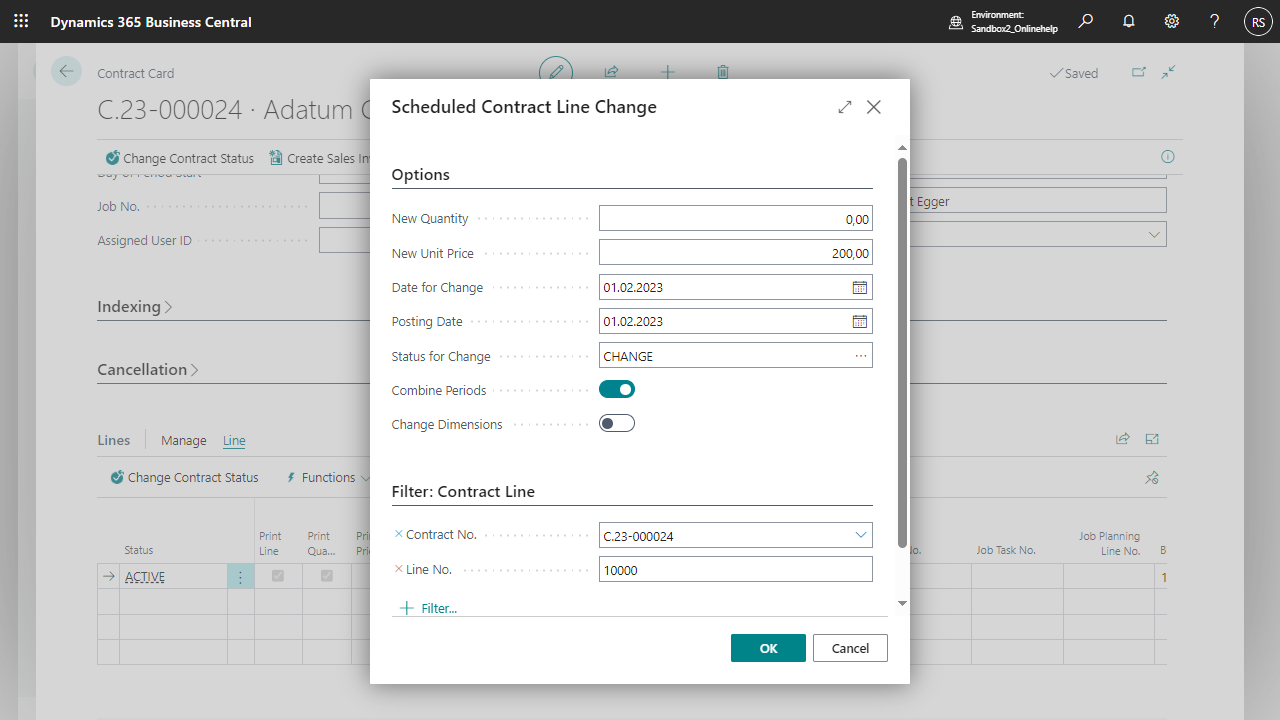 New Quantity: 0 – the quantity remains the same
New Unit Price: 200,00 – the Unit Cost in the Contract line increases from 100,00€ to 200,00€
Date for Change: 01.02.23 – the period from which the change comes into force
Posting Date: 01.02.23 – the posting date of the sales invoice
Status for Change: the status that is set briefly to execute the change
Combine Periods: If activated, sales invoices which concern several periods are summarized on one invoice.
Change Dimensions: see Working With The App, Dimensions, Dimensions in Contract
Result:
New Quantity: 0 – the quantity remains the same
New Unit Price: 200,00 – the Unit Cost in the Contract line increases from 100,00€ to 200,00€
Date for Change: 01.02.23 – the period from which the change comes into force
Posting Date: 01.02.23 – the posting date of the sales invoice
Status for Change: the status that is set briefly to execute the change
Combine Periods: If activated, sales invoices which concern several periods are summarized on one invoice.
Change Dimensions: see Working With The App, Dimensions, Dimensions in Contract
Result:
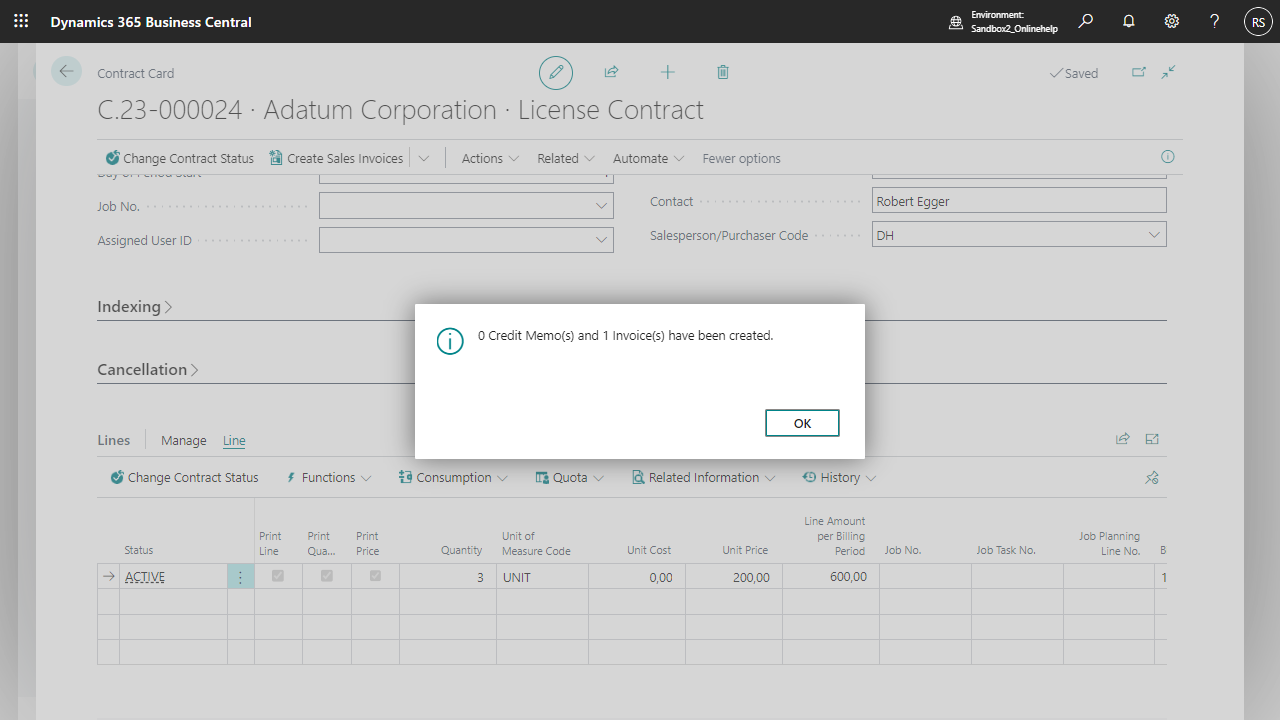 The unit price has been increased from 100 to 200 in period 2, which results in an increase in the line amount and thus triggers a sales invoice.
The sales invoice is created but not posted and is visible in the relevant Payment Plan lines in the additional table No. of Related Documents and can be posted.
The unit price has been increased from 100 to 200 in period 2, which results in an increase in the line amount and thus triggers a sales invoice.
The sales invoice is created but not posted and is visible in the relevant Payment Plan lines in the additional table No. of Related Documents and can be posted.
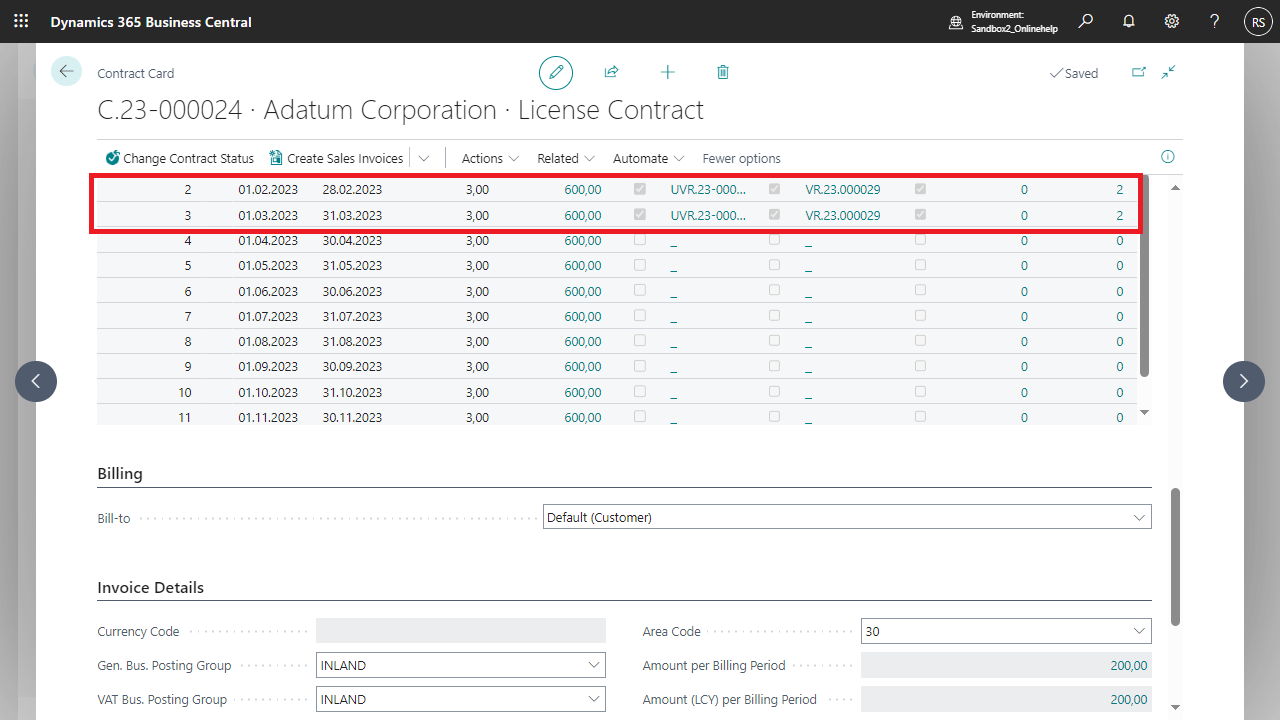 The Unit Price in the Contract line has also been increased as the new price affects the next billing interval.
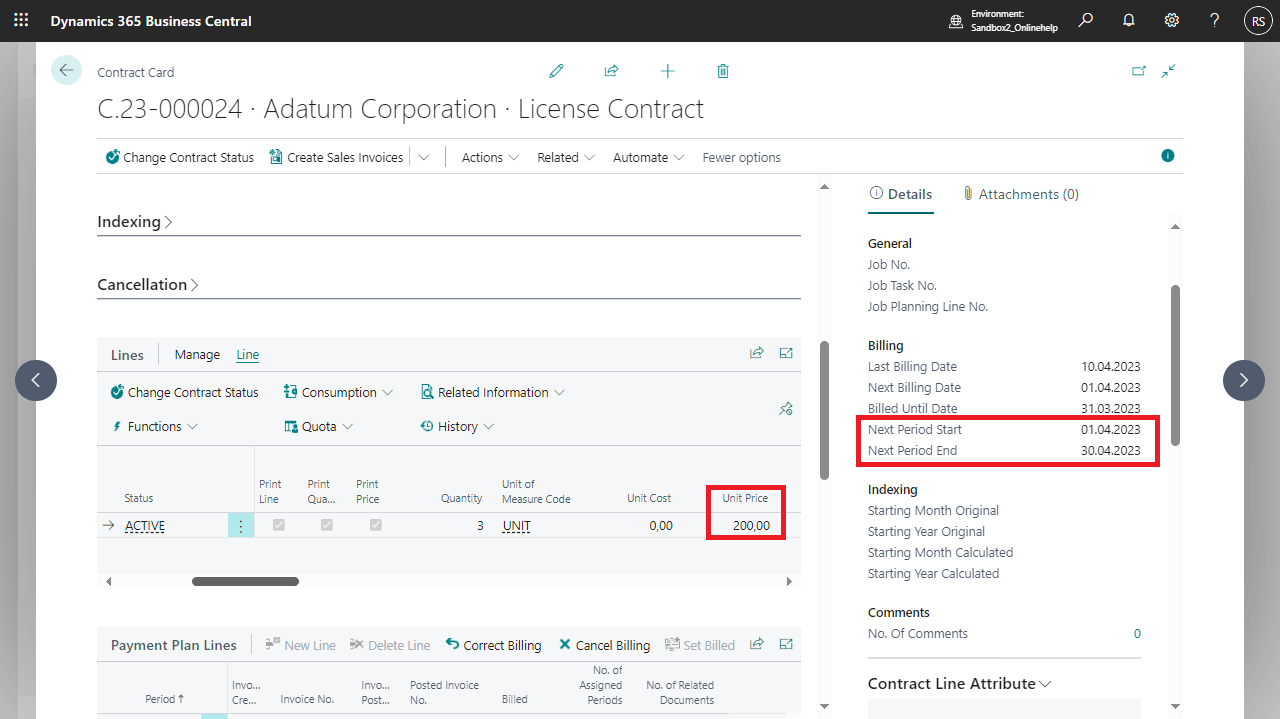
 However, the quantity has been reduced from 2 to 1 in period 2, which results in a reduction of the line amount and thus triggers a sales credit memo.
The sales credit memo is created but not posted and is visible in the relevant Payment Plan lines in the additional table No. of Related Documents and can be posted there.
However, the quantity has been reduced from 2 to 1 in period 2, which results in a reduction of the line amount and thus triggers a sales credit memo.
The sales credit memo is created but not posted and is visible in the relevant Payment Plan lines in the additional table No. of Related Documents and can be posted there.
 The quantity in the Contract line has also been increased as the new quantity affects the next billing interval.
 The unit price in the Contract line has also been increased as the new price affects the next billing interval.
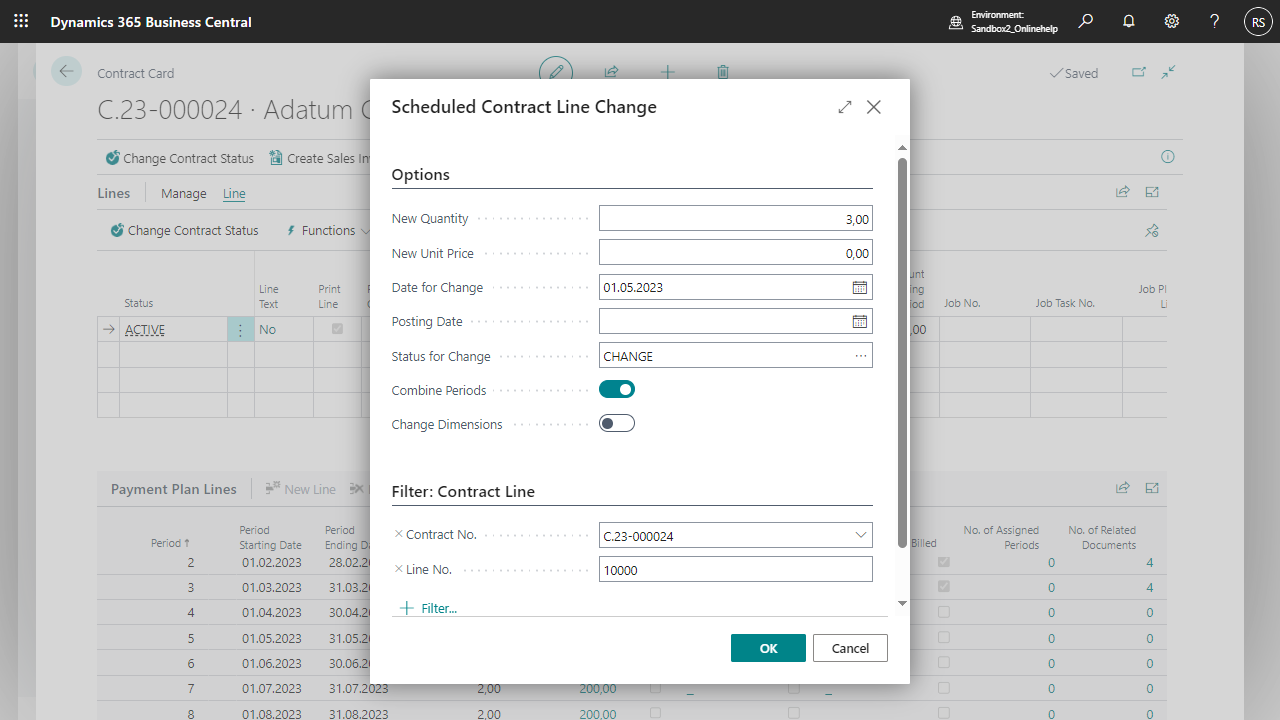 New Quantity: 3 – the Quantity increases from 2 to 3
New Unit Price: 0,00 – the Unit Price remains the same
Date for Change: 01.05.23 – the period from which the change comes into force
Posting Date: can be left blank as this entry does not trigger a sales document
Status for Change: the status that is set briefly to execute the change
Combine Periods: If activated, sales invoices which concern several periods are summarized on one invoice.
Change Dimensions: see Working With The App, Dimensions, Dimensions in Contract
Result:
New Quantity: 3 – the Quantity increases from 2 to 3
New Unit Price: 0,00 – the Unit Price remains the same
Date for Change: 01.05.23 – the period from which the change comes into force
Posting Date: can be left blank as this entry does not trigger a sales document
Status for Change: the status that is set briefly to execute the change
Combine Periods: If activated, sales invoices which concern several periods are summarized on one invoice.
Change Dimensions: see Working With The App, Dimensions, Dimensions in Contract
Result:
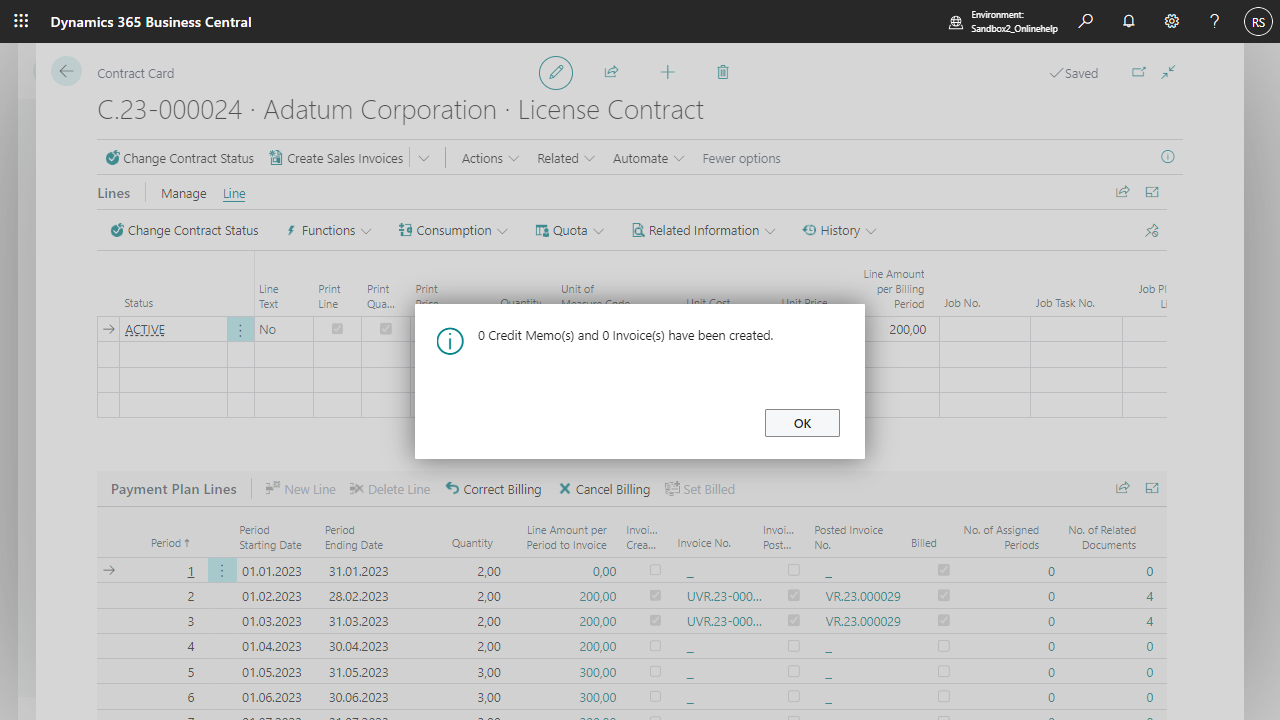 The quantity has been increased from 1 to 2 starting from period 5, which results in an increase of the line amount but no additional document.
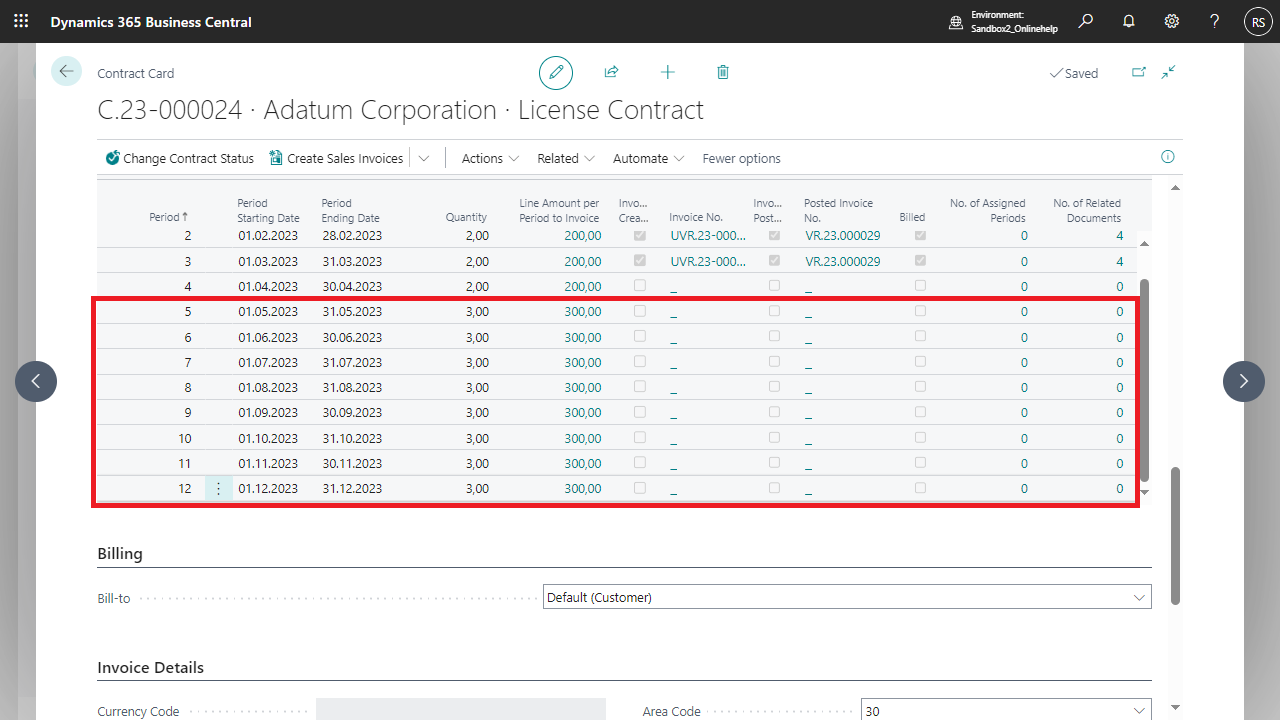 The quantity in the Contract line has not been increased because the new quantity does not yet affect the next billing interval.
Only when the new quantity affects the next billing interval, the new quantity is automatically transferred to the Contract line.
The quantity in the Contract line has not been increased because the new quantity does not yet affect the next billing interval.
Only when the new quantity affects the next billing interval, the new quantity is automatically transferred to the Contract line.
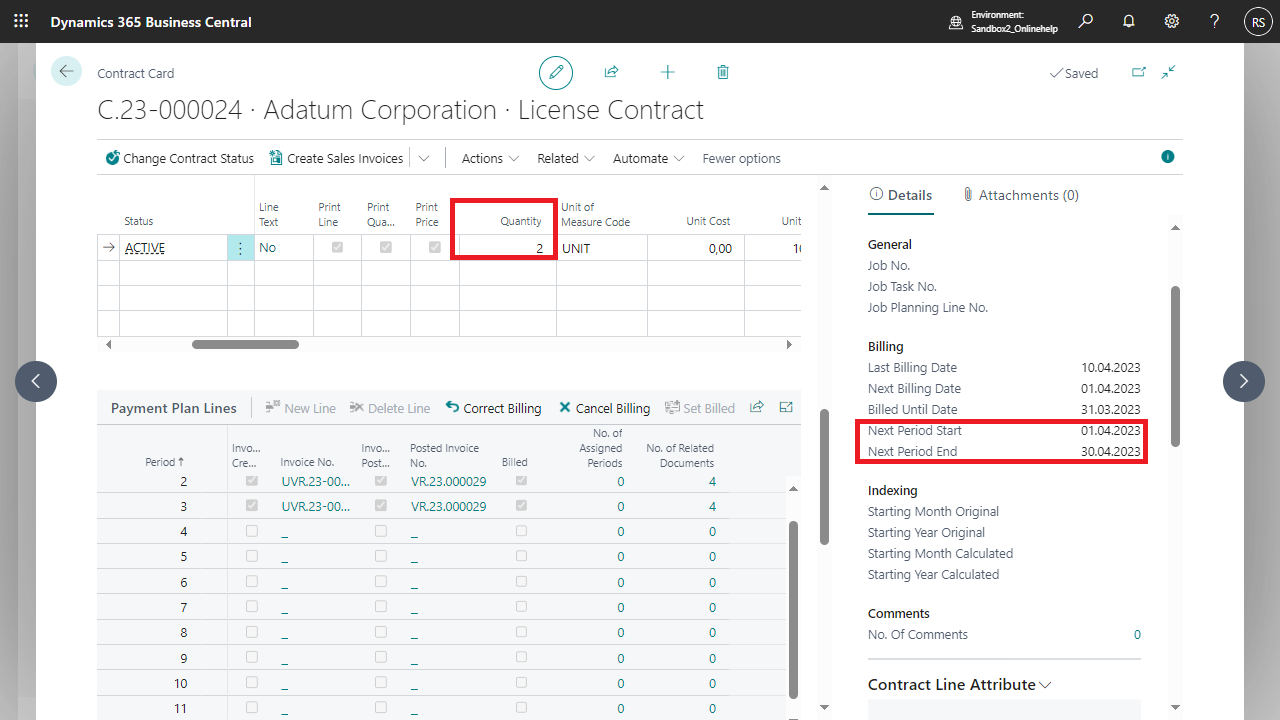
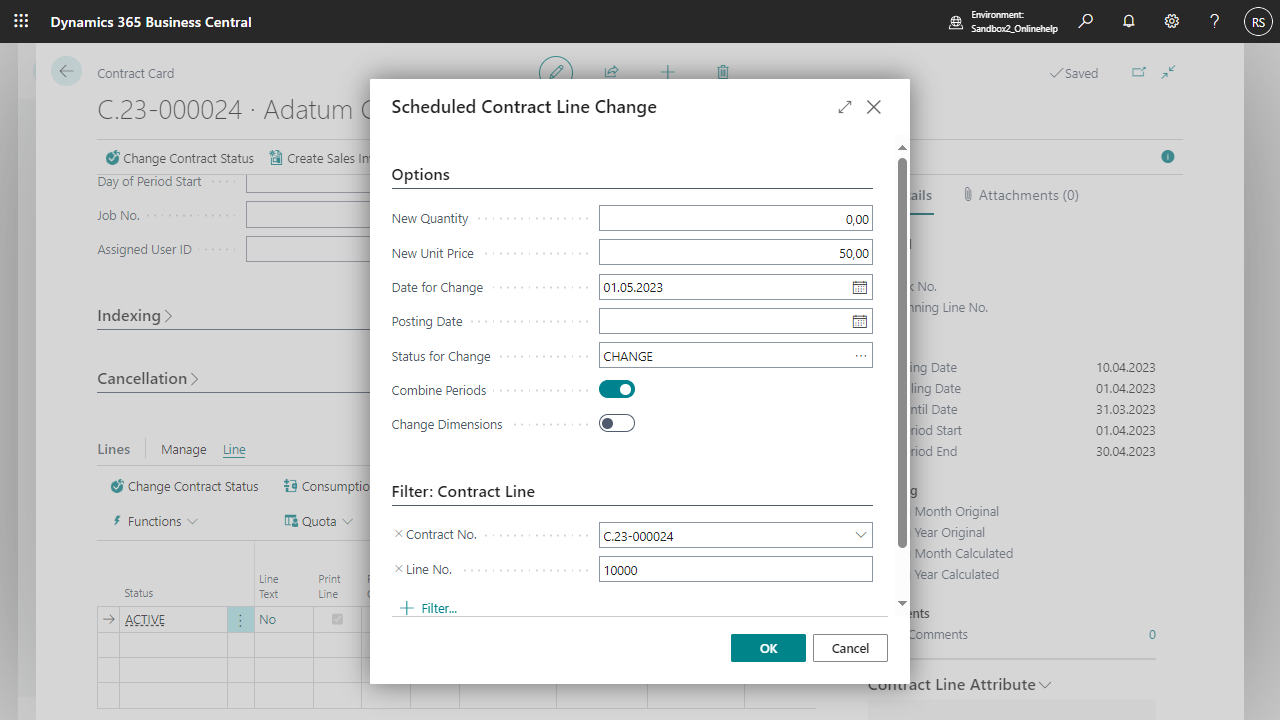 New Quantity: 0 – the Quantity remains the same
New Unit Price: 50,00 – the Unit Price is decreased to 50,00
Date for Change: 01.05.23 – the period from which the change comes into force
Posting Date: can be left blank as this entry does not trigger a sales document
Status for Change: the status that is set briefly to execute the change
Combine Periods: If activated, sales invoices which concern several periods are summarized on one invoice.
Change Dimensions: see Working With The App, Dimensions, Dimensions in Contract
Result:
New Quantity: 0 – the Quantity remains the same
New Unit Price: 50,00 – the Unit Price is decreased to 50,00
Date for Change: 01.05.23 – the period from which the change comes into force
Posting Date: can be left blank as this entry does not trigger a sales document
Status for Change: the status that is set briefly to execute the change
Combine Periods: If activated, sales invoices which concern several periods are summarized on one invoice.
Change Dimensions: see Working With The App, Dimensions, Dimensions in Contract
Result:
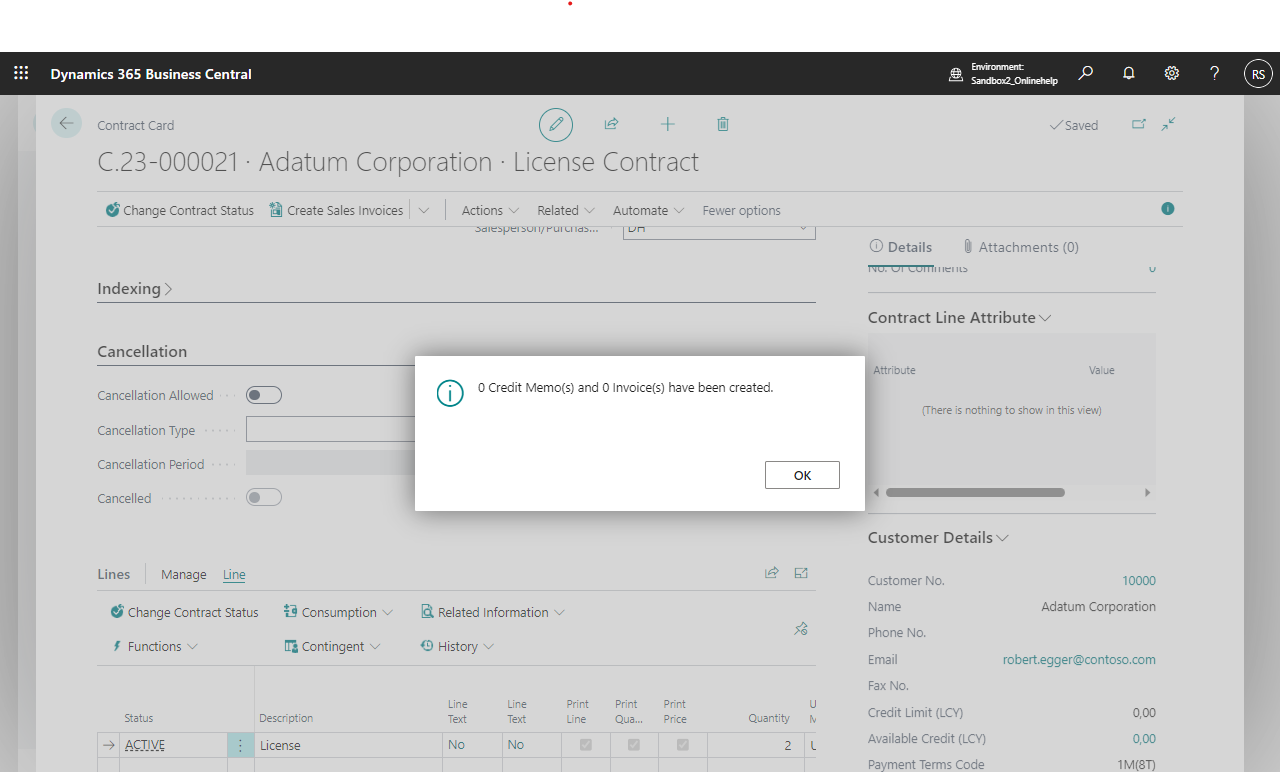 The unit price has been reduced from 100 to 50 starting from period 5, resulting in a reduction of the line amount but no additional document.
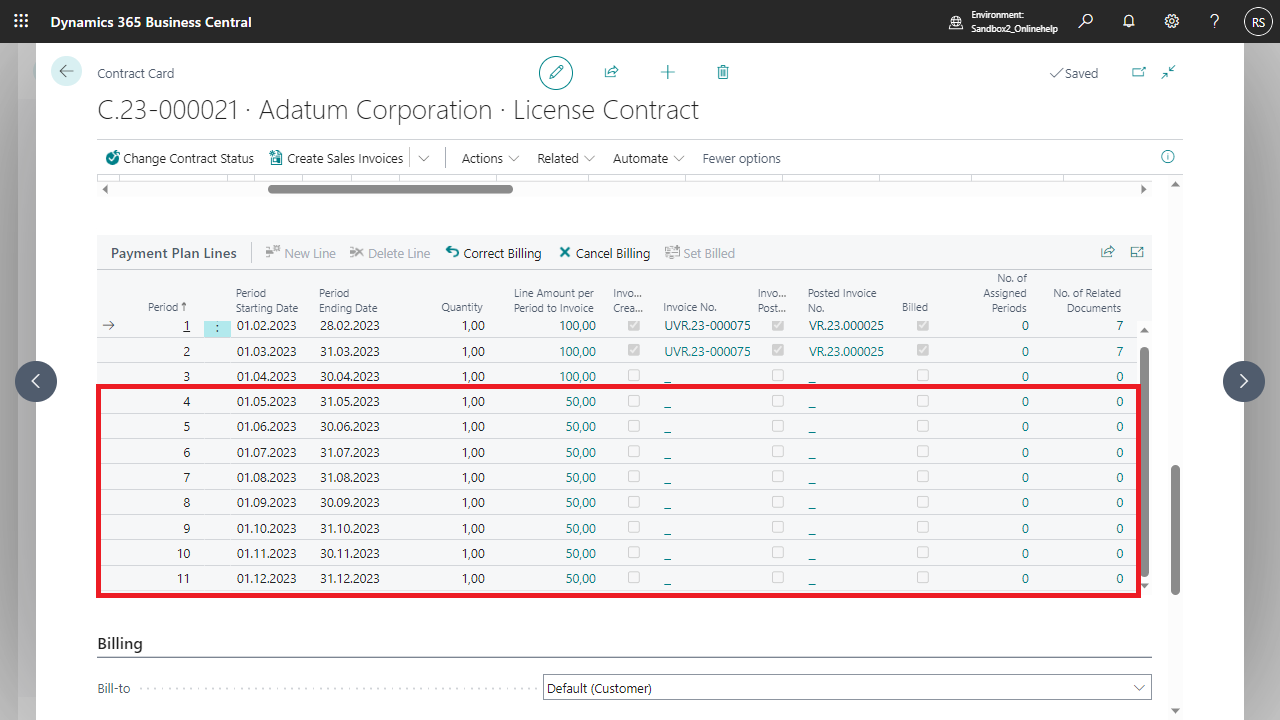 The unit price in the Contract line has not been changed, because the new price does not affect the next billing interval yet.
Only when the price affects the next billing interval, it will be automatically transferred to the Contract line.
The unit price in the Contract line has not been changed, because the new price does not affect the next billing interval yet.
Only when the price affects the next billing interval, it will be automatically transferred to the Contract line.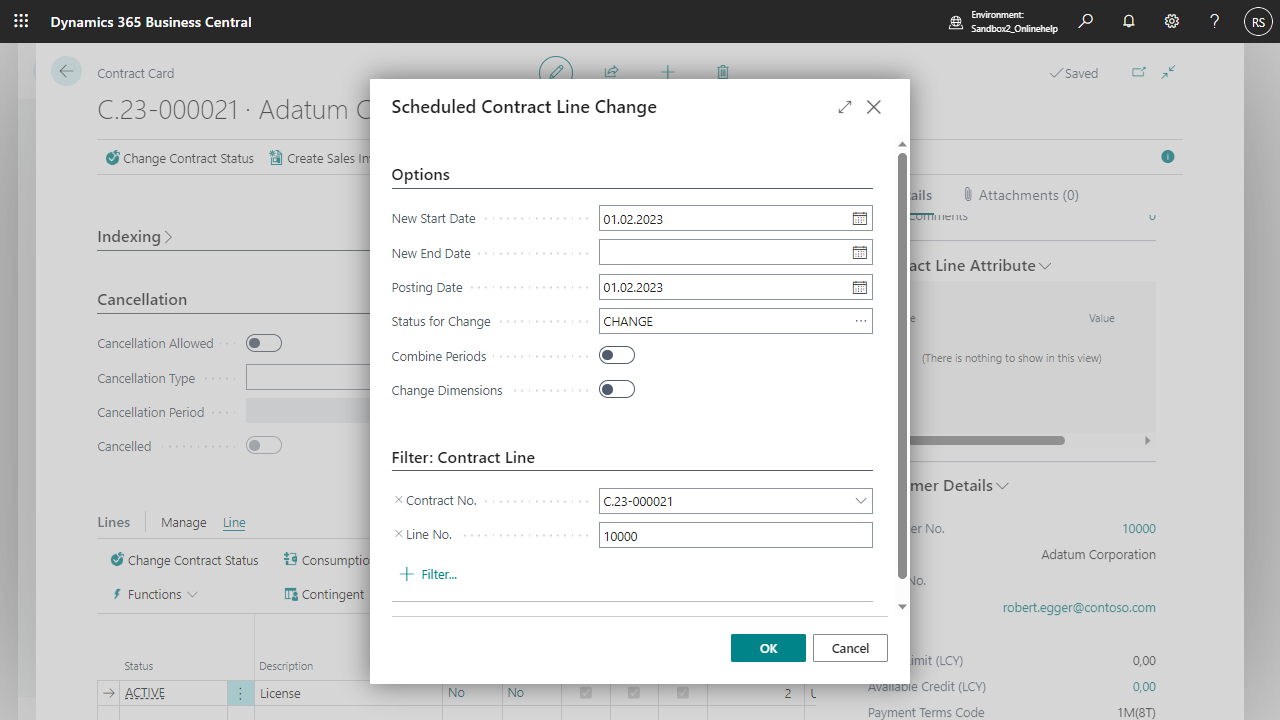 If you set the start date later and the first period has already been invoiced, a sales credit note will be created for it.
However, the original first period is no longer included in the new Payment Plan, and can therefore only be accessed and posted via the previous version of the Payment Plan.
If you set the start date later and the first period has already been invoiced, a sales credit note will be created for it.
However, the original first period is no longer included in the new Payment Plan, and can therefore only be accessed and posted via the previous version of the Payment Plan.


 In the Bundle field, select the Bundle value to enter the Bundle creation screen and create your Bundle there.
Bundles consist of a text line as a header and one or more item lines and are created for each Contract.
You can create the Bundle description as a default text and select it in the No. field, the components will be added individually.
Certain values, such as the term and extension and termination type, are maintained at the Bundle header level and automatically copied to all component lines.
In the Bundle field, select the Bundle value to enter the Bundle creation screen and create your Bundle there.
Bundles consist of a text line as a header and one or more item lines and are created for each Contract.
You can create the Bundle description as a default text and select it in the No. field, the components will be added individually.
Certain values, such as the term and extension and termination type, are maintained at the Bundle header level and automatically copied to all component lines.
 By clicking OK, the Bundle will be added to the Contract.
 The Bundle line (=Bundle header) is a remark line and is displayed in bold, the component lines are assigned to the Bundle header line via the respective line ID in the Belongs to Bundle field.
By default, the text, the quantity and the price are printed for the Bundle line. Printing is disabled for the component lines, but can be enabled for each individual component.
The Bundle line (=Bundle header) is a remark line and is displayed in bold, the component lines are assigned to the Bundle header line via the respective line ID in the Belongs to Bundle field.
By default, the text, the quantity and the price are printed for the Bundle line. Printing is disabled for the component lines, but can be enabled for each individual component.
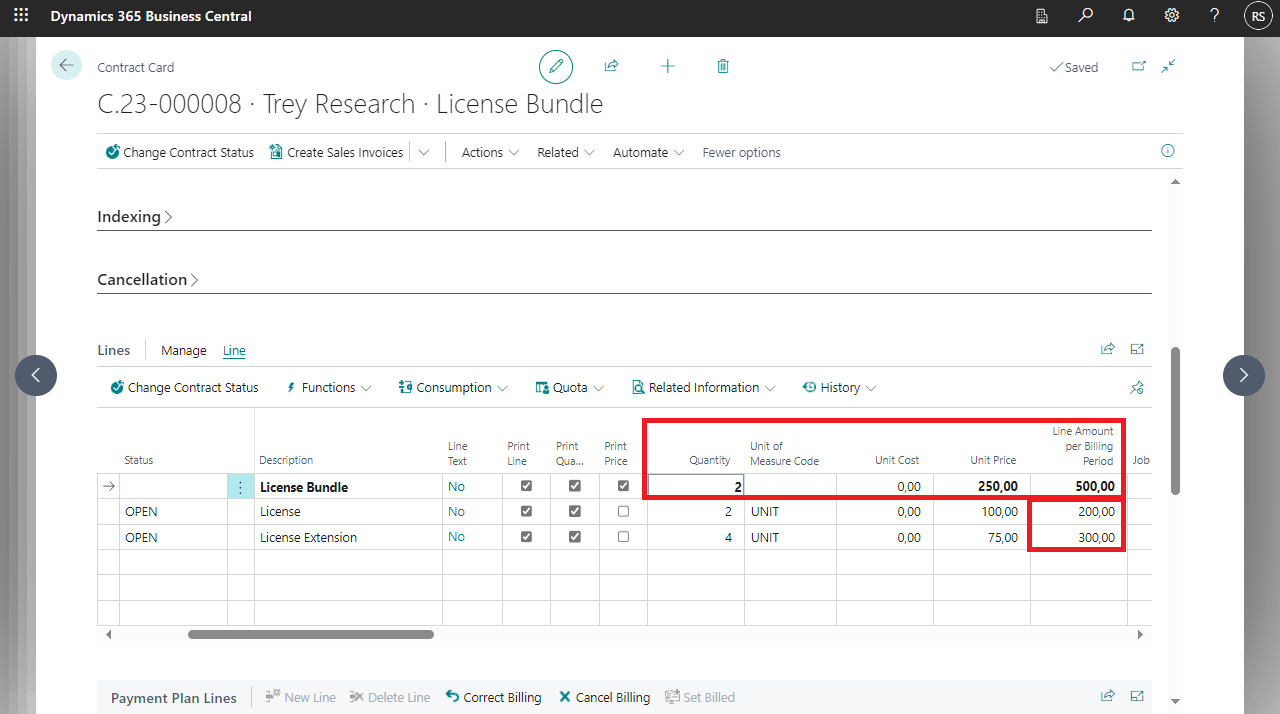 Values which must remain the same for the entire Bundle (e.g. Billing Type, Cancellation Type, etc.) cannot be changed in the Contract line. If these values must be edited afterwards, the Bundle entry mask can be called via Functions > Open Bundle.
All components of a Bundle must always have the same status. If you change the Contract line status of a component line, the status of all component line is automatically changed.
Payment Plans are created for the respective component lines, just as for normal Contract lines, and can then also be transferred to a sales invoice.
The print options from the Contract line are transferred to the invoice.
Values which must remain the same for the entire Bundle (e.g. Billing Type, Cancellation Type, etc.) cannot be changed in the Contract line. If these values must be edited afterwards, the Bundle entry mask can be called via Functions > Open Bundle.
All components of a Bundle must always have the same status. If you change the Contract line status of a component line, the status of all component line is automatically changed.
Payment Plans are created for the respective component lines, just as for normal Contract lines, and can then also be transferred to a sales invoice.
The print options from the Contract line are transferred to the invoice.
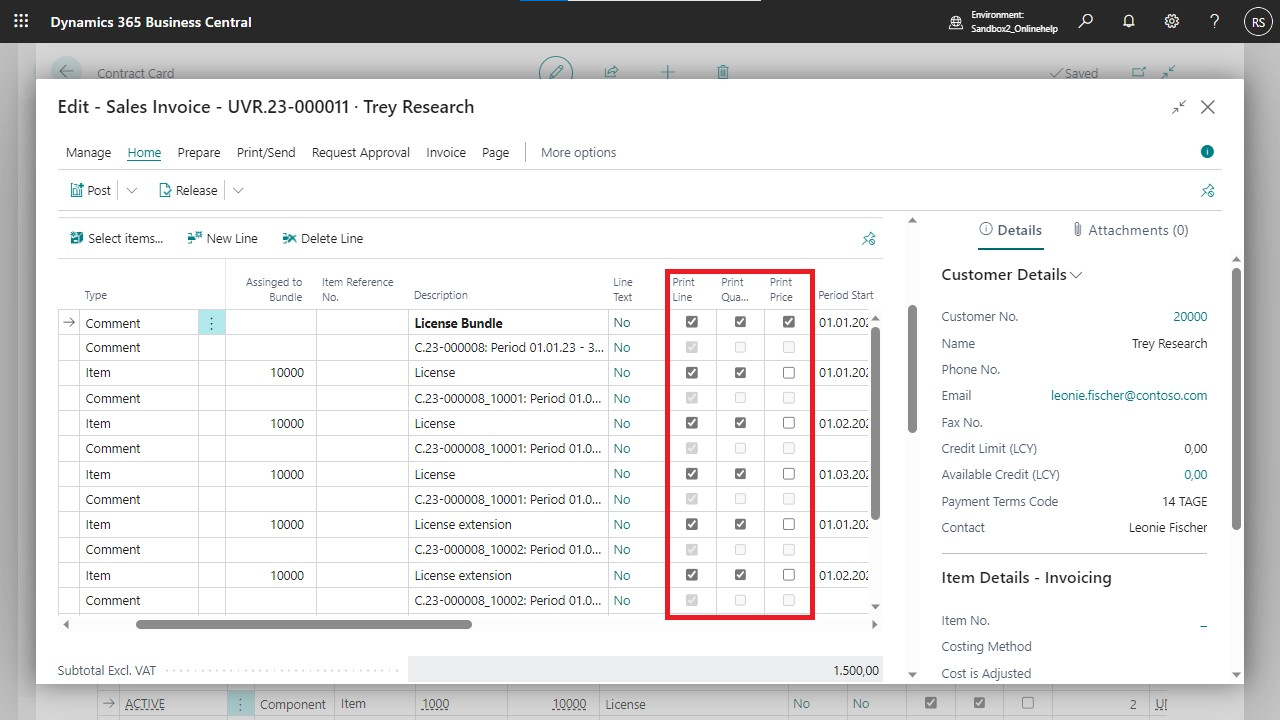

 Fill in the fields in the page and then click Send License Request. Please note that the licensing process may take some time. In the next few days you will receive an email with further information.
