Interface for AI-driven document processing tool by Finmatics.
Current Version: 28.2.1.0as of Business Central 28. For older BC versions, downgrades are available. AppSource Name: Finmatics Connector
Manual
Creation date: 2026/07/24 The current version of this manual can be found at:
☰ Contents
General
Finmatics Connector The Finmatics Connector adds the Finmatics AI-based document capture functionality to Microsoft Dynamics 365 Business Central...
Finmatics Access Data The Finmatics Connector operates exclusively in conjunction with a validated Finmatics account. Additional charges apply...
Setup
Finmatics Setup Before the Finmatics Connector can be used, its basic functionality must be set up...
Real Data Permissions Real Data Permissions add an additional level of security to actions and processes. This is to prevent test data from being accidentally interpreted as real data. Particularly critical actions and processes (e.g. sending data to an external service) can therefore only be executed if a real data permission has been granted for the current environment...
Master Data Most of the Finmatics actions can only be executed after the required Finmatics Master Data (Vendors and at least G/L Accounts or Items) have been activated and synchronized...
Training Data Finmatics is machine-learning-driven and requires training data to generate good results...
Tax Code Setup The Finmatics Tax Code Setup page is used to set up the VAT Prod. Posting Groups to be proposed when creating incoming Finmatics Documents in Business Central...
Unit of Measure Setup The Finmatics Unit of Measure Setup page is used to set up the Unit of Measure Codes that should be suggested in Business Central instead of the units determined by Finmatics...
Dropzone Setup In the NAVAX Dropzone Setup page the settings and defaults for the different Dropzones are defined...
Working with the App
Role Center Integration The Finmatics Connector is integrated into the Accountant and Accounting Manager roles, but can be accessed from any role via the Search function...
Incoming Finmatics Documents Incoming Finmatics Documents are displayed on the Incoming Finmatics Documents page and are either uploaded manually to Finmatics or transferred via other means (email, web scan, mobile app, etc.)...
Purchase Documents From incoming Finmatics Documents, Purchase Invoices and Purchase Credit Memos can be created. The documents are created either via the Incoming Finmatics Documents page or directly in the overview pages. The following fields, actions and FactBoxes are available on the overview pages...
Archive
Finmatics Service Log The Finmatics Service Log page displays detailed information about what has been sent to and what was returned from the service...
Information for Developers
Event Request
Appendix
Optional Extensions
NAVAX License Management The NAVAX License Management page (in older versions NAVAX License Overview or NCEX License Overview) displays the current license status of the NAVAX extensions...
Installation Notes
Release Notes
Docs / App / Finmatics Connector / General Finmatics Connector
The Finmatics Connector adds the Finmatics AI-based document capture functionality to Microsoft Dynamics 365 Business Central.
Navigation
The Finmatics Connector is integrated into the Accountant and Accounting Manager roles, but can be accessed from any role via the Search function.
For more information, see Working with the App, Role Center Integration.
Fields, actions, pages and reports originating from the extension are labeled with Finmatics.
The search terms "finmatics", "nvxfa", "ncfa" and "navax" are also recognized by "Tell me what you want to do".
Note
The Finmatics Connector was developed with the prefix NCFA resp. NVXFA.
NCFA resp. NVXFA stands for NAVAX Consulting resp. NAVAXFinmatics Connector.
Permission Sets
The following permission sets are available for the Finmatics Connector:
Name
Description
NVXFA
Finmatics Connector
You need these permissions to use the Finmatics Connector.
NVXFA, SETUP
Finmatics Connector Setup
You need these permissions to set up the Finmatics Connector.
For more information, see Setup, Finmatics Setup.
Extend existing Permission Sets
Important
Note that users who edit G/L Accounts or Vendors need the following additional permissions when the Finmatics Connector extension is installed:
Docs / App / Finmatics Connector / General Finmatics Access Data
The Finmatics Connector operates exclusively in conjunction with a validated Finmatics account. Additional charges apply.
How do I request my Finmatics access?
To create a new account with Finmatics, it is necessary for you to fill out the Contact form on the Finmatics website. Finmatics will promptly get in touch with you, providing your account details and guiding you through the initial steps in the interface.
Before the Finmatics Connector can be used, its basic functionality must be set up.
In the Finmatics Setup page the general settings and defaults are defined.
Finmatics Access Data, Fields
The first thing to do is to set up the connection with the Finmatics service. As soon as Environment, Username and Password are specified, the action Check Connection can be used to check whether the Finmatics service is reachable and a connection with the stored settings is possible.
For more information on how to request your Finmatics access, see General, Finmatics Access Data.
Finmatics Environment
Specifies whether the Finmatics production environment or the Finmatics test environment should be used.
Real Data Permission
Indicates whether data may be sent from the current Business Central environment to the Finmatics production environment. This additional security level prevents test data from being accidentally interpreted as real data. Click on the field to manage the Permissions.
For more information, see Setup, Real Data Permissions.
Important
When granting a real data permission, please check whether the current Business Central Company is linked to the correct Finmatics Client (Field: Client ID).
Make sure that several Business Central Companies are not accidentally linked to the same Finmatics Client. Especially if a company or database has been copied or a sandbox has been created from a production environment.
Specifies the length of time in milliseconds that the service is allowed to use, before aborting with an error. If you don't set a duration, then a default value is used. The default value is currently 100000 ms (100 seconds).
Company ID
Specifies which Finmatics Company (Organization) should be used. Finmatics Companies are created by Finmatics and set up for Business Central (System BC or ID 37). Each Company has a unique ID. The Companies can be managed via the Finmatics Web Frontend. Several Finmatics Clients can be subordinated to one Finmatics Company. Click on the AssistEdit button of the field to select from already existing Finmatics Companies.
Client ID
Specifies to which Finmatics Client the current Business Central Company is linked. Click on the AssistEdit button of the field to set up the link.
If no Finmatics Clients exist yet, a message appears and you can create a new Finmatics Client directly.
New Finmatics Clients can also be created on the selection page via the Create Finmatics Client action.
Note
The Finmatics Clients are created based on the Company Information of the current Business Central Company.
The following fields are considered:
Name
Address
Post Code
City
Country/Region Code (ISO Code)
VAT Registration No.
Registration No.
If this information later changes, you can update the data at Finmatics at any time via the AssistEdit button of the field.
Master Data, Fields
After the connection is fully set up, the master data must be synchronized with the Finmatics system.
Note
Basically, the Business Central System is the leading system (with a few exceptions). Therefore, if master data is changed via the Finmatics Web Frontend, this does not affect the data stored in Business Central.
Status
The status fields indicate whether the Master Data is activated.
Note
Most of the Finmatics actions can only be executed after the required Finmatics Master Data (Vendors and at least G/L Accounts or Items) have been activated and synchronized.
These fields specify whether the Master Data should be synchronized automatically when changes are made that affect the Finmatics Master Data. If the field is enabled, a Job Queue is automatically started which updates the data at Finmatics with a delay of max. 5 minutes.
Synchronize non-EU VAT
Specifies whether the VAT Registration No. should also be synchronized for Vendors whose Country/Region Code is not a member of the EU.
Synchronize Email and Phone No.
Specifies whether the EMail and the Phone No. of the Vendors should be synchronized.
G/L Account No. and Item No. Prefix
Specifies a prefix (e.g. A_ for G/L Accounts and I_ for Items) which is added to the accounts at Finmatics.
G/L Accounts and Items in Business Central can both be synchronized with the Accounts at Finmatics. If a G/L Account uses the same number as an Item, there will be overlaps. Assign a prefix to avoid these overlaps.
Determine Document Dimensions via 1st Line
Specifies whether the dimensions of the document (header) are to be determined via the 1st document line.
Transfer blank Dim. Codes
These fields specify whether empty dimension values in incoming Finmatics Documents should overwrite or remove any existing default values in Business Central.
Documents, Fields
After initializing and synchronizing the master data, you only need to define which Booking Type ID should be used for the purchasing documents. Also, upload training data to get good recognition results from the beginning.
Purch. Booking Type ID
Specifies to which Finmatics Booking Type the purchase documents are linked. Finmatics Booking Types are categories to which the various documents at Finmatics are assigned. Click on the AssistEdit button of the field to select from already existing Finmatics Booking Types.
Training Data uploaded
Finmatics is machine-learning-driven and requires training data to generate good results. This field indicates whether training data has been uploaded to Finmatics.
For more information, see Setup, Training Data.
Document Attachment
Specifies which file should be added as a document attachment when creating a document in Business Central. Finmatics provides each document in PDF format. Optionally, the original file sent to Finmatics (e.g. an image file) is also available.
Finmatics PDF
The PDF generated by Finmatics is attached to the document.
Original File
The file sent to Finmatics is attached to the document.
Original PDF or Finmatics PDF
If a PDF has been sent to Finmatics, this PDF will be attached as a document. Otherwise, the PDF generated by Finmatics will be attached.
Amount Control
Specifies whether the Amount Control should only be performed for Finmatics Documents or for all Documents when posting a Purchase Invoice or a Purchase Credit Memo.
When posting, the Amount Control checks whether the Total Amount Incl. VAT of the document matches the value in the Finmatics Control Amount Incl. VAT field.
For more information, see Working with the App, Purchase Documents.
Zero-Amount Documents
Specifies whether incoming Finmatics Documents that do not have an amount should be created as an invoice or a credit memo.
Determine Posting Description via 1st Line
Specifies whether the posting description of the document (header) is to be determined via the 1st document line if the posting text of the Finmatics Document is empty.
Prioritize Finmatics Article Number
Specifies whether to search for a Vendor Item No. using Finmatics Article Numbers when creating a document in Business Central. If a unique result is found, the Item No. is suggested in the document line.
If the According to Vendor option is selected, Finmatics Article Numbers are only taken into account for vendors where the Prioritize Finmatics Article Number field is set. The field can be found on the Vendor Card in the Invoicing section under Posting Details.
Auto. Receive Documents Status
Indicates whether a job queue is set up to automatically receive incoming Finmatics Documents. If a job queue exists, its current status is displayed. Click on the field to set up, manage or view the Job Queue.
Auto. Create Purch. Documents
Specifies whether the automatic document receipt should create incoming Finmatics Documents in Business Central when they are ready to be created.
Note
Only Finmatics Documents with Doc. Creation Status Ready are considered. Documents with Ready - Check Value(s) status are not created automatically.
If the Yes option is selected, all documents will be created automatically.
If the According to Vendor option is selected, documents will only be created automatically for vendors where the Auto. Create Finmatics Documents field is set. The field can be found on the Vendor Card in the Invoicing section under Posting Details.
History, Fields
Delete Service Log Date Calculation
Specifies the time period for deleting service log entries. If the field is empty, the period is assumed to be 1M (1 month).
For more information, see Archive, Finmatics Service Log.
Auto. Delete Service Log
Specifies whether to automatically delete all service log entries older than the period specified in the Delete Service Log Date Calculation field when creating new entries.
Log Service Requests
Specifies whether to store the data sent to the service.
Log Service Responses
Specifies whether the data returned by the service should be stored.
Actions
Check Connection
Checks if the Finmatics service can be reached and a connection with the stored settings is possible.
View the Finmatics Web Frontend Users of the Finmatics Client.
Master Data, Actions
Vendor Synchronization
Create or update the Business Partners at Finmatics (Master Data) based on the Business Central Vendors.
For more information, see Setup, Master Data.
G/L Account Synchronization
Create or update the Accounts at Finmatics (Master Data) based on the Business Central G/L Accounts.
For more information, see Setup, Master Data.
Item Synchronization
Create or update the Accounts at Finmatics (Master Data) based on the Business Central Items.
For more information, see Setup, Master Data.
Dimension Synchronization
Create or update the Dimensions at Finmatics (Master Data) based on the Business Central Dimensions.
For more information, see Setup, Master Data.
Project Synchronization
Create or update the Cost Keys at Finmatics (Master Data) based on the Business Central Projects.
For more information, see Setup, Master Data.
Deactivate
Deactivates the synchronization for selected Master Data.
If, for example, the Projects have been activated but you no longer want Finmatics to suggest Projects, you can deactivate the Projects with this action.
Setup, Actions
Training Data
Upload Business Central documents as training data to Finmatics.
For more information, see Setup, Training Data.
Tax Code Setup
View or set up the Finmatics Tax Codes.
For more information, see Setup, Tax Code Setup.
View or set up the settings and defaults for the Dropzone.
For more information, see Setup, Dropzone Setup.
Finmatics Support
Opens the Finmatics support home page.
System, Actions
Real Data Permissions
View or set up the Real Data Permissions of the Extension. This additional security level prevents test data from being accidentally interpreted as real data.
For more information, see Setup, Real Data Permissions.
NAVAX License Management
Opens the NAVAX License Management which displays the current license status of the NAVAX extensions.
For more information, see Appendix, NAVAX License Management.
Copy Company
To ensure that several Business Central companies are not accidentally linked to the same Finmatics Client, the following data is reset in the new company's Finmatics Setup when the Copy Company action is performed for a company:
Company ID
Client ID
Purch. Booking Type ID
Docs / App / Finmatics Connector / Setup Real Data Permissions
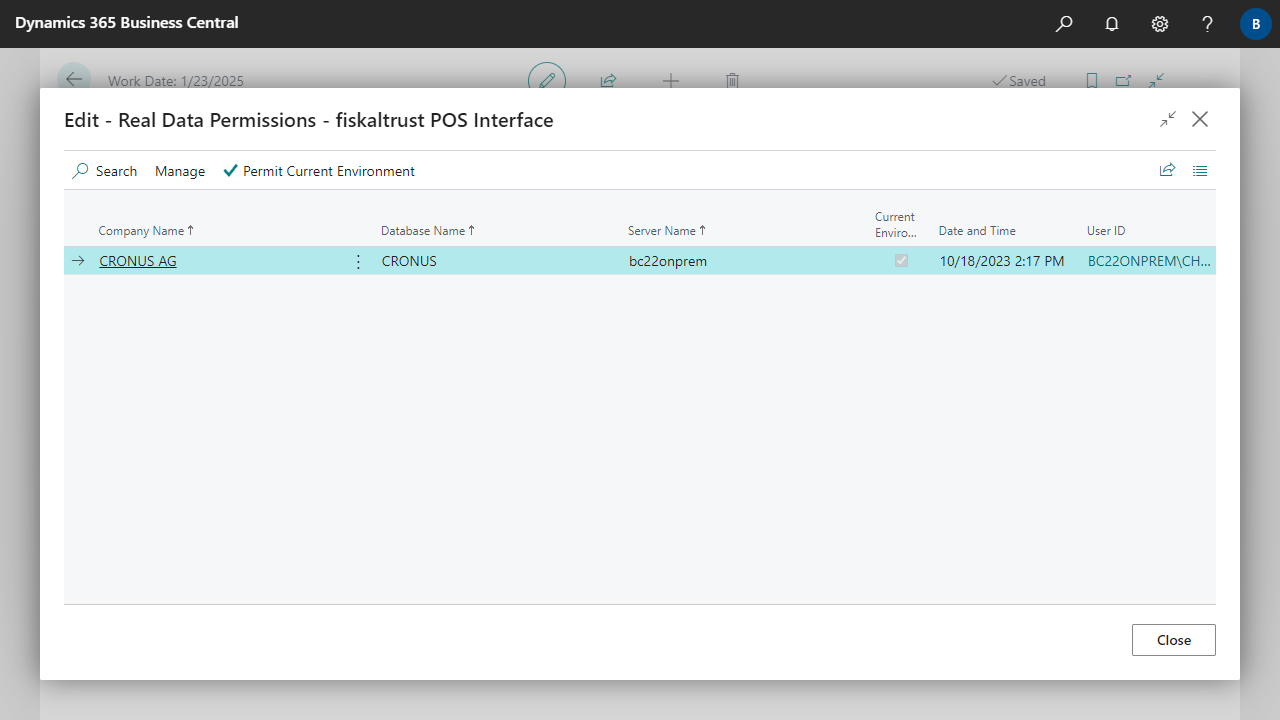
Real Data Permissions add an additional level of security to actions and processes. This is to prevent test data from being accidentally interpreted as real data. Particularly critical actions and processes (e.g. sending data to an external service) can therefore only be executed if a real data permission has been granted for the current environment.
Practical example
You create a new test database in an on-premises environment by copying the real database, which contains the fully set up fiskaltrust extension. The service of the fiskaltrust extension has the function to sign documents that are subject to the cash register obligation and to protect them against manipulation. Without an additional security level, data from the test database would also be forwarded to fiskaltrust, where it would be interpreted as real data and reported to the tax office. However, this is prevented by the real data permissions function.
Manage Real Data Permissions
The real data permissions of an extension can be viewed or managed via the setup page of the extension in the system area. In the setup of the real data permissions, an environment is defined by the company name, the database name and the server name.
Fields
Company Name
Specifies the company name of the permitted environment.
Database Name
Specifies the database name of the permitted environment.
Server Name
Specifies the server name of the permitted environment.
Current Environment
Specifies whether the permitted environment is the current environment.
Date and Time
Specifies the date and time when the environment was permitted.
User ID
Specifies the ID of the user who permitted the environment.
User Name
Specifies the name of the User ID.
Actions
Permit Current Environment
Grants a real data permission for the current environment.
Warning
Do not permit your current environment unless you are absolutely sure.
Once the environment is permitted, the secured action or process can be called or executed by all users. Although real data permissions can be deleted or removed at any time, this does not undo actions that have already been performed.
Docs / App / Finmatics Connector / Setup Master Data
Most of the Finmatics actions can only be executed after the required Finmatics Master Data (Vendors and at least G/L Accounts or Items) have been activated and synchronized.
Basically, the Business Central System is the leading system (with a few exceptions). Therefore, if master data is changed via the Finmatics Web Frontend, this does not affect the data stored in Business Central.
Required Master Data
Finmatics Vendor Synchronization
Via this page you can create or update the Finmatics Business Partners based on the Business Central Vendors.
Finmatics G/L Account Synchronization
Via this page you can create or update the Finmatics Accounts based on the Business Central G/L Accounts.
Only G/L Accounts with Account Type Posting are considered.
Finmatics Item Synchronization
Via this page you can create or update the Finmatics Accounts based on the Business Central Items.
Optional Master Data
Finmatics Dimension Synchronization
Via this page you can create or update the Finmatics Dimensions based on the Business Central Dimensions 1 to 6 (according to the General Ledger Setup).
Only Dimensions with Type Standard are considered.
Finmatics Project Synchronization
Via this page you can create or update the Finmatics Cost Keys based on the Business Central Projects.
Synchronization Pages
All synchronization pages are structured identically. The screenshots below show the Finmatics Vendor Synchronization.
The pages can be accessed via the Finmatics Setup in the Master Data area, or by clicking on the corresponding Status field.
For more information, see Setup, Finmatics Setup.
Fields
View
Specifies which data should be displayed on the page.
No.
Specifies the value stored in Business Central.
Name/Description
Specifies the value stored in Business Central.
Sync. Status
Indicates the current status of the synchronization.
Sync. Action
Indicates which action a (re)synchronization performs at Finmatics.
The following applies to the Finmatics Vendor Synchronization:
The field also indicates if a new Partner has been created by Finmatics, which now can be created as a Vendor via the Create in Business Central action.
Sync. Error Message
Specifies technical details in case of an error.
Last Sync.
Specifies the last date and time when the Business Central record was synchronized with the Master Data at Finmatics.
Last Sync. User ID
Specifies the ID of the user who performed the last synchronization.
Finmatics No.
Specifies the number with which the G/L Account or the Item is stored at Finmatics.
Master Data ID
Specifies the ID assigned by Finmatics for the Master Data.
Actions
Synchronize Data
Synchronizes the selected records. This creates or updates the Master Data at Finmatics based on the Business Central Master Data. The synchronization takes into account all selected lines except the synchronization exceptions.
Open in Web Frontend
Opens the record overview in the Finmatics Web Frontend.
Create Exception
Creates a Synchronization Exception for the selected records. Records for which a synchronization exception exists will no longer be synchronized with Finmatics.
Note
Records that have already been created at Finmatics will not be deleted at Finmatics. Use the Delete Data at Finmatics action if you want to delete the records at Finmatics.
Remove Exception
Removes the Synchronization Exception for the selected records.
Card
Opens the Card for the selected record.
Create in Business Central
Creates a new Vendor in Business Central based on this Finmatics Business Partner.
Note
Basically, the Business Central System is the leading system.
However, it may be that business partners are created by the Finmatics system or a Finmatics processing user. If there are new business partners in Finmatics, you will receive a notification and then you can use this action to create the business partner in Business Central.
Delete Data at Finmatics
Deletes the data stored at Finmatics for the selected records.
If, for example, you have created G/L Accounts at Finmatics that should no longer be available in Finmatics, you can remove these records with this action.
A Synchronization Exception is automatically created for all deleted records so that they are not accidentally created again at Finmatics during the next (automatic) synchronization.
Support, Actions
Show Detailed Data
Displays detailed information about the data stored at Finmatics. The information can be useful for technical support.
Show Service Log Entry
Displays the Service Log Entry for the record. The information can be useful for technical support.
For more information, see Archive, Finmatics Service Log.
Show Request/Response
View detailed information about what has been sent to and returned from the service. The information can be useful for technical support.
Deactivate Master Data
The Master Data can also be deactivated again in the Finmatics Setup in the Master Data area via the Deactivate action.
If, for example, the Projects have been activated but you no longer want Finmatics to suggest Projects, you can deactivate the Projects with this action.
For more information, see Setup, Finmatics Setup.
Docs / App / Finmatics Connector / Setup Training Data
Finmatics is machine-learning-driven and requires training data to generate good results.
The Finmatics Training Data page displays all Business Central documents that have been uploaded to Finmatics. Additional training data can be uploaded via the upload actions.
Fields
Date and Time
Specifies the date and time when the document was uploaded to Finmatics.
Document Type
Specifies the type of the Business Central document uploaded to Finmatics.
Document No.
Specifies the number of the Business Central document uploaded to Finmatics.
File Name
Specifies whether a file has been uploaded to Finmatics in addition with the document data, and if so, which file.
User ID
Specifies the ID of the user who uploaded the document to Finmatics.
Training Data ID
Specifies the ID assigned by Finmatics for the uploaded document.
Uploads posted Purchase Invoices resp. Purchase Credit Memos as training data to Finmatics.
Options
Finmatics Environment
Indicates whether the data is sent to the Finmatics production environment or to the Finmatics test environment.
Include Incoming Document Files
Specifies whether to upload incoming document files (main attachment - PDF or image) as training data.
Include Document Attachments
Specifies whether to upload document attachments (PDF or image) as training data. If an incoming document file has already been found for the document, the document attachments are no longer considered. PDF files are searched for first followed by image files if no pdf file was found. If there are multiple PDF files or image files, no file will be uploaded.
Include already uploaded Documents
Specifies whether previously uploaded documents should be uploaded again. This updates the previously uploaded data.
Cancel on Error
Stops uploading when an error occurs and displays the cause of the error.
Delete Training Data
Deletes the selected training data at Finmatics.
Support, Actions
Show Detailed Data
Displays detailed information about the data stored at Finmatics. The information can be useful for technical support.
Show Service Log Entry
Displays the Service Log Entry for the record. The information can be useful for technical support.
For more information, see Archive, Finmatics Service Log.
Show Request/Response
View detailed information about what has been sent to and returned from the service. The information can be useful for technical support.
The Finmatics Tax Code Setup page is used to set up the VAT Prod. Posting Groups to be proposed when creating incoming Finmatics Documents in Business Central.
Finmatics assigns the fields Tax Code and Tax Percent to each line of an incoming Finmatics Document. This combination is then used to determine the VAT Prod. Posting Group for each document line when the document is created in Business Central.
Tip
You could also leave this setup empty and only complete it when you need to.
If a combination of Tax Code and Tax Percent has not yet been set up when creating a document in Business Central, you will be notified and redirected directly to this page to complete the missing setup.
Fields
Tax Code
Specifies the code that is determined and provided for incoming Finmatics Documents.
Tax Percent
Specifies the value that is determined and provided for incoming Finmatics Documents.
Description
Specifies a description.
Purch. VAT Prod. Posting Group
Specifies the VAT Prod. Posting Group to be proposed for this combination of Tax Code and Tax Percent.
Actions
Download
Via this action the most common Finmatics Tax Codes can be downloaded. This allows you to create or update the setup quickly and easily.
Import
Imports the Finmatics Tax Codes from a file.
Export
Exports the Finmatics Tax Codes to a file.
Docs / App / Finmatics Connector / Setup Unit of Measure Setup
The Finmatics Unit of Measure Setup page is used to set up the Unit of Measure Codes that should be suggested in Business Central instead of the units determined by Finmatics.
Tip
You could also leave this setup empty and only complete it when you need to.
If a unit is determined when creating a document in Business Central that does not exist, you will be notified and redirected directly to this page to complete the missing setup.
Fields
Finmatics Unit
Specifies the Unit that is determined and provided for incoming Finmatics Document Lines.
Vendor No.
Specifies the vendor for which the setup for this unit is valid. If no vendor is specified, the setup for this unit applies to all vendors for which no separate setup for this unit has been defined.
Unit of Measure Code
Specifies the Unit of Measure Code to be proposed for this Finmatics Unit.
In the NAVAX Dropzone Setup page the settings and defaults for the different Dropzones are defined.
The NAVAX Dropzone can be used by various extensions. These extensions automatically add further options in the Dropzone field. For example, the NAVAX extension NAVAX Drag & Drop Document Attachments adds the option Document Attachments and the NAVAX extension Finmatics Autonomous Accounting adds the option Incoming Finmatics Documents.
Note
NAVAX Dropzones are suitable for upload sizes up to 120000 KB (120 MB).
If you change the settings, the page that displays the Dropzone may need to be reloaded or refreshed for the new settings to take effect.
Fields
Dropzone
Specifies for which Dropzone the settings apply.
The settings of the Default dropzone apply to all dropzones that do not have their own settings.
Max. Upload Size (KB)
Specifies the maximum total size of all files in KB that may be uploaded at the same time.
The default value that is suggested is 5000 KB (5 MB). The maximum value that can be entered is 120000 KB (120 MB).
Note
When you try to upload large files, your system decides how big those files can be. If the file is larger than what your system allows, you will likely see an error message or the upload will not go through.
Max. No. of Files
Specifies the maximum number of files that may be uploaded at the same time.
Allowed File Extensions
Specifies which file extensions may be uploaded. If the field is empty, all extensions are allowed. If multiple extensions are allowed, they can be specified separated by a comma. Example: pdf,doc*,xls*,png,txt,zip
Tip
If you specify 'doc', only files with .doc file extension may be uploaded. If 'doc*' is specified, files with file extension .docx, .docm etc. may also be uploaded.
Extract zip Files
Specifies whether *.zip files should be automatically decompressed or unzipped during upload.
Height %
Specifies the height of the dropzone as a percentage. The value must be between 50 and 100.
Timeout (Milliseconds)
Specifies the length of time in milliseconds that a file may take to upload before the process terminates with an error. If you don't set a duration, then a default value is used. The default value is currently 100000 ms (100 seconds).
Docs / App / Finmatics Connector / Working with the App Role Center Integration
The Finmatics Connector is integrated into the Accountant and Accounting Manager roles, but can be accessed from any role via the Search function.
Cues
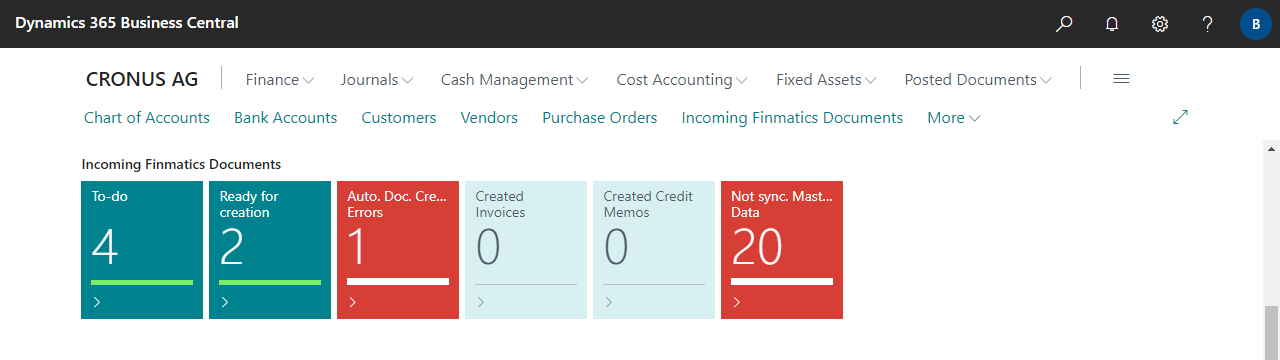
In addition, the following cues (status tiles) are available:
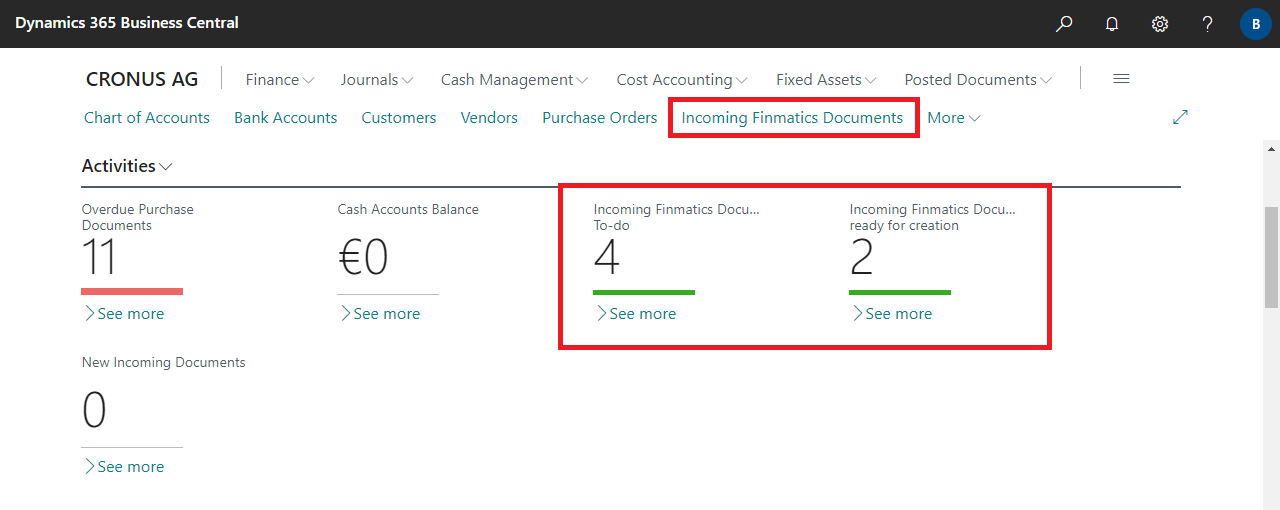
Incoming Finmatics Documents
To-do
Specifies the number of incoming Finmatics Documents that still need to be manually checked and confirmed. Documents are either uploaded manually to Finmatics or transferred via other means (email, web scan, mobile app, etc.). If not all fields can be determined automatically, or if discrepancies are detected, then a To-do is created and the document must be checked and confirmed manually.
For more information, see Working with the App, Incoming Finmatics Documents.
Ready for creation
Specifies the number of incoming Finmatics Documents ready for creation in Business Central. Documents are either uploaded manually to Finmatics or transferred via other means (email, web scan, mobile app, etc.). Once all fields are captured and/or predicted, and if no discrepancies are detected, documents are automatically ready for creation.
For more information, see Working with the App, Incoming Finmatics Documents.
Auto. Doc. Creation Errors
Specifies the number of incoming Finmatics Documents where an error occurred during automatic document creation.
For more information, see Working with the App, Purchase Documents.
Created Invoices
Specifies the number of Finmatics Documents that have already been created as a purchase invoices in Business Central but have not yet been posted.
For more information, see Working with the App, Purchase Documents.
Created Credit Memos
Specifies the number of Finmatics Documents that have already been created as a purchase credit memo in Business Central but have not yet been posted.
For more information, see Working with the App, Purchase Documents.
Not sync. Master Data
Specifies the number of Master Data that need to be synchronized with Finmatics. If the automatic synchronization is enabled, the records are automatically synchronized with a delay of max. 5 minutes.
For more information, see Setup, Master Data.
Docs / App / Finmatics Connector / Working with the App Incoming Finmatics Documents
Incoming Finmatics Documents are displayed on the Incoming Finmatics Documents page and are either uploaded manually to Finmatics or transferred via other means (email, web scan, mobile app, etc.).
If not all fields can be determined automatically, or if discrepancies are detected, then a To-do is created and the document must be checked and confirmed manually. Once all fields are captured and/or predicted, and if no discrepancies are detected, documents are automatically ready for creation in Business Central. Use the Receive (Update) action to retrieve the current Finmatics Documents and their current status.
Fields
View
Specifies which data should be displayed on the page.
Created at Finmatics on
Displays when the document was created or uploaded to Finmatics.
Finmatics Doc. Status
Displays the values of the Finmatics status fields (status | controlStatus | verificationLevel) for the document. The fields are determined or updated when the Receive (Update) action is called and determine the value in the Doc. Creation Status field.
Doc. Creation Status
The status of document creation is determined as follows:
status
processing
Processing
error
Processing Error
finished
controlStatus
pending
Processing
error
Not ready - Check Document
Other values
verificationLevel
-10
Cannot verify
0
Not ready - Check Document
10 oder 20
controlStatus
warning
Ready - Check Value(s)
Other values
Ready
Other values
Processing Error
In the first step, the status value is checked:
For processing the document creation status is set to Processing.
For error the document creation status is set to Processing Error.
For finished the controlStatus value is checked in the next step.
If another value is transmitted, the document creation status is also set to Processing Error.
After the status value has been checked and found to be OK, the controlStatus value is checked:
For pending the document creation status is set to Processing.
For error the document creation status is set to Not ready - Check Document.
Other values are skipped and only checked in the next step.
In the last step, the verificationLevel value is checked:
For -10 the document creation status is set to Cannot verify.
For 0 the document creation status is set to Not ready - Check Document.
For 10 or 20 the controlStatus value is checked again:
For warning the document creation status is set to Ready - Check Value(s).
If another value is transmitted, the document creation status is set to Ready.
Received (Updated) on
Indicates when the displayed records were last updated or retrieved.
Document Type
Displays the value that Finmatics has determined for the document.
Invoice No.
Displays the value that Finmatics has determined for the document.
Workflow Status
Finmatics provides its own workflow for checking incoming documents. If this workflow is used, the field shows the current workflow status.
Note
Only documents with Workflow Status Approved or Skipped may be created in Business Central.
Doc. Creation Status
Specifies whether Finmatics Document is ready for creation in Business Central. The status is determined via the Finmatics Doc. Status field.
The field is determined or updated when the Receive (Update) action is called.
Processing indicates that the document is currently being analyzed by Finmatics.
Processing Error indicates that the document could not be processed.
Not ready - Check Document indicates that not all fields could be determined automatically and the document has to be checked and confirmed manually.
Cannot verify indicates that the document has been set to this status via the Web Frontend.
Ready - Check Value(s) indicates that the document is basically ready for creation in Business Central, but some fields should be checked and confirmed manually to be on the safe side.
Ready indicates that the document is ready for creation in Business Central.
Note
Only documents with Doc. Creation Status Ready or Ready - Check Value(s) may be created in Business Central.
Documents with Ready - Check Value(s) status are not considered by the automatic document creation.
Auto. Doc. Creation Error
Specifies whether an error during the automatic document creation has occurred.
Auto. Doc. Creation Error Message
Specifies technical details in case of an error.
Invoice Date
Displays the value that Finmatics has determined for the document.
Partner Number
Displays the value that Finmatics has determined for the document.
Partner Name
Displays the value that Finmatics has determined for the document.
Order Numbers
Displays the value that Finmatics has determined for the document. Click on the field to view the Orders.
Amount Including VAT
Displays the value that Finmatics has determined for the document.
Currency
Displays the value that Finmatics has determined for the document.
Document ID
Specifies the ID assigned by Finmatics for the document.
Actions
Upload
Upload new documents to Finmatics. Incoming Finmatics Documents are either uploaded manually to Finmatics or transferred via other means (email, web scan, mobile app, etc.). After uploading the document, it will be in Processing status until it has been analyzed by Finmatics. Use the Receive (Update) action to retrieve the current Finmatics Documents and their current status.
Tip
Documents can also be uploaded via a zip file. Zip files are always unzipped when uploaded.
Receive (Update)
Updates the displayed records resp. retrieves the current Finmatics Documents and their current status.
Check (Verify)
Opens the document in the Finmatics Web Frontend where it can be further edited.
Open To-do in Web Frontend
Opens the To-do overview in the Finmatics Web Frontend.
Create in Business Central
Creates the selected Finmatics Documents in Business Central. Only documents that are ready for creation (Doc. Creation Status = Ready or Ready - Check Value(s)) are considered. Once a Finmatics Document is created in Business Central, it is removed from this view. If a created document is deleted, it will appear again in this view after the data is updated.
Note
If a document has been created in Business Central, changes in the Finmatics Web Frontend no longer affect the created document. However, you can delete the created document in Business Central at any time and create it again afterwards.
Create and Open in Business Central
Same as Create in Business Central action but opens the document as soon as it is created. It is not possible to select multiple documents here.
FactBoxes
Created Documents
In this area, additional information such as the number of documents already created but not yet posted is displayed.
Created Invoices
Specifies the number of Finmatics Documents that have already been created as a purchase invoices in Business Central but have not yet been posted.
For more information, see Working with the App, Purchase Documents.
Created Credit Memos
Specifies the number of Finmatics Documents that have already been created as a purchase credit memo in Business Central but have not yet been posted.
For more information, see Working with the App, Purchase Documents.
Not sync. Master Data
Specifies the number of Master Data that need to be synchronized with Finmatics. If the automatic synchronization is enabled, the records are automatically synchronized with a delay of max. 5 minutes.
For more information, see Setup, Master Data.
Auto. Receive Documents
Indicates whether a job queue is set up to automatically receive incoming Finmatics Documents. If a job queue exists, its current status is displayed. Click on the field to set up, manage or view the Job Queue.
Upload
This area provides a Dropzone that can be used to upload new documents to Finmatics via drag and drop. You can view or set up the settings and defaults for the Dropzone via the Dropzone Setup action.
For more information, see Setup, Dropzone Setup.
Note
In Business Central 14 this area is only available in the Web Client.
Support, Actions
Show Detailed Data
Displays detailed information about the data stored at Finmatics. The information can be useful for technical support.
Show Service Log Entry
Displays the Service Log Entry for the last time the records were received. The information can be useful for technical support.
For more information, see Archive, Finmatics Service Log.
Show Request/Response
View detailed information about what has been sent to and returned from the service the last time the records were received. The information can be useful for technical support.
View the system commands that will be sent to the service in the background during the next update of the incoming documents. The information can be useful for technical support.
Which fields are transferred?
The following fields are transferred from the Finmatics document when a Business Central document is created:
Quantity
If no quantity is specified, the quantity is automatically set to 1.
Gross Amount or Net Amount
Direct Unit Cost
Depending on whether prices in the document are specified with or without VAT, either the Gross Amount field or the Net Amount field is used.
Note
The amount is divided by the quantity.
Booking Text
Description
Dimension 1 to 6
Dimension 1 to 6
This is only taken into account if the dimensions are activated.
Cost Key
Project No.
This is only taken into account if the projects are activated.
Order Numbers
Finmatics Order Numbers
The number is added to the field in the purchase header if it is not already included there.
Docs / App / Finmatics Connector / Working with the App Purchase Documents
From incoming Finmatics Documents, Purchase Invoices and Purchase Credit Memos can be created. The documents are created either via the Incoming Finmatics Documents page or directly in the overview pages. The following fields, actions and FactBoxes are available on the overview pages.
Tip
Purchase documents can also be received and created automatically.
For more information, see Setup, Finmatics Setup.
Fields
Finmatics Document
Specifies whether the document was created from Finmatics.
Finmatics Control Amount Incl. VAT
Specifies an amount that must match the total amount of the document when posting.
The field is displayed only on the Card.
In the Finmatics Setup you can specify whether the check should be performed only for Finmatics Documents or for all Documents.
For more information, see Setup, Finmatics Setup.
Finmatics Order Numbers
Displays the value that Finmatics has determined for the document. Click on the field to view the Orders.
The field is displayed only on the Card.
Actions
Incoming Finmatics Documents
View all incoming Finmatics Documents. Documents are either uploaded manually to Finmatics or transferred via other means (email, web scan, mobile app, etc.).
For more information, see Working with the App, Incoming Finmatics Documents.
Upload
Upload new documents to Finmatics. Incoming Finmatics Documents are either uploaded manually to Finmatics or transferred via other means (email, web scan, mobile app, etc.). After uploading the document, it will be in Processing status until it has been analyzed by Finmatics. Use the Receive (Update) action to retrieve the current Finmatics Documents and their current status.
Tip
Documents can also be uploaded via a zip file. Zip files are always unzipped when uploaded.
Receive (Update)
Updates the displayed records resp. retrieves the current Finmatics Documents and their current status.
Open To-do in Web Frontend
Opens the To-do overview in the Finmatics Web Frontend.
Create in Business Central
Creates all Finmatics Documents that are ready for creation (Doc. Creation Status = Ready) in Business Central.
Note
Documents with Ready - Check Value(s) status are not considered by this action.
FactBoxes
Incoming Finmatics Documents
This area displays additional information such as the number of incoming Finmatics Documents that still need to be manually checked and confirmed or that are already ready for creation in Business Central.
To-do
Specifies the number of incoming Finmatics Documents that still need to be manually checked and confirmed. Documents are either uploaded manually to Finmatics or transferred via other means (email, web scan, mobile app, etc.). If not all fields can be determined automatically, or if discrepancies are detected, then a To-do is created and the document must be checked and confirmed manually.
For more information, see Working with the App, Incoming Finmatics Documents.
Ready for creation
Specifies the number of incoming Finmatics Documents ready for creation in Business Central. Documents are either uploaded manually to Finmatics or transferred via other means (email, web scan, mobile app, etc.). Once all fields are captured and/or predicted, and if no discrepancies are detected, documents are automatically ready for creation.
For more information, see Working with the App, Incoming Finmatics Documents.
Not sync. Master Data
Specifies the number of Master Data that need to be synchronized with Finmatics. If the automatic synchronization is enabled, the records are automatically synchronized with a delay of max. 5 minutes.
For more information, see Setup, Master Data.
Auto. Receive Documents
Indicates whether a job queue is set up to automatically receive incoming Finmatics Documents. If a job queue exists, its current status is displayed. Click on the field to set up, manage or view the Job Queue.
Auto. Doc. Creation Errors
Specifies the number of incoming Finmatics Documents where an error occurred during automatic document creation.
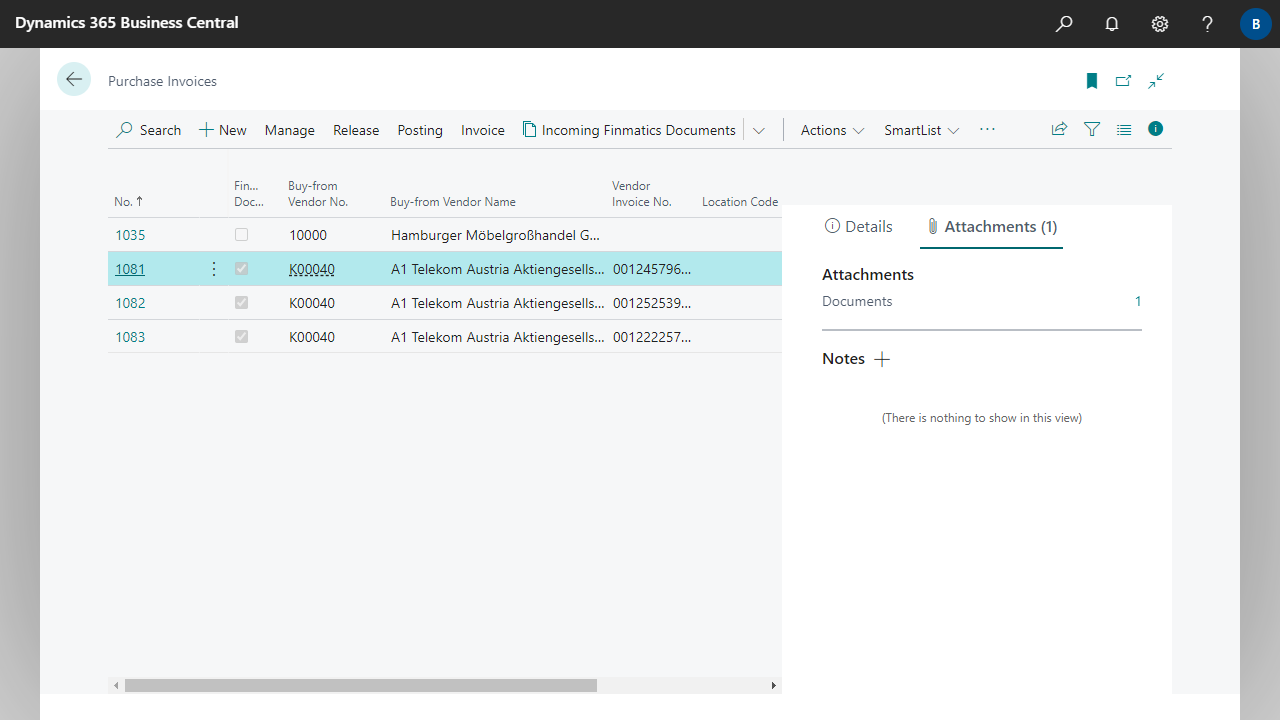
Attachments
When a document is created in Business Central, a document attachment is automatically added. Via the Document Attachment field in the Finmatics Setup it is possible to specify which file should be used.
For more information, see Setup, Finmatics Setup.
Finmatics Document View
In the Purchase Invoices and Purchase Credit Memos, the incoming Finmatics Document is displayed as a PDF in the Finmatics document view group.
Tip
If the mouse pointer is placed over the PDF, the view can be zoomed using the key combination Ctrl + mouse wheel. To do this, press and hold the Ctrl key and turn the mouse wheel.
The FactBox action View can be used to display the PDF in a larger view. From there, it is also possible to open the PDF via Open this page in a new window (top right) in a separate window that is detached from the current window.
Note
In Business Central 14 this area is only available in the Web Client.
Posted Documents
The following fields are available in the Posted Purchase Invoices and the Posted Purchase Credit Memos.
Finmatics Document
Specifies whether the document was created from Finmatics.
The Finmatics Service Log page displays detailed information about what has been sent to and what was returned from the service.
Fields
Date and Time
Specifies the date and time when the entry was created.
Type
Specifies the type of the entry.
Test Environment
Specifies whether the data has been sent to the Finmatics Test Environment.
HTTP Request URL
Specifies the address used for communication with the service.
HTTP Request Method
Specifies the method used for communication with the service.
HTTP Status Code
Specifies the HTTP status code returned when communicating with the service.
HTTP Status Message
Specifies the HTTP status message returned when communicating with the service.
Error
Specifies whether an error has occurred.
Error Message
Specifies technical details in case of an error.
Archived Request Exists
Specifies whether data has been sent to the service and stored in the log.
Archived Response Exists
Specifies whether data was returned from the service and stored in the log.
Response Time
Specifies the response time from the service.
User ID
Specifies the ID of the user who created the entry.
Company ID
Specifies to which Finmatics Company the record belongs.
Client ID
Specifies to which Finmatics Client the record belongs.
Entry No.
Specifies the number assigned to the entry.
Actions
Show Request/Response
View detailed information about what has been sent to and returned from the service. The information can be useful for technical support.
Delete entries older than...
Deletes log entries that are older than the period specified in the Delete Log Entries Date Calculation field in the Finmatics Setup.
For more information, see Setup, Finmatics Setup.
Delete all entries
Deletes all log entries.
Docs / App / Finmatics Connector / Information for Developers Event Request
If you're building your own app and need something specific from us, like an event, you can help improve the general extensibility of our apps. We'll have a look at your request, and if we can we'll implement it asap. If we can't we'll let you know and briefly explain why not. When that happens, don't be discouraged. Go back to the drawing board, see if you can work it out, and then come back and submit another request.
If, in addition to the Finmatics Connector, the Excel Report Builder extension is installed, you will have access to the following evaluations via the Download Area of the Excel Report Builder:
Finmatics Doc. Creation Status by Company
This evaluation shows the number of incoming Finmatics documents according to their status per company. In addition, all current error messages from the automatic document creation process are displayed.
The NAVAX License Management page (in older versions "NAVAX License Overview" or "NCEX License Overview") displays the current license status of the NAVAX extensions.
Fields
Name
Specifies the name of the Extension.
License Status
Specifies the current license status of the Extension.
Serial No.
Specifies the serial number of the Extension.
Version
Specifies the currently installed version of the Extension.
Trial Version
A NAVAX extension can be tested or used free of charge for 30 days after installation. After that, the extension can only be used with a valid license.
Request License
The license can be requested or checked via the Current Status action. This opens a new page.
The following example shows the NAVAX extension Excel Report Builder.
Fill in the fields in the page and then click Send License Request. Please note that the licensing process may take some time. In the next few days you will receive an email with further information.
Note
For licensing, calling the online help and performing some actions, access to https://www.navax.app must be granted.
Public IP from www.navax.app for setting firewall access: 94.136.22.236, Port: TCP/443
Checking the connection to https://www.navax.app using PS: Test-NetConnection navax.app -port 443 (PS must be performed with the M-Tier service user)
CRL Servers In addition, the following CRL Servers must also be accessible for the certificate check: https://certificates.godaddy.com/* http://crl.godaddy.com/* or their IP: 192.124.249.36
Activate/Update License
As soon as the licensing has been completed, you will receive an email and the license can be activated via the Update License action. The license is company independent. So it does not matter in which company the action is called.
Note
The licence must be updated once a year via the Update License action.
The update is only possible or necessary within the last 30 days before the license expires, or afterwards. Within the last 30 days before the license expires, notes are displayed.
If the Automatic License Renewal is enabled, the Update License action is called automatically before the license expires. During this process, all licenses for which automatic license renewal is enabled are checked and updated if necessary. If automatic renewal is not successful, notifications will be displayed within the last 15 days before the license expires. Note that the setting is only active after the license has been activated.
This action can be used to open the Microsoft AppSource ratings page for the extension. We would be very happy if you submit your rating and let us know about your experience with the Extension.
The following Granules are required for an On-Premises installation:
70714835 NAVAX Finmatics Connector
1010860 NAVAX Extension Base
External Addresses
https://app.finmatics.com/
For communication with the Finmatics production environment, access to https://app.finmatics.com/ resp. to https://api.finmatics.com/api/v1/ must be granted.
https://test.finmatics.com/
For communication with the Finmatics test environment, access to https://test.finmatics.com/ resp. to https://test.finmatics.com/api/v1/ must be granted.
https://www.navax.app
For licensing, calling the online help and performing some actions, access to https://www.navax.app must be granted.
Public IP from www.navax.app for setting firewall access: 94.136.22.236, Port: TCP/443
Checking the connection to https://www.navax.app using PS: Test-NetConnection navax.app -port 443 (PS must be performed with the M-Tier service user)
CRL Servers In addition, the following CRL Servers must also be accessible for the certificate check: https://certificates.godaddy.com/* http://crl.godaddy.com/* or their IP: 192.124.249.36
The Finmatics Autonomous Accounting extension has been renamed to Finmatics Connector.
Version 26.1.17.0
as of Business Central 26 2026/04/01
Improvements
The field Zero-Amount Documents has been added to the Finmatics Setup page.
For more information, see Setup, Finmatics Setup.
The option Original PDF or Finmatics PDF has been added to the field Document Attachment on the Finmatics Setup page.
For more information, see Setup, Finmatics Setup.
Modifications
The value for the token is now replaced by ***token*** in the archived response.
For more information, see Archive, Finmatics Service Log.
The field captions on the Incoming Finmatics Documents page have been optimized.
The Creation Date and Time field has been renamed to Created at Finmatics on.
The field Finmatics Doc. Status has been added.
The Status field has been renamed to Doc. Creation Status. In addition, the names of the options have been changed to avoid confusion with the Status field in the Finmatics Web Frontend.
The automatic license renewal no longer tries to update the license directly, but instead automatically starts a job queue. During this process, all licenses for which automatic license renewal is enabled are checked and updated if necessary.
For more information, see Appendix, NAVAX License Management.
If an error occurs during the automatic creation of a purchase document in the automatic document receiving process, the job queue is no longer interrupted, but instead the Auto. Doc. Creation Error field is set in the incoming Finmatics document.
The number of current errors is displayed in the FactBox area of purchase invoices and purchase credit memos. In addition, a separate cue (status tile) is available in the role center integration.
For more information, see Working with the App, Purchase Documents and Working with the App, Role Center Integration.
Version 24.1.13.2
as of Business Central 24 2025/06/24
Corrections
The Dimension synchronization via the job queue was aborted with an error.
Version 24.1.13.1
as of Business Central 24 2025/06/05
Corrections
In certain configurations, the document type for incoming Finmatics documents could not be determined.
Version 24.1.13.0
as of Business Central 24 2025/05/30
Improvements
The Finmatics Unit of Measure Setup page has been added.
For more information, see Setup, Unit of Measure Setup.
Version 24.1.11.1
as of Business Central 24 2025/05/22
Corrections
Problems could occur in certain constellations when suggesting a Vendor Item No..
Version 24.1.11.0
as of Business Central 24 2025/05/16
Improvements
The field Prioritize Finmatics Article Number has been added in the Finmatics Setup.
For more information, see Setup, Finmatics Setup.
Version 24.1.10.0
as of Business Central 24 2025/05/15
Improvements
The field Finmatics Article Number has been added to the Purchase Invoice and Purchase Credit Memo lines.
Version 24.1.9.2
as of Business Central 24 2025/04/13
Improvements
The option names in the Sync. Status field of the master data have been revised.
Version 24.1.9.1
as of Business Central 24 2024/11/20
Corrections
When updating a Finmatics Client via the Finmatics Setup, a connection problem could occur.
Version 24.1.9.0
as of Business Central 24 2024/11/19
Improvements
The Master Data section has been split in the Finmatics Setup. There is now an additional Optional Master Data section.
The fields Synchronize non-EU VATSynchronize Email and Synchronize Phone No. have been added for Vendors in the Finmatics Setup.
For more information, see Setup, Finmatics Setup.
Corrections
Files from Finmatics were always saved with the file extension PDF in the Business Central document attachment, even if it was not a PDF file.
In certain constellations, update problems could occur if a real data permission was granted via the Finmatics Setup page.
Version 24.1.8.0
as of Business Central 24 2024/11/11
Improvements
The Finmatics Document View is now also displayed in the lists of purchase invoices and purchase credit memos.
In addition to the Finmatics Control Amount Incl. VAT field, the Finmatics Control Amount and Finmatics VAT Control Amount fields are now also available internally in the purchase documents.
The fields Finmatics Document and Finmatics Order Number have been added to the Purchase Invoice and Purchase Credit Memo lines.
For more information, see Working with the App, Purchase Documents.
Modifications
Changes for developers resp. the extensibility of the app.
Version 24.1.5.3
as of Business Central 24 2024/10/08
Corrections
Credit Memos were not recognized correctly and created as Invoices with a negative amount in Business Central.
Version 24.1.5.2
as of Business Central 24 2024/09/19
Corrections
Correction of Version 24.1.5.1.
Version 24.1.5.1
as of Business Central 24 2024/09/18
Corrections
Problems could occur in certain constellations when confirming posted credit memos.
Version 24.1.5.0
as of Business Central 24 2024/07/30
Improvements
On the Incoming Finmatics Documents page, the Service Log action has been added in the Support section.
The field Finmatics Order Numbers has been added to the Purchase Invoice and Purchase Credit Memo card.
For more information, see Working with the App, Purchase Documents.
When creating a document in Business Central, the Posting Date is now initialized with the Invoice Date of the incoming Finmatics Document.
When creating a document in Business Central, the Posting Description is now initialized with the Posting Text of the incoming Finmatics Document.
The field Determine Posting Description via 1st Line has been added in the Finmatics Setup.
For more information, see Setup, Finmatics Setup.
If the dimensions were activated in the master data of the Finmatics Setup, only the Dimension ID was determined when a document was created in Business Central. The individual Shortcut fields were not filled.
Version 22.1.3.0
as of Business Central 22 2024/05/23
Improvements
Real Data Permissions can now also be granted in a Business Central sandbox environment.
The Master Data has been enhanced with Items, Dimensions and Projects.
For more information, see Setup, Master Data.
The Master Data area in the Finmatics Setup has been revised.
For more information, see Setup, Finmatics Setup.
New master data records are now uploaded in packages of up to 100 records during synchronization.
Quantities and Units are now supported.
The incoming Finmatics Document is now displayed as a PDF in the Finmatics document view group in the Purchase Invoice and Purchase Credit Memo cards.
For more information, see Working with the App, Purchase Documents.
The fields for Not sync. Vendors and Not sync. G/L Accounts have been combined in the field Not sync. Master Data.


 If not all fields can be determined automatically, or if discrepancies are detected, then a To-do is created and the document must be checked and confirmed manually. Once all fields are captured and/or predicted, and if no discrepancies are detected, documents are automatically ready for creation in Business Central. Use the Receive (Update) action to retrieve the current Finmatics Documents and their current status.


 In the Finmatics Setup you can specify whether the check should be performed only for Finmatics Documents or for all Documents.
For more information, see Setup, Finmatics Setup.
In the Finmatics Setup you can specify whether the check should be performed only for Finmatics Documents or for all Documents.
For more information, see Setup, Finmatics Setup.


 Fill in the fields in the page and then click Send License Request. Please note that the licensing process may take some time. In the next few days you will receive an email with further information.
