Current Version: 26.3.9.0as of Business Central 26. For older BC versions, downgrades are available. AppSource Name: NAVAX Extension Base
Manual
Creation date: 2026/06/18 The current version of this manual can be found at:
☰ Contents
General
NAVAX Extension Base The NAVAX Extension Base provides basic functionality for NAVAX Extensions...
Setup
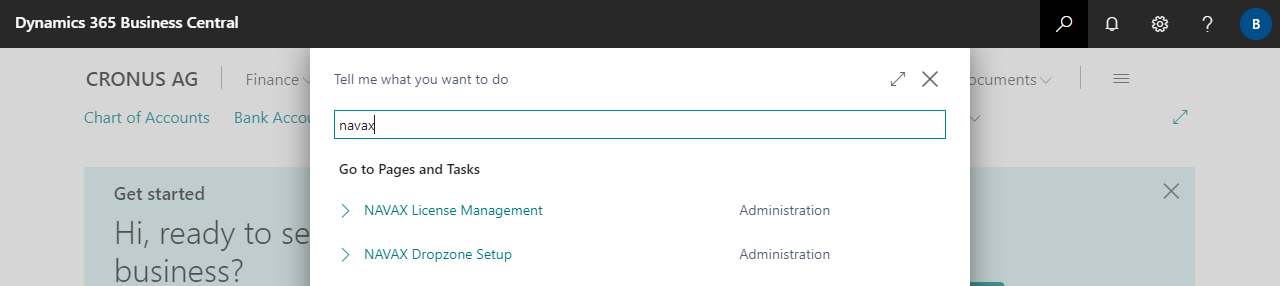
NAVAX License Management The NAVAX License Management page (in older versions NAVAX License Overview or NCEX License Overview) displays the current license status of the NAVAX extensions...
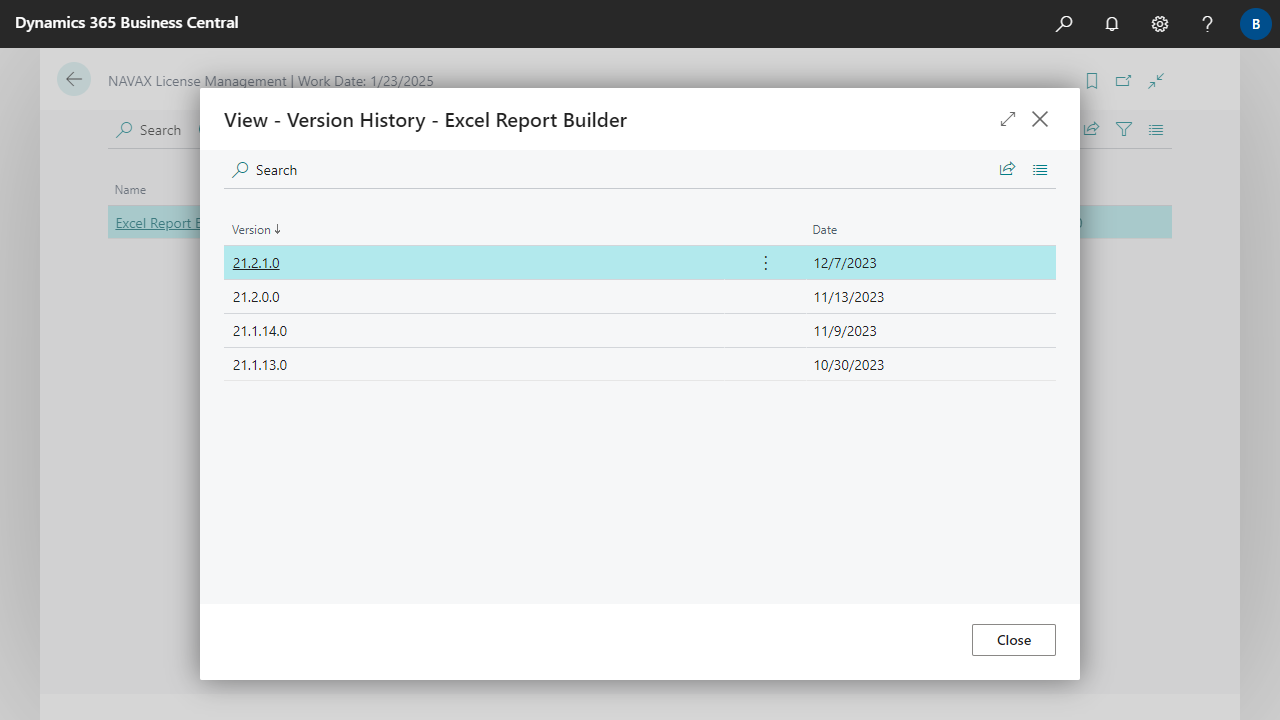
Version History The Version History page shows when which version of the extension was installed...
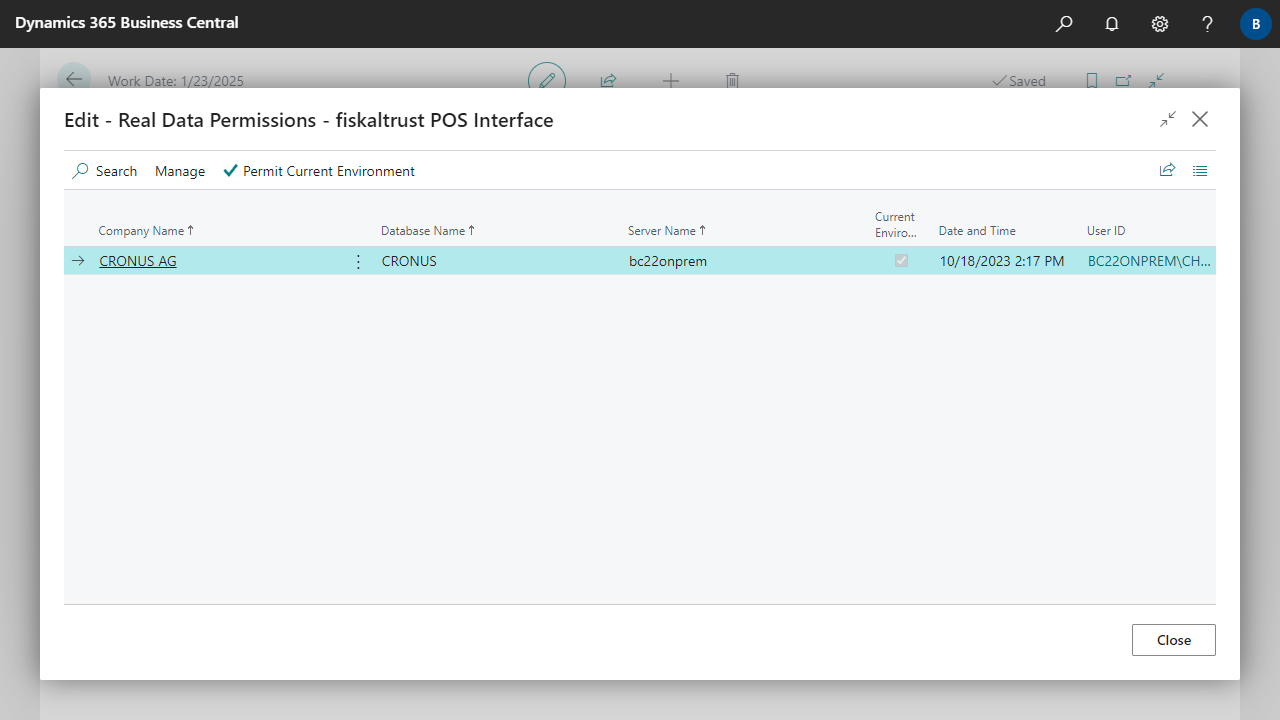
Real Data Permissions Real Data Permissions add an additional level of security to actions and processes. This is to prevent test data from being accidentally interpreted as real data. Particularly critical actions and processes (e.g. sending data to an external service) can therefore only be executed if a real data permission has been granted for the current environment...
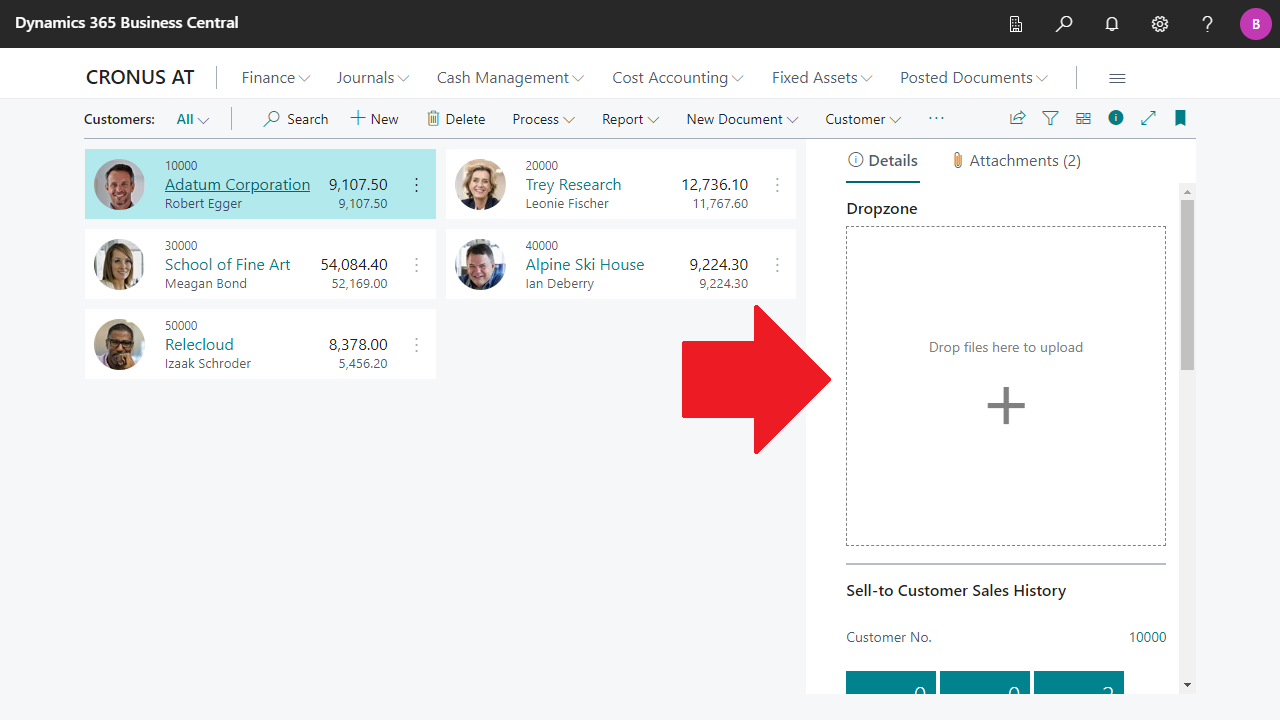
NAVAX Dropzone Setup In the NAVAX Dropzone Setup page the settings and defaults for the different Dropzones are defined...
Working with NAVAX Apps
Service Log Request/Response This page displays detailed information about what has been sent to and returned from the service. The information can be useful for technical support...
Date Filter Variables It is possible to specify [Variables] in date filters that will be calculated and replaced based on the Evaluation Date when the evaluation executed...
PDF Viewer This page displays PDF files...
Text Editor This page can be used to display or edit text...
NAVAX News This page displays current news about NAVAX extensions...
Information for Developers
XML Builder Schemas
QR Codes QR Codes can be created via the CreateQRCodeRedSoft procedure from the NCEX QR Code Mgt. codeunit...
Text Editor The Text Editor can be opened via the EditText and ShowText procedures from the NCEX Text Editor Mgt. codeunit...
Dropzone A NAVAX Dropzone can be integrated into a page very easily. Each added dropzone is addressed and identified by a unique ID...
PDF Viewer PDF files can be displayed via the ShowPDF procedure from the NCEX PDF Viewer Mgt. codeunit...
Service Log Request/Response Service log requests/responses can be displayed via various procedures from the NCEX Service Log Mgt. codeunit...
Update Notification Update notifications indicate whether updates are available for NAVAX extensions...
Event Request
Appendix
Environment Confirmations (Obsolete)
NAVAX Registration (Dynamics NAV AddOns) The current registration status of a NAVAX Dynamics NAV AddOn is displayed in the AddOn Setup page in the System group...
Installation Notes
Release Notes
Docs / App / NAVAX Extension Base / General NAVAX Extension Base
The NAVAX Extension Base provides basic functionality for NAVAX Extensions.
The NAVAX License Management page (in older versions "NAVAX License Overview" or "NCEX License Overview") displays the current license status of the NAVAX extensions.
Fields
Name
Specifies the name of the Extension.
License Status
Specifies the current license status of the Extension.
Serial No.
Specifies the serial number of the Extension.
Version
Specifies the currently installed version of the Extension.
Trial Version
A NAVAX extension can be tested or used free of charge for 30 days after installation. After that, the extension can only be used with a valid license.
Request License
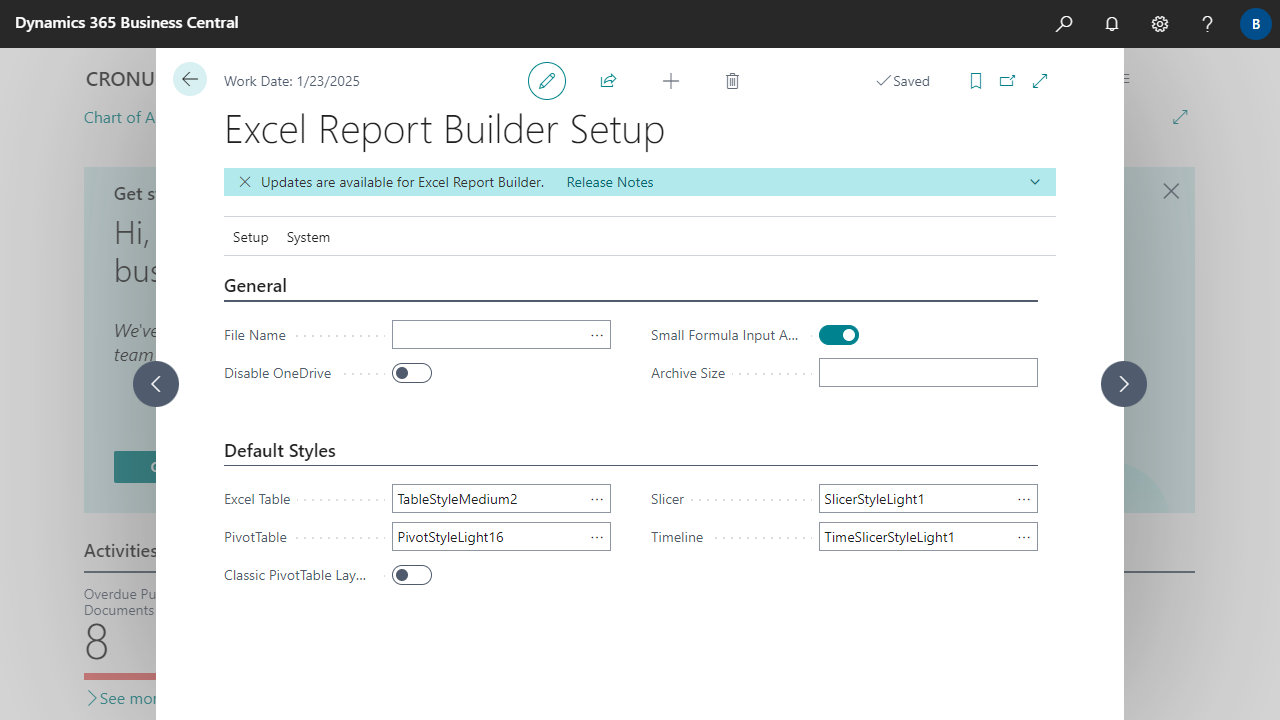
The license can be requested or checked via the Current Status action. This opens a new page.
The following example shows the NAVAX extension Excel Report Builder.
Fill in the fields in the page and then click Send License Request. Please note that the licensing process may take some time. In the next few days you will receive an email with further information.
Note
For licensing, calling the online help and performing some actions, access to https://www.navax.app must be granted.
Public IP from www.navax.app for setting firewall access: 94.136.22.236, Port: TCP/443
Checking the connection to https://www.navax.app using PS: Test-NetConnection navax.app -port 443 (PS must be performed with the M-Tier service user)
CRL Servers In addition, the following CRL Servers must also be accessible for the certificate check: https://certificates.godaddy.com/* http://crl.godaddy.com/* or their IP: 192.124.249.36
Activate/Update License
As soon as the licensing has been completed, you will receive an email and the license can be activated via the Update License action. The license is company independent. So it does not matter in which company the action is called.
Note
The licence must be updated once a year via the Update License action.
The update is only possible or necessary within the last 30 days before the license expires, or afterwards. Within the last 30 days before the license expires, notes are displayed.
If the Automatic License Renewal is enabled, the Update License action is called automatically before the license expires. During this process, all licenses for which automatic license renewal is enabled are checked and updated if necessary. If automatic renewal is not successful, notifications will be displayed within the last 15 days before the license expires. Note that the setting is only active after the license has been activated.
This action can be used to open the Microsoft AppSource ratings page for the extension. We would be very happy if you submit your rating and let us know about your experience with the Extension.
Docs / App / NAVAX Extension Base / Setup Version History
The Version History page shows when which version of the extension was installed.
Fields
Version
Specifies the version.
Date
Specifies the date since the version was used.
Docs / App / NAVAX Extension Base / Setup Real Data Permissions
Real Data Permissions add an additional level of security to actions and processes. This is to prevent test data from being accidentally interpreted as real data. Particularly critical actions and processes (e.g. sending data to an external service) can therefore only be executed if a real data permission has been granted for the current environment.
Practical example
You create a new test database in an on-premises environment by copying the real database, which contains the fully set up fiskaltrust extension. The service of the fiskaltrust extension has the function to sign documents that are subject to the cash register obligation and to protect them against manipulation. Without an additional security level, data from the test database would also be forwarded to fiskaltrust, where it would be interpreted as real data and reported to the tax office. However, this is prevented by the real data permissions function.
Manage Real Data Permissions
The real data permissions of an extension can be viewed or managed via the setup page of the extension in the system area. In the setup of the real data permissions, an environment is defined by the company name, the database name and the server name.
Fields
Company Name
Specifies the company name of the permitted environment.
Database Name
Specifies the database name of the permitted environment.
Server Name
Specifies the server name of the permitted environment.
Current Environment
Specifies whether the permitted environment is the current environment.
Date and Time
Specifies the date and time when the environment was permitted.
User ID
Specifies the ID of the user who permitted the environment.
User Name
Specifies the name of the User ID.
Actions
Permit Current Environment
Grants a real data permission for the current environment.
Warning
Do not permit your current environment unless you are absolutely sure.
Once the environment is permitted, the secured action or process can be called or executed by all users. Although real data permissions can be deleted or removed at any time, this does not undo actions that have already been performed.
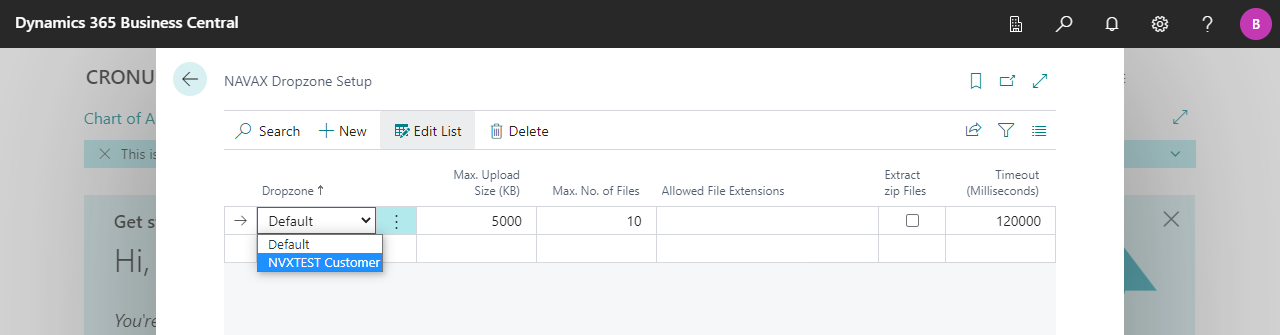
In the NAVAX Dropzone Setup page the settings and defaults for the different Dropzones are defined.
The NAVAX Dropzone can be used by various extensions. These extensions automatically add further options in the Dropzone field. For example, the NAVAX extension NAVAX Drag & Drop Document Attachments adds the option Document Attachments and the NAVAX extension Finmatics Autonomous Accounting adds the option Incoming Finmatics Documents.
Note
NAVAX Dropzones are suitable for upload sizes up to 120000 KB (120 MB).
If you change the settings, the page that displays the Dropzone may need to be reloaded or refreshed for the new settings to take effect.
Fields
Dropzone
Specifies for which Dropzone the settings apply.
The settings of the Default dropzone apply to all dropzones that do not have their own settings.
Max. Upload Size (KB)
Specifies the maximum total size of all files in KB that may be uploaded at the same time.
The default value that is suggested is 5000 KB (5 MB). The maximum value that can be entered is 120000 KB (120 MB).
Note
When you try to upload large files, your system decides how big those files can be. If the file is larger than what your system allows, you will likely see an error message or the upload will not go through.
Max. No. of Files
Specifies the maximum number of files that may be uploaded at the same time.
Allowed File Extensions
Specifies which file extensions may be uploaded. If the field is empty, all extensions are allowed. If multiple extensions are allowed, they can be specified separated by a comma. Example: pdf,doc*,xls*,png,txt,zip
Tip
If you specify 'doc', only files with .doc file extension may be uploaded. If 'doc*' is specified, files with file extension .docx, .docm etc. may also be uploaded.
Extract zip Files
Specifies whether *.zip files should be automatically decompressed or unzipped during upload.
Height %
Specifies the height of the dropzone as a percentage. The value must be between 50 and 100.
Timeout (Milliseconds)
Specifies the length of time in milliseconds that a file may take to upload before the process terminates with an error. If you don't set a duration, then a default value is used. The default value is currently 100000 ms (100 seconds).
Docs / App / NAVAX Extension Base / Working with NAVAX Apps Service Log Request/Response
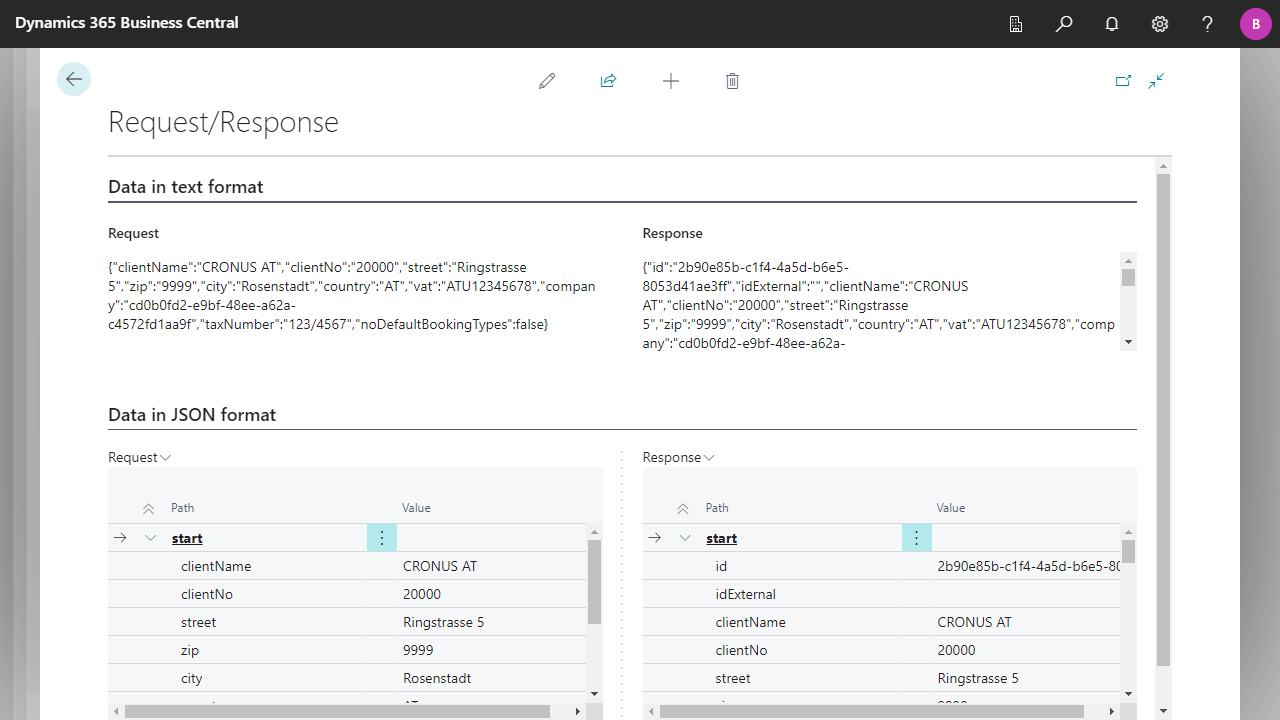
This page displays detailed information about what has been sent to and returned from the service. The information can be useful for technical support.
Docs / App / NAVAX Extension Base / Working with NAVAX Apps Date Filter Variables
It is possible to specify [Variables] in date filters that will be calculated and replaced based on the Evaluation Date when the evaluation executed.
Basically, the variables are date formulas. However, the English date formulas are always used, e.g.: D (Day).
The advantage over date formulas is that several date values (e.g. a date interval) can be specified combined in one filter.
As Evaluation Date the Work Date is suggested. The suggested date can be additionally modified via the Evaluation Date Formula of the evaluation.
Date Filter Variables can be used, for example, to set up evaluations where the date filter is automatically set to the current month when the evaluation is executed.
A variable must begin with [ and end with ].
A variable can be composed of the following IDs:
D Day
WD Weekday
W Week
M Month
Q Quarter
Y Year
C meaning 'current' and can be specified as a prefix to an ID
A list of date filter examples can be opened via the lookup of the date filter field.
Examples
The following table shows some examples of Date Filter Variable combinations and their results when the Work Date or the Evaluation Date is set to 06/30/2020.
Example
Result
Comment
[CD]
06/30/20
Evaluation Date
..[CD]
..06/30/20
Until Evaluation Date
01/01/20..[CD]
01/01/20..06/30/20
01/01/20 until Evaluation Date
..[-CM-1D]
..05/31/20
Until the end of last month (based on the Evaluation Date)
[-CM]..[CM]
06/01/20..06/30/20
Current Month
[-CM-1M]..[-CM-1D]
05/01/20..05/31/20
Last Month
[-CM-2M]..[-CM-1M-1D]
04/01/20..04/30/20
2 months ago
[-CM-3M]..[-CM-2M-1D]
03/01/20..03/31/20
3 months ago
[-CY]..[-CY+1M-1D]
01/01/20..01/31/20
January of the current year
[-CY+1M]..[-CY+2M-1D]
02/01/20..02/29/20
February of the current year
[-CY]..[CY]
01/01/20..12/31/20
Current Year
[-CY-1Y]..[CY-1Y]
01/01/19..12/31/19
Last Year
[-CY-2Y]..[CY-2Y]
01/01/18..12/31/18
2 years ago
[-CY-2Y]..[CY]
01/01/18..12/31/20
The last 3 years
[-CQ]..[CQ]
04/01/20..06/30/20
Current Quarter
[-CQ-1Q]..[-CQ-1D]
01/01/20..03/31/20
Last Quarter
[-CQ-2Q]..[-CQ-1Q-1D]
10/01/19..12/31/19
2 quarters ago
[-CY]..[-CY+1Q-1D]
01/01/20..03/31/20
The first quarter of the current year
[-CY+1Q]..[-CY+2Q-1D]
04/01/20..06/30/20
The second quarter of the current year
[-CY+2Q]..[-CY+3Q-1D]
07/01/20..09/30/20
The third quarter of the current year
[-CY+3Q]..[CY]
10/01/20..12/31/20
The fourth quarter of the current year
Docs / App / NAVAX Extension Base / Working with NAVAX Apps PDF Viewer
This page displays PDF files.
Docs / App / NAVAX Extension Base / Working with NAVAX Apps Text Editor
This page can be used to display or edit text.
Docs / App / NAVAX Extension Base / Working with NAVAX Apps NAVAX News
This page displays current news about NAVAX extensions.
Docs / App / NAVAX Extension Base / Information for Developers XML Builder Schemas
Note
The following instructions use the NAVAX extension E-Document - ebInterface as an example.
Define your own XML schema type
XML Builder Schemas can be used by various extensions. In order for an extension to have its own schemas available, a new XML Schema Type must first be added via an enumextension:
The OnGetMultipleRootRecordsAllowed event in the "NCEX XML Schema Mgt." codeunit determines whether the schemas of the extension are based on a single root record or whether multiple records are allowed. By default, multiple records are allowed.
With ebInterface, for example, only one posted document per XML file is allowed. The root data record must therefore be unique for ebInterface schemas and must not contain multiple posted documents.
For more information, see [Docs] XML Builder - Working with the App, Root Line Settings
[EventSubscriber(ObjectType::Codeunit, Codeunit::"NCEX XML Schema Mgt.", 'OnGetMultipleRootRecordsAllowed', '', false, false)]
local procedure OnGetMultipleRootRecordsAllowed(SchemaType: Enum "NCEX XML Schema Type"; var MultipleRootRecordsAllowed: Boolean)
begin
    if (SchemaType = SchemaType::"NVXEB ebInterface") then
        MultipleRootRecordsAllowed := false;
end;
Important
if (SchemaType = SchemaType::"NVXEB ebInterface") then
This if condition determines for which XML schema type the code should be executed and must not be omitted under any circumstances.
The value must match the added value from the enumextension.
Open XML Schemas
The page for the XML Schemas can be opened via the codeunit "NCEX XML Schema Mgt.". To do this, it is best to add an action on the extension setup page:
action(NVXEBXMLSchemasAction)
{
    ApplicationArea = All;
    Caption = 'XML Schemas', Comment = 'DEU="XML-Schemata"';
    ToolTip = 'View or set up the ebInterface XML Schemas.', Comment = 'DEU="Zeigt die Einstellungen der ebInterface XML-Schemata an, oder richtet sie ein."';
    Image = XMLSetup;

    trigger OnAction()
    var
        NCEXXMLSchemaMgt: Codeunit "NCEX XML Schema Mgt.";
    begin
        NCEXXMLSchemaMgt.OpenXMLSchemas("NCEX XML Schema Type"::"NVXEB ebInterface", false);
    end;
}
Create/check file
The file can be created or checked via the CreateXMLFile method in codeunit "NCEX XML Schema Mgt.".
Note
A check is always performed when creating the file.
procedure CreateXMLFile(SchemaType: Enum "NCEX XML Schema Type"; SchemaCode: Code[20]; RootRecordRef: RecordRef; var TempBlob: Codeunit "Temp Blob"; NCEXXMLExecuteAction: enum "NCEX XML Execute Action"): Boolean
Parameters
Type
Name
Description
NCEX XML Schema Type
SchemaType
Specifies the schema type.
Code
SchemaCode
Specifies the schema code.
RecordRef
RootRecordRef
Specifies the table and the record(s) for the root line of the schema.
Temp Blob
TempBlob
The Temp Blob in which the created file is returned.
NCEX XML Execute Action
NCEXXMLExecuteAction
Specifies which action should be performed.
Returns
Type
Description
Boolean
True if the file was created or checked.
Execute Action
Check
Checks whether the file can be created with the specified RecordRef. In other words, whether all mandatory data has been specified, etc.
Create
Checks and creates the file with the specified RecordRef. The created file is returned in the TempBlob.
Create and Download
Checks and creates the file with the specified RecordRef. The created file is then downloaded.
Real Data Preview
Displays a preview of the file in a new page.
Add reserved variables
The event OnGetAdditionalVariables in codeunit "NCEX XML Schema Mgt." can be used to add your own reserved variables, i.e., variables that are permanently available in all schemas of the extension.
For more information, see [Docs] XML Builder - Working with the App, Variables
[EventSubscriber(ObjectType::Codeunit, Codeunit::"NCEX XML Schema Mgt.", 'OnGetAdditionalVariables', '', false, false)]
local procedure OnGetAdditionalVariables(SchemaType: Enum "NCEX XML Schema Type"; var TempNCEXXMLSchemaVariable: Record "NCEX XML Schema Variable" temporary)
var
    NCEXXMLSchemaMgt: Codeunit "NCEX XML Schema Mgt.";
    NextPositionNo: Integer;
    DETAILS_HEADERTxt: Label 'Optional pretext for all details.', Comment = 'DEU="Optionaler Vortext für alle Details."';
    DETAILS_FOOTERTxt: Label 'Optional posttext for all details.', Comment = 'DEU="Optionaler Nachtext für alle Details."';
begin
    if (SchemaType <> SchemaType::"NVXEB ebInterface") then
        exit;

    NCEXXMLSchemaMgt.AddAdditionalVariable(TempNCEXXMLSchemaVariable, NextPositionNo, '[DETAILS_HEADER]', DETAILS_HEADERTxt, false);
    NCEXXMLSchemaMgt.AddAdditionalVariable(TempNCEXXMLSchemaVariable, NextPositionNo, '[DETAILS_FOOTER]', DETAILS_FOOTERTxt, false);
end;
Fill reserved variables
The event OnGetAdditionalVariableValue in codeunit "NCEX XML Schema Mgt." is used to fill your own reserved variables with values.
Important
The parameter SetVariable must be set to true in order for the value of the variable to be changed or applied. However, SetVariable must not be set generally, as otherwise all variables will be reset. SetVariable should only be set if the condition for filling the variable is met.
[EventSubscriber(ObjectType::Codeunit, Codeunit::"NCEX XML Schema Mgt.", 'OnGetAdditionalVariableValue', '', false, false)]
local procedure OnGetAdditionalVariableValue(SchemaType: Enum "NCEX XML Schema Type"; Variable: Code[20]; var VariableValue: Text; CurrentRecordRef: RecordRef; var SetVariable: Boolean)
var
    SalesInvoiceHeader: Record "Sales Invoice Header";
    CRLF: Text[2];
begin
    if (SchemaType <> SchemaType::"NVXEB ebInterface") then
        exit;

    case Variable of
        '[DETAILS_HEADER]':
            case CurrentRecordRef.Number of
                Database::"Sales Invoice Header":
                    begin
                        SetVariable := true;
                        CurrentRecordRef.SetTable(SalesInvoiceHeader);
                        CRLF[1] := 13;
                        CRLF[2] := 10;
                        VariableValue := 'Hello Header!' + CRLF + SalesInvoiceHeader."Posting Description";
                    end;
            end;
        '[DETAILS_FOOTER]':
            case CurrentRecordRef.Number of
                Database::"Sales Invoice Header":
                    begin
                        SetVariable := true;
                        CurrentRecordRef.SetTable(SalesInvoiceHeader);
                        VariableValue := 'Hello Footer!'
                    end;
            end;
    end;
end;
Set advanced options
Convert to JSON
The OnGetConverttoJSONAllowed event in the "NCEX XML Schema Mgt." codeunit determines whether the Convert to JSON field should be available for the schemas of the extension. By default, this field is not available.
For more information, see [Docs] XML Builder - Working with the App, Schemas
Allow API Access
The OnGetAPIAccessAllowed event in the "NCEX XML Schema Mgt." codeunit determines whether the Allow API Access field should be available for the schemas of the extension. By default, this field is not available.
For more information, see [Docs] XML Builder - Working with the App, Schemas
Permission Sets
The following permissions are required for the XML Builder Schemas:
tabledata
Use permission
Setup permission
"NCEX XML Schema"
R
RIMD
"NCEX XML Schema Comment"
R
RIMD
"NCEX XML Schema Change Log"
R
RIMD
"NCEX XML Schema Line"
R
RIMD
"NCEX XML Schema Line Filter"
R
RIMD
d
Docs / App / NAVAX Extension Base / Information for Developers QR Codes
QR Codes can be created via the CreateQRCodeRedSoft procedure from the NCEX QR Code Mgt. codeunit.
Here a service from http://www.redsoft.at is used.
Note
To create the QR Codes, access to the service must also be allowed.
For more information, see Appendix, Installation Notes.
The Size parameter of the CreateQRCodeRedSoft procedure can be used to specify the size of the QR Code in pixels.
If no value is specified, the QR Codes will be created with a resolution of 200x200 pixels.
If the QR Code is displayed blurred on the document, a different specification may improve the print quality.
The fiskaltrust POS Interface extension has defined e.g. 600 as the default value.
In addition, a different value can be specified there via a field in the setup.
For more information, see [Docs] fiskaltrust POS Interface - Setup, Cash Register Setup
The Temp Blob in which the created QR Code is returned.
Integer
Size
The size of the QR Code in pixel (default=200).
Docs / App / NAVAX Extension Base / Information for Developers Text Editor
The Text Editor can be opened via the EditText and ShowText procedures from the NCEX Text Editor Mgt. codeunit.
Several variants (or several overloads) are available for the EditText function.
The ShowText function is only for displaying and not for editing a text.
The SetPageCaption function can be called before the EditText or ShowText function to set the caption of the editor page.
The following examples show different starting situations and possibilities for integrating the text editor.
Save everything in the text field
The text editor can be called e.g. with a variable of the type Text:
MaxLineStrLen
If specified, this can be used to limit the maximum number of characters per line.
The text is automatically wrapped when entered in the editor if the length is exceeded.
The wrap tries to leave words whole.
MaxTextLen
If specified, this can be used to limit the maximum number of characters of the entire text.
ReadOnly
Specifies whether to open the editor in read-only mode.
In read-only mode, the text cannot be changed. However, the text can be marked and contents from it can be copied.
Scenario
The following example shows the integration of the editor into the Cash Register Sales Slip Text Setup.
The table has a text field with a length of 1000 characters:
Since a starting date and an ending date can be added to each text line in addition to the text and the text field itself is large enough, the following simple solution was chosen here, which does not split the text into several lines. A line break in the text is still possible.
It is important that the text field in the page is set to Editable = false; because in this solution the line breaks (not visible) are also stored in the text field.
Implementation
Table
...
procedure EditText(Editable: Boolean)
var
    NCEXTextEditorMgt: Codeunit "NCEX Text Editor Mgt.";
    TempText: Text;
begin
    TempText := Text;
    if not NCEXTextEditorMgt.EditText(TempText, 0, MaxStrLen(Text), not Editable) then
        exit;
    Text := CopyStr(TempText, 1, MaxStrLen(Text));
end;
...
Page
...
field("Text"; Rec."Text")
{
    ApplicationArea = All;
    ToolTip = 'Specifies the text. Click on the field to edit the text.', Comment = 'DEU="Gibt den Text an. Klicken Sie auf das Feld, um den Text zu bearbeiten."';
    Editable = false;
    AssistEdit = true;

    trigger OnAssistEdit()
    begin
        Rec.EditText(CurrPage.Editable());
        CurrPage.Update();
    end;
}
...
Split text over multiple lines
The text editor can also be called with a variable of the type RecordRef:
RecordRef
Specifies which table and which records from the table should be loaded into the text editor.
Important
Special care must be taken to ensure that the correct filters are set on the RecordRef.
TextFieldNo
Indicates in which field the text is stored.
Note
The maximum number of characters per line (MaxLineStrLen) is determined by the length of the TextFieldNo field in this call.
The text is automatically wrapped when entered in the editor if the length is exceeded.
The wrap tries to leave words whole.
TempBlob
Contains the new, edited text.
ReadOnly
Specifies whether to open the editor in read-only mode.
In read-only mode, the text cannot be changed. However, the text can be marked and contents from it can be copied.
Scenario
The following example shows a possible integration of the editor into the Extended Text Lines:
Since the table "Extended Text Line" contains only the text and the text field with a length of 100 characters is not large enough, the following solution was chosen here, which splits the text over several lines.
Implementation
pageextension 50000 "NVX Extended Text Lines" extends "Extended Text Lines"
{
    actions
    {
        addfirst(Processing)
        {
            action(NVXTextEditorAction)
            {
                ApplicationArea = All;
                Caption = 'Text Editor', Comment = 'DEU="Texteditor"';
                Image = Edit;
                ToolTip = 'Edit the text in the text editor.', Comment = 'DEU="Bearbeiten Sie den Text im Texteditor."';

                trigger OnAction()
                var
                    ExtendedTextLine: Record "Extended Text Line";
                    NCEXTextEditorMgt: Codeunit "NCEX Text Editor Mgt.";
                    TempBlob: Codeunit "Temp Blob";
                    RecordRef: RecordRef;
                    InStream: InStream;
                    NextLineNo: Integer;
                    TempText: Text;
                begin
                    Clear(ExtendedTextLine);
                    ExtendedTextLine.SetRange("Table Name", Rec."Table Name");
                    ExtendedTextLine.SetRange("No.", Rec."No.");
                    ExtendedTextLine.SetRange("Language Code", Rec."Language Code");
                    ExtendedTextLine.SetRange("Text No.", Rec."Text No.");
                    RecordRef.GetTable(ExtendedTextLine);
                    if not NCEXTextEditorMgt.EditText(RecordRef, ExtendedTextLine.FieldNo(Text), TempBlob, not CurrPage.Editable()) then
                        exit;

                    ExtendedTextLine.LockTable();
                    ExtendedTextLine.DeleteAll();
                    NextLineNo := 10000;
                    TempBlob.CreateInStream(InStream);
                    while (not InStream.EOS()) do begin
                        Clear(ExtendedTextLine);
                        ExtendedTextLine."Table Name" := Rec."Table Name";
                        ExtendedTextLine."No." := Rec."No.";
                        ExtendedTextLine."Language Code" := Rec."Language Code";
                        ExtendedTextLine."Text No." := Rec."Text No.";
                        ExtendedTextLine."Line No." := NextLineNo;
                        NextLineNo += 10000;
                        InStream.ReadText(TempText);
                        ExtendedTextLine.Text := CopyStr(TempText, 1, MaxStrLen(ExtendedTextLine.Text));
                        ExtendedTextLine.Insert();
                    end;
                end;
            }
        }
    }
}
Store text in a blob
Calling the text editor with Codeunit "Temp Blob" without RecordRef is also possible:
MaxLineStrLen
If specified, this can be used to limit the maximum number of characters per line.
The text is automatically wrapped when entered in the editor if the length is exceeded.
The wrap tries to leave words whole.
MaxTextLen
If specified, this can be used to limit the maximum number of characters of the entire text.
ReadOnly
Specifies whether to open the editor in read-only mode.
In read-only mode, the text cannot be changed. However, the text can be marked and contents from it can be copied.
Scenario
If the text is to be stored directly to the record (i.e. no splitting to several records) and the solution via a text field is out of question due to the limited field length (depending on the definition max. 2048 characters), the text can also be stored in a blob field.
Optionally, another field can be created, which displays a preview of the blob field content.
The following example shows a possible solution.
...
field("Text Preview"; Rec."Text Preview")
{
    ApplicationArea = All;
    ToolTip = 'Specifies the text. Click on the field to edit the text.', Comment = 'DEU="Gibt den Text an. Klicken Sie auf das Feld, um den Text zu bearbeiten."';
    Editable = false;
    AssistEdit = true;

    trigger OnAssistEdit()
    begin
        Rec.EditText(CurrPage.Editable());
        CurrPage.Update();
    end;
}
...
Docs / App / NAVAX Extension Base / Information for Developers Dropzone
A NAVAX Dropzone can be integrated into a page very easily. Each added dropzone is addressed and identified by a unique ID.
Note
NAVAX Dropzones are suitable for upload sizes up to 120000 KB (120 MB).
The following example shows how to add a new dropzone.
Scenario
A dropzone should be provided on the customer list (Page 22), which can be used to add document attachments via drag & drop:
Note
This example serves only to illustrate the simplest implementation.
For document attachments, it is recommended to use the NAVAX App NAVAX Drag & Drop Document Attachments.
This app is also based on NAVAX Dropzone, but integrates it directly with the document attachment FactBox.
For more information, see [Docs] NAVAX Drag & Drop Document Attachments - General
Implementation
enumextension
A NAVAX Dropzone triggers the OnAfterUpload event on a successful "Drag & Drop".
The NCEXDropzoneID parameter of the event specifies which Dropzone triggered the event.
For each new Dropzone an additional NCEXDropzoneID must be defined, so that it can be uniquely identified in the event. A new NCEXDropzoneID is added or created via an enumextension:
Through this enum extension, the customer will also have the ability to specify the settings and defaults for the new Dropzone later on the NAVAX Dropzone Setup page:
Add Dropzone
The new Dropzone can then be added to the customer list, e.g. as a FactBox:
trigger OnAfterGetCurrRecord()
begin
    CurrPage.NVXTESTDropzone.Page.SetCurrRecord(Rec);
end;
can also be omitted if, for example, you need a Dropzone that is not record related. (e.g. import of payment files of the NAVAX App NCPI Payments Import).
Note
An overload with the following additional parameters is also available for the SetDropzoneID function:
AdditionalCallID
Can be used as needed, and is passed to the OnAfterUpload Event.
For example, if several pages share the same NCEXDropzoneID, you can specify the ID of the page (e.g. Page:: "Purchase Invoices") as a parameter and query it later in the event.
AdditionalDropzoneText
Can be used if necessary to display additional information to users in the Dropzone area.
OnAfterUpload Event
The last step is now to react to the OnAfterUpload event of the Dropzone:
codeunit 50000 "NVXTEST Event Mgt."
{
    [EventSubscriber(ObjectType::Codeunit, Codeunit::"NCEX Dropzone Mgt.", 'OnAfterUpload', '', false, false)]
    local procedure NVXTEST_NCEXDropzoneMgt_OnAfterUpload(NCEXDropzoneID: Enum "NCEX Dropzone ID"; CurrRecordVariant: Variant; var UploadedTempBlobList: Codeunit "Temp Blob List"; FileNameList: List of [Text]; AdditionalCallID: Integer)
    var
        Customer: Record Customer;
        DocumentAttachment: Record "Document Attachment";
        TempBlob: Codeunit "Temp Blob";
        ConfirmManagement: Codeunit "Confirm Management";
        RecordRef: RecordRef;
        InStream: InStream;
        FileName: Text;
        i: Integer;
        NoOfFiles: Integer;
        NoOfNoContentFiles: Integer;
        NoRecordSelectedErr: Label 'No %1 is selected.', Comment = 'DEU="Es ist kein %1 ausgewählt."';
        UploadMsg: Label 'Do you want to add %1 file(s) to the document attachments of %2 ''%3''?.', Comment = 'DEU="Möchten Sie %1 Datei(en) zu den Beleganhängen von %2 ''%3'' hinzufügen?"';
        NoContentFilesMsg: Label 'Files that have no content cannot be added to the document attachments.\\Number of files not added: %1\Number of files added: %2', Comment = 'DEU="Dateien, die keinen Inhalt haben, können nicht zu den Beleganhängen hinzugefügt werden.\\Anzahl nicht hinzugefügter Dateien: %1\Anzahl hinzugefügter Dateien: %2"';
    begin
        if (NCEXDropzoneID <> NCEXDropzoneID::"NVXTEST Customer") then
            exit;

        if (UploadedTempBlobList.Count() = 0) then
            exit;

        if not CurrRecordVariant.IsRecord() then
            Error(NoRecordSelectedErr, Customer.TableCaption());
        Customer := CurrRecordVariant;
        if (Customer."No." = '') then
            Error(NoRecordSelectedErr, Customer.TableCaption());
        Customer.Get(Customer."No.");

        if not ConfirmManagement.GetResponseOrDefault(StrSubstNo(UploadMsg, UploadedTempBlobList.Count(), Customer.TableCaption(), Customer."No."), true) then
            exit;

        RecordRef.GetTable(Customer);
        NoOfFiles := 0;
        NoOfNoContentFiles := 0;
        for i := 1 to UploadedTempBlobList.Count() do begin
            UploadedTempBlobList.Get(i, TempBlob);
            if TempBlob.HasValue() then begin
                FileNameList.Get(i, FileName);
                TempBlob.CreateInStream(InStream);
                Clear(DocumentAttachment);
                DocumentAttachment.Init();
                DocumentAttachment.InitFieldsFromRecRef(RecordRef);
                DocumentAttachment.SaveAttachmentFromStream(InStream, RecordRef, FileName);
                NoOfFiles += 1;
            end else
                NoOfNoContentFiles += 1;
        end;

        if (NoOfNoContentFiles <> 0) then
            Message(NoContentFilesMsg, NoOfNoContentFiles, NoOfFiles);
    end;
}
Important
if (NCEXDropzoneID <> NCEXDropzoneID::"NVXTEST Customer") then
    exit;
This if-condition decides for which Dropzone the code should be executed and must not be omitted under any circumstances.
The value must match the added value from the enumextension.
Docs / App / NAVAX Extension Base / Information for Developers PDF Viewer
PDF files can be displayed via the ShowPDF procedure from the NCEX PDF Viewer Mgt. codeunit.
Several variants (or several overloads) are available for the ShowPDF function.
The field that contains the pdf file to be displayed.
ShowPDF
Displays a pdf in a new page.
procedure ShowPDF(Base64PDFTXT: Text)
Parameters
Type
Name
Description
Text
Base64PDFTXT
The field that contains the pdf file to be displayed.
Docs / App / NAVAX Extension Base / Information for Developers Service Log Request/Response
Service log requests/responses can be displayed via various procedures from the NCEX Service Log Mgt. codeunit.
The procedures can be used for requests and responses which were sent/returned in JSON format or XML format and are available in a BLOB field.
This opens a page that displays detailed information about what has been sent to and returned from the service.
The information can be useful for technical support.
Methods
ShowJSONRequestResponse
Displays a JSON format request/response in a new page.
The field that contains the response to be displayed.
FieldRef
[Optional] ResponseXMLPartFieldRef
The field that contains the XML part of the response to be displayed.
Docs / App / NAVAX Extension Base / Information for Developers Update Notification
Update notifications indicate whether updates are available for NAVAX extensions.
The "NCEX Check Update Status Mgt." codeunit can be used to add an update notification, e.g. on the setup page of a NAVAX extension. The following code shows the implementation on a setup page. The code is identical for all extensions.
trigger OnOpenPage()
var
    AppInfo: ModuleInfo;
    UpdateTaskParameters: Dictionary of [Text, Text];
begin
    Clear(UpdateTaskID);
    NavApp.GetCurrentModuleInfo(AppInfo);
    UpdateTaskParameters.Add('AppID', AppInfo.Id());
    CurrPage.EnqueueBackgroundTask(UpdateTaskID, Codeunit::"NCEX Check Update Status Mgt.", UpdateTaskParameters, 0, PageBackgroundTaskErrorLevel::Ignore);
end;

var
    UpdateTaskID: Integer;

trigger OnPageBackgroundTaskCompleted(TaskId: Integer; Results: Dictionary of [Text, Text])
var
    NCEXCheckUpdateStatusMgt: Codeunit "NCEX Check Update Status Mgt.";
begin
    if (TaskId = UpdateTaskID) then
        NCEXCheckUpdateStatusMgt.ShowUpdateNotification(Results);
end;
Docs / App / NAVAX Extension Base / Information for Developers Event Request
If you're building your own app and need something specific from us, like an event, you can help improve the general extensibility of our apps. We'll have a look at your request, and if we can we'll implement it asap. If we can't we'll let you know and briefly explain why not. When that happens, don't be discouraged. Go back to the drawing board, see if you can work it out, and then come back and submit another request.
Environment Confirmations have been replaced by Real Data Permissions and should no longer be used.
For more information, see Setup, Real Data Permissions.
Environment Confirmations add an additional level of security to actions and processes to prevent test data from being accidentally interpreted as real data.
These additional secured actions and processes can only be executed if the current environment in which the action is executed is already confirmed or will be confirmed.
Example
Environment Confirmations are used, for example, by the NCCR Cash Register from the cash register posting process. This is to prevent test data from being accidentally forwarded to the external service of fiskaltrust as real data.
This case can occur, for example, especially when deploying via On-Premises, if a test or development database (or a test company) has been created based on the real data and is not defined as a sandbox environment. Without another level of security, cash register postings from this test system would also be forwarded to the fiskaltrust service as real data.
By using Environment Confirmations, the cash register posting recognizes that the test environment has not yet been confirmed and the user can now respond to the warning.
Testing and Confirmation
An environment is defined by the company name, the database name and the server name.
The action or process may be executed if the current environment is found in the environment confirmations and the setting entered in the Confirmed as field matches the setting of the current environment.
Environments set as Production can be confirmed as production environment or as sandbox environment.
If you confirm the environment as a production environment, all information will be interpreted as real data.
If you confirm the environment as a sandbox environment, all information will be interpreted as test data and the action or process may not be executed until the current environment is also set as a sandbox.
When deploying via On-Premises, test and development databases should or must be confirmed as a sandboxed environment.
Warning
Confirm your current environment only if you are absolutely sure.
Once the environment is confirmed, the action or process is confirmed for all users. While environments that have already been confirmed can be deleted at any time, this will not undo any action that has already been performed.
Environments set as Sandbox cannot be confirmed as production environment.
Confirmation as a sandbox environment is still necessary for security reasons.
Change a confirmation
All confirmed environments of an extension can be viewed from the extension's setup page via the System area.
An environment confirmation cannot be changed directly, but must be deleted first.
As soon as a secured action or process in the environment is executed, the environment must be reconfirmed.
Tip
The current environment can also be confirmed immediately using the Confirm Current Environment action.
Fields
Company Name
Specifies the company name of the confirmed environment.
Database Name
Specifies the database name of the confirmed environment.
Server Name
Specifies the server name of the confirmed environment.
Current Environment
Specifies whether the confirmed environment is the current environment.
Confirmed as
Specifies whether the environment was confirmed as a production environment (Real Data) or as a sandbox environment (Test Data).
Date Confirmed
Specifies the date when the environment was confirmed.
Time Confirmed
Specifies what time the environment was confirmed.
Confirmed By
Specifies the user ID of the person who confirmed this environment.
Actions
Confirm Current Environment
Confirms the current environment as a production environment or as a sandbox environment.
Docs / App / NAVAX Extension Base / Appendix NAVAX Registration (Dynamics NAV AddOns)
The current registration status of a NAVAX Dynamics NAV AddOn is displayed in the AddOn Setup page in the System group.
Fields
Version
Specifies the currently installed version of the AddOn.
Serial No.
Specifies the serial number of the AddOn.
Status
Specifies the current registration status of the AddOn.
Trial Version
A NAVAX AddOn can be tested or used free of charge for 30 days after installation. After that, the AddOn can only be used with a valid registration.
Request Registration
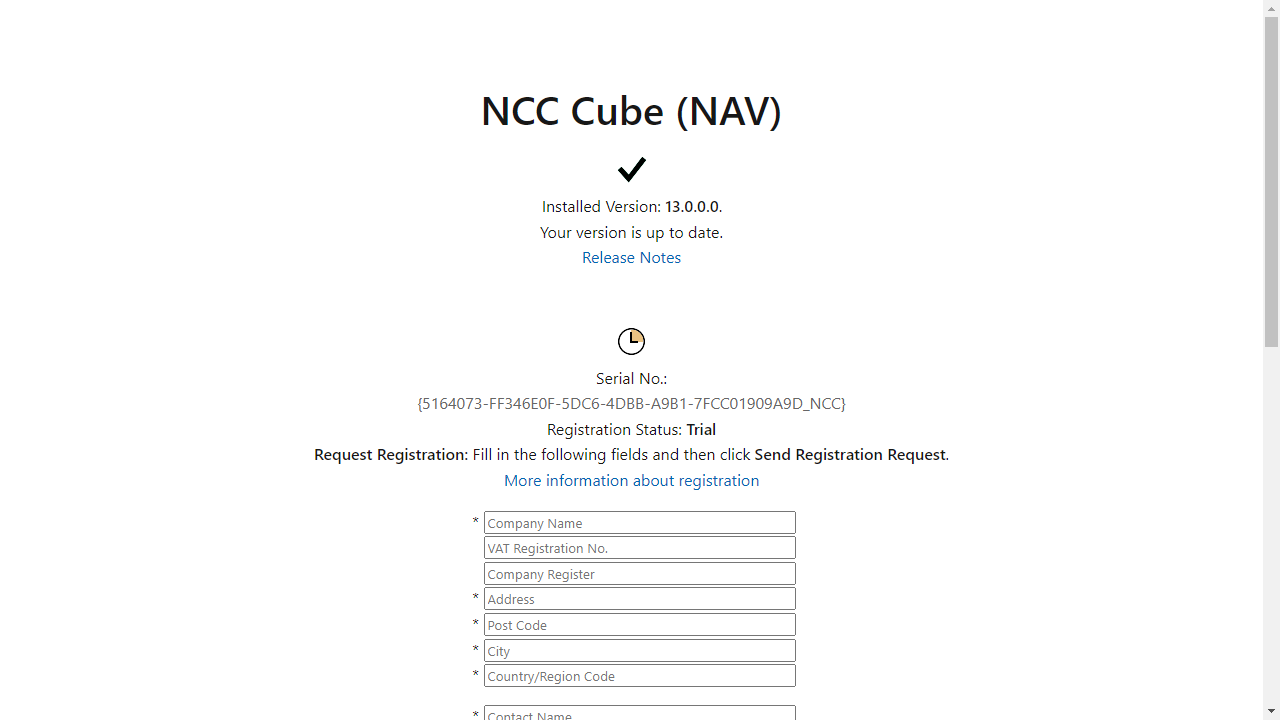
The registration can be requested or checked via the What's New? action. This opens a window.
The following example shows the NAVAX AddOn "NCC Cube".
Fill in the fields in the window and then click Send Registration Request.
Please note that the registration process may take some time.
In the next few days you will receive an email with further information.
Note
For registration, calling the online help and performing some actions, access to https://www.nccube.com and https://www.navax.app must be allowed.
In addition, TLS 1.2 is required.
For more information, see How to get earlier versions of the Dynamics NAV development environment to work with TLS 1.2Public IP from www.navax.app for setting firewall access:
94.136.22.236, Port: TCP/443
Checking the connection to https://www.navax.app using PS:
Test-NetConnection navax.app -port 443
(PS must be performed with the M-Tier service user)
CRL Servers
In addition, the following CRL Servers must also be accessible for the certificate check:
https://certificates.godaddy.com/*http://crl.godaddy.com/*
or their IP: 192.124.249.36
Activate/Update Registration
As soon as the registration has been completed, you will receive an email and the registration can be activated via the Update Registration action.
The registration is company independent. So it does not matter in which company the action is called.
Note
The registration must be updated once a year via the Update Registration action.
The update is only possible or necessary within the last 30 days before the registration expires, or afterwards. Within the last 30 days before the registration expires, notes are displayed.
The following Granules are required for an On-Premises installation:
1010860 NAVAX Extension Base
External Addresses
https://www.navax.app
For licensing, calling the online help and performing some actions, access to https://www.navax.app must be granted.
Public IP from www.navax.app for setting firewall access: 94.136.22.236, Port: TCP/443
Checking the connection to https://www.navax.app using PS: Test-NetConnection navax.app -port 443 (PS must be performed with the M-Tier service user)
CRL Servers In addition, the following CRL Servers must also be accessible for the certificate check: https://certificates.godaddy.com/* http://crl.godaddy.com/* or their IP: 192.124.249.36
https://qr01.navax.com:8080
To create the QR Codes via the CreateQRCodeRedSoft function, access to https://qr01.navax.com:8080 must be granted.
Checking the connection to https://qr01.navax.com:8080 using PS: Test-NetConnection qr01.navax.com -port 8080 (PS must be performed with the M-Tier service user)
Would you like to know what has changed in the extension? Below you'll find an overview of the new features and changes made in the updates.
Version 26.3.9.0
as of Business Central 26 2026/06/02
Note
This version is also available as a downgrade version for Business Central 24, 21 and 14.
Improvements
A counter showing the remaining characters has been added to the Text Editor. The counter appears automatically when the number of characters in the editor is limited.
If text is copied into the Text Editor that exceeds the maximum number of characters, a message will now appear stating that the text has been truncated.
If HttpClient Requests are not allowed in the settings of the NAVAX Extension Base extension when creating a QR Code, an improved error message is now displayed.
Version 26.3.1.2
as of Business Central 26 2025/09/19
Corrections
Problems could occur in XML Schemas when selecting and filtering Enum and Option fields.
Version 26.3.1.1
as of Business Central 26 2025/09/16
Improvements
The automatic license renewal no longer tries to update the license directly, but instead automatically starts a job queue. During this process, all licenses for which automatic license renewal is enabled are checked and updated if necessary.
For more information, see Setup, NAVAX License Management.
Version 26.3.0.0
as of Business Central 26 2025/09/15
Important
Due to changes in the Granules, the Business Central license needs to be updated for On-Premises installations.
In Real Data Permissions, the database name is now set to the environment name for a SaaS infrastructure because the database name changes automatically under certain circumstances.
Important
After the update, all real data permissions must be manually reassigned in a SaaS infrastructure.
Version 24.2.6.1
as of Business Central 24 2024/11/06
Corrections
Correction in connection with the removal of obsolete code parts.
Version 24.2.6.0
as of Business Central 24 2024/10/24
Improvements
If HttpClient Requests are not allowed in the settings of the NAVAX Extension Base extension, an improved error message is now displayed.
The NCEX Extension Base extension has been renamed to NAVAX Extension Base.
Version 21.1.17.0
as of Business Central 21 2023/12/12
Improvements
The NAVAX License Management page displays notifications when updates for NAVAX extensions are available.
Developers can also add an update notification on the extension's setup page.
For more information, see Information for Developers, Update Notification.
Version 21.1.16.0
as of Business Central 21 2023/11/10
Improvements
The NAVAX License Management page now supports automatic adding of NAVAX extensions.
NAVAX extensions that use this system no longer need to have the corresponding extension setup opened first to be displayed in this page.
Version 21.1.15.0
as of Business Central 21 2023/09/20
Important
For On-Premises an update of the License or the following granules is required:
In the text editor the ShowText function has been added. The function is only for displaying and not for editing a text.
For more information, see Information for Developers, Text Editor.
Environment Confirmations have been replaced by Real Data Permissions and should no longer be used.
For more information, see Setup, Real Data Permissions.
Version 21.1.14.0
as of Business Central 21 2023/02/24
Improvements
The NAVAX License Overview has been renamed to NAVAX License Management.
The page NAVAX News has been added.
The page displays current news about NAVAX extensions and can be accessed directly or via the NAVAX License Management.
For developers, the additional parameters AdditionalCallID and AdditionalDropzoneText have been added to the SetDropzoneID Dropzone function.
For more information, see Information for Developers, Dropzone.
Version 21.1.13.0
as of Business Central 21 2023/01/25
Improvements
Since there have been increased requests to reintroduce the automatic license renewal, we have decided to make this feature available again in a slightly modified form.
The following changes were made:
The automatic license renewal is now no longer activated automatically, but must be activated manually for each extension in the NAVAX License Overview.
The license check (and thus also the automatic license renewal) is not called more frequently in the last 7 days before the license expires.
Information for Developers: If necessary, the automatic license renewal can be skipped when calling the license check via the SkipAutoLicenseRenewal parameter.
Correction related to the disabled automatic license renewal.
Version 21.1.12.0
as of Business Central 21 2023/01/02
Improvements
The licensing process has been improved.
Modifications
Disabled and removed the Automatic License Renewal setting in the NAVAX License Overview page.
For more information, see Setup, NAVAX License Management.
Version 21.1.11.0
as of Business Central 21 2022/11/30
Improvements
The licensing process has been improved.
Corrections
Some messages in the Environment Confirmations section have been corrected.
The Current Status action in the NAVAX License Overview can now also be called for "Currently not installed" entries.
The call then shows which extension it is.
Version 20.1.7.0
as of Business Central 20 2022/06/07
Modifications
The UpdateWebPageViewer function in the Text Editor is now no longer local.
Version 20.1.6.0
as of Business Central 20 2022/05/30
Modifications
The phrase "by NAVAX" has been removed from the product name.
Version 20.1.5.0
as of Business Central 20 2022/05/03
Business Central Update
Improvements
Added Automatic License Renewal setting to the NAVAX License Overview page.
For more information, see Setup, NAVAX License Management.
The licensing of a NAVAX extension is now only necessary in the production environment.
In the sandbox environment, NAVAX extensions can now be tested unlimited. Updating the license in a sandbox environment is no longer possible.
For more information, see Setup, NAVAX License Management.
More Notes are now displayed within the last 7 days (previously 3 days) before the license expires.
The What's New? action in the NAVAX License Overview has been renamed to Current Status.
The status information is no longer opened in a separate browser window, but directly in Business Central.
Version 19.1.2.0
as of Business Central 19 2021/11/22
Quality of life update
Version 19.1.1.0
as of Business Central 19 2021/10/15
Business Central Update
Modifications
The parameters of the license check have been changed.
Version 18.1.0.0
as of Business Central 18 2021/08/06
Modifications
Removed the commits associated with the license check.
Version 18.0.1.0
as of Business Central 18 2021/07/17
Modifications
The CreateQRCode function in the NCEX QR Code Mgt. codeunit has been replaced by the CreateQRCodeRedSoft and CreateQRCodeTECIT functions.
For more information, see Information for Developers, QR Codes.
Version 18.0.0.0
as of Business Central 18 2021/05/13
Business Central Update
Modifications
In the environment confirmations, the server name is now fixed to the value 'SaaS' for a SaaS infrastructure.


 Fill in the fields in the page and then click Send License Request. Please note that the licensing process may take some time. In the next few days you will receive an email with further information.


 The "NCEX Check Update Status Mgt." codeunit can be used to add an update notification, e.g. on the setup page of a NAVAX extension. The following code shows the implementation on a setup page. The code is identical for all extensions.

 Fill in the fields in the window and then click Send Registration Request.
Please note that the registration process may take some time.
In the next few days you will receive an email with further information.
Fill in the fields in the window and then click Send Registration Request.
Please note that the registration process may take some time.
In the next few days you will receive an email with further information.
