Online Help tool for Microsoft Dynamics 365 Business Central Extensions.
Current Version: 3.1.0as of Business Central 3.
Manual
Creation date: 2026/06/17 The current version of this manual can be found at:
☰ Contents
General
NAVAX Help Builder NAVAX Help Builder was mainly designed to create Online Help for Microsoft Dynamics 365 Business Central Extensions. However, it is also possible to create Online Help that is not related to Business Central. An example of this is the help you are reading right now...
Preparations
How the Help Builder works Every help project basically consists of a collection of normal text files in which the help text for the different help topics is stored. These files are stored or uploaded on the Help Builder server (i.e. on navax.app). If the online help for a help topic is then called, the Help Builder prepares the help topic accordingly and the result is displayed in the browser...
Set up AL Extension So that the online help can be called from a Business Central Extension by the user, the links to the online help must be specified in the app.json of the Extension...
Set up Visual Studio Code The help should be written in Visual Studio Code. It is also possible to write the help with another tool, but then no supporting functions are available...
Write Help
Basics
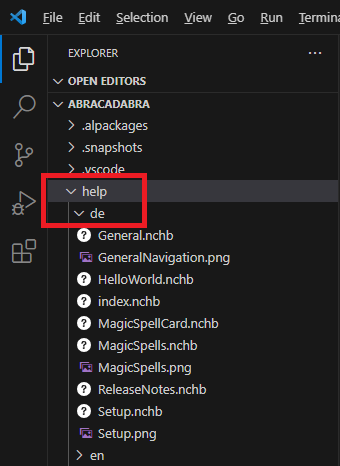
Create Topics The Help Builder requires that the individual help files for each language are grouped together in one folder (2 characters, lower case)...
Create Table of Contents Every help project needs a table of contents which is created in a separate file named index.nchb...
Topic Links & External Links
Index-driven Approach Until now, the text to be displayed for topic headers and topic links was always specified directly in the help topic...
Topic Redirections Redirections of help topics can be realized by specifying another help file in the first line of a help file. In order for the Help Builder to recognize the redirection, the file extension .nchb must be specified...
Create Release Notes Release Notes can be added using the _ReleaseNotes snippets...
Spell Check For spell checking the Visual Studio Code Extension Code Spell Checker is recommended...
Suggest Help Text
Suggest Help Text from AL File Via the Suggest Help Text from AL File Command a help topic can be generated from an AL object (page, pageextension, report oder xmlport). The help text will be suggested based on the object structure and the tooltips, which can then be used as a starting point for the help topic...
Ghostwriter With the NCHB Ghostwriter, a suggestion for a complete online help or for newly added AL objects can be created within a very short time...
Extended
Notes Notes can be added using the _Note snippets...
Lists Bulleted lists can be added using the snippet _List...
Tables Tables can be added using the _Table snippets...
Images Images can be added using the _Image snippet...
Animated Images (GIF) If animated images are inserted (file extension .gif), basically the same things must be observed as for normal ...
Videos Videos can be linked either indirectly via navax.app or directly (not recommended)...
Page Breaks When printing the help or when creating a PDF, a page break is inserted for each help topic...
Display Screen/Print With <span class=hideonprint> or <span class=hideonscreen> elements can be displayed either only on the screen or only when printing...
Source Code Source Code can be added using the _SourceCode snippets...
Upload Help
Upload Help to navax.app In order for the help to be available online, the help project must be uploaded to navax.app...
Appendix
Release Notes
Docs / App / NAVAX Help Builder / General NAVAX Help Builder
NAVAX Help Builder was mainly designed to create Online Help for Microsoft Dynamics 365 Business Central Extensions. However, it is also possible to create Online Help that is not related to Business Central. An example of this is the help you are reading right now.
The following instructions assume that you want to create Online Help for a Business Central Extension. All the necessary steps are explained using the sample extension Abracadabra.
Note
NAVAX Help Builder was developed with the acronym "NCHB".
NCHB stands for NAVAX Consulting Help Builder.
Examples
Here are some examples of online help created with the NAVAX Help Builder:
Docs / App / NAVAX Help Builder / Preparations How the Help Builder works
Every help project basically consists of a collection of normal text files in which the help text for the different help topics is stored. These files are stored or uploaded on the Help Builder server (i.e. on navax.app). If the online help for a help topic is then called, the Help Builder prepares the help topic accordingly and the result is displayed in the browser.
Example of an online help call:
https://www.navax.app/contextSensitiveHelpUrl.php?AppID=NVXYZ&L=de&ObjID=HelloWorld
AppID
To assign the online help call to a help project, the AppID parameter must be specified in the call. This AppID is assigned by the NAVAX App Team or has to be coordinated with the NAVAX App Team and must be set up on the server. NVXYZ is assigned to the Abracadabra sample extension, for example.
ObjID
The ObjID parameter is used to specify the help topic or more precisely the file name of the help topic.
Folder Structure and Languages
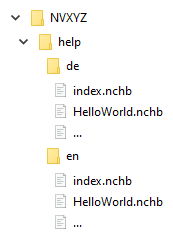
Every help project on navax.app has the following folder structure:
AppID\help\Language
For each language, the individual help files are grouped together in one folder (2 characters, lower case).
Example:
When calling the online help (e.g. from Business Central), the corresponding help topic is first searched in the folder of the requested language (parameter L).
If no language is specified in the call, the search is performed using the language set in the browser.
If the help topic is not available in the language, the folders of the other languages are searched, if available.
If the help topic cannot be found here either, the table of contents of the help project is displayed.
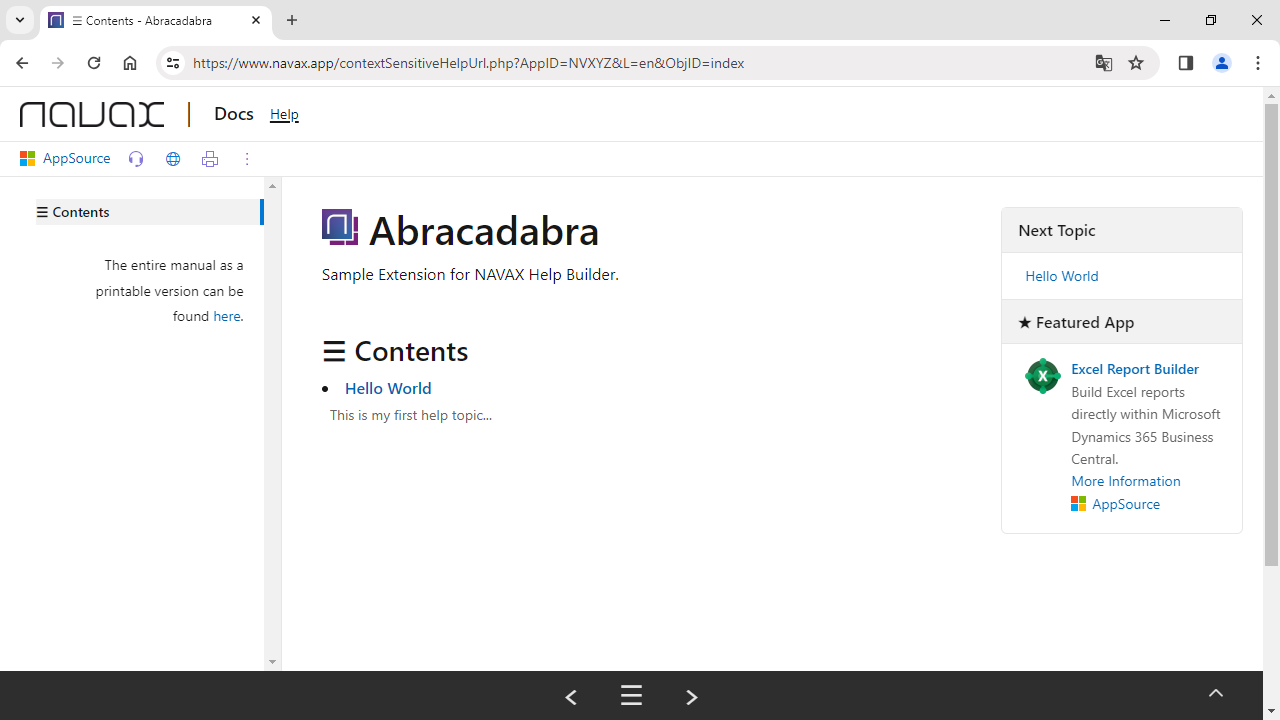
Example for the call https://www.navax.app/contextSensitiveHelpUrl.php?AppID=NVXYZ&L=de&ObjID=HelloWorld:
Each page is prepared by the Help Builder before being displayed. Among other things, actions such as Feedback and Print are added to the page.
Settings like the feedback email address are configured on the server by the NAVAX App Team for the help project.
In addition, the Help Builder automatically adds an action for the Manual to the table of contents. This allows the user to print out the entire Help or save it as a PDF.
Docs / App / NAVAX Help Builder / Preparations Set up AL Extension
So that the online help can be called from a Business Central Extension by the user, the links to the online help must be specified in the app.json of the Extension.
To assign extension calls to a help project, the AppID parameter must be specified in all links. This AppID is assigned by the NAVAX App Team or has to be coordinated with the NAVAX App Team and must be set up on the server. NVXYZ is assigned to the Abracadabra sample extension, for example.
As soon as an AppID is assigned and set up, a call with the GUID of the extension is also possible. But this method should only be used for special internal calls.
app.json
The following information must be added at the App-level in app.json:
supportedLocales defines for which languages the help is generally planned or which languages Business Central should explicitly send with the online help call.
The first specified language (here en-US) is used as the default value and should be set to en-US even if no help is planned in English. All other languages must be specified afterwards so that Business Central sends the corresponding language in the online help call as well.
Note
Whether the help is actually available later in the requested language does not matter here. The only question here is which languages Business Central should generally take into account when calling up the online help.
In the setting used here, for example, all German languages are also defined. This results in the following:
If the user has set the language German (Austria), the online help is called with the parameter de-AT.
If the user has set the language to Danish (Denmark), the online help is called with en-US, because da-DK is not part of the supportedLocales.
Page-level
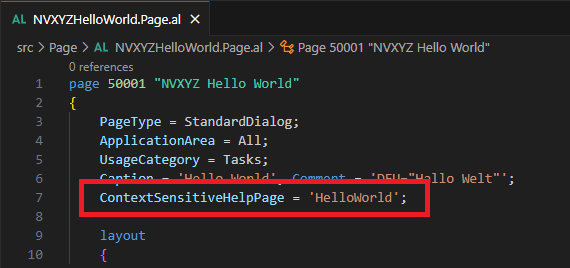
The following information must be added at Page-level:
ContextSensitiveHelpPage = 'TODO';
The ContextSensitiveHelpPage property in the page or requestpage objects establishes the connection to the individual help topics.
TODO must be replaced by the file name of the help topic and is given as ObjID parameter when the online help is called.
It is recommended to use the name of the page (or the object name) for ContextSensitiveHelpPage (and thus for the file name of the help topic).
Example:
If the same help topic is to be called from different pages, topic redirections should be used. Although it is possible to specify the same name in the ContextSensitiveHelpPage property in all pages, but it is not recommended.
The advantage of topic redirections is that they are resolved on the server and thus independent of the extension. If it later turns out that the pages needs different help, this can be changed later at any time (without changing the extension) and all customers have immediate access to the changed/extended help.
For more information, see Write Help, Basics, Topic Redirections.
Docs / App / NAVAX Help Builder / Preparations Set up Visual Studio Code
The help should be written in Visual Studio Code. It is also possible to write the help with another tool, but then no supporting functions are available.
NAVAX Help Builder Extension
A separate Visual Studio Code Extension resp. the NAVAX Help Builder has been developed for creating help topics in Visual Studio Code. This extension provides various Commands and Snippets for creating and writing the help topics.
A Preview can be used to display the later result of a help topic directly in Visual Studio Code.
Additionally, tags and special parameters within the help topic files are color-coded.
Note
NAVAX Help Builder was developed with the acronym "NCHB".
NCHB stands for NAVAX Consulting Help Builder.
Installation
The latest version can be downloaded here:
nchb-3.1.0.vsix
The installation is carried out in Visual Studio Code in the Extension area via the action Install from VSIX.
After the installation, Visual Studio Code must either be restarted or a reload window must be performed.
Snippets
The extension provides snippets for the following areas:
NCHB
These snippets make it easier to write the help texts.
Suggest Help Text from AL File
Via the this Command a help topic can be generated from an AL object (page, pageextension, report oder xmlport). The help text will be suggested based on the object structure and the tooltips, which can then be used as a starting point for the help topic.
For more information, see Write Help, Suggest Help Text, Suggest Help Text from AL File.
The more detailed functionality of the individual commands will be discussed later.
Docs / App / NAVAX Help Builder / Write Help / Basics Create Topics
The Help Builder requires that the individual help files for each language are grouped together in one folder (2 characters, lower case).
For more information, see Preparations, How the Help Builder works.
It is recommended to create the necessary folder structure directly in the directory of the AL extension. This way the online help is also integrated into the source control process.
The help should be written in Visual Studio Code. It is also possible to write the help with another tool, but then no supporting functions are available.
For more information, see Preparations, Set up Visual Studio Code.
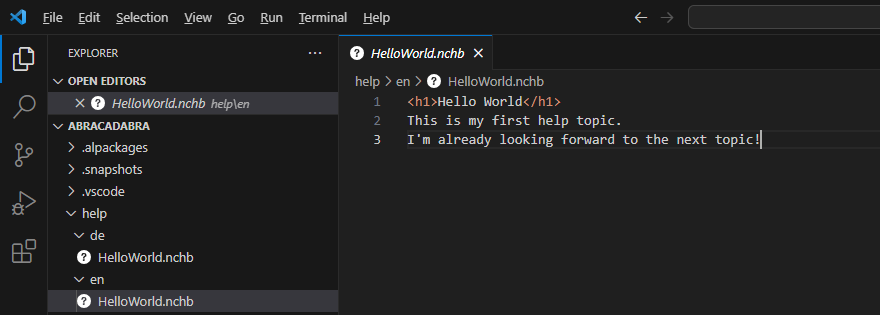
Each help topic is stored in a separate file with the file extension .nchb. The file is basically a normal text file.
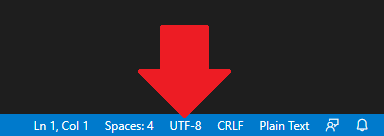
It is important that the file is created as a UTF-8 file (with or without BOM) so that special characters are displayed correctly later. The default encoding of Visual Studio Code is UTF-8 without BOM. In the status bar in the lower right corner you will see the label UTF-8. if not, click it to open the action bar and select Save with Encoding. You can now select a new encoding for the file.
Structure of the help topic
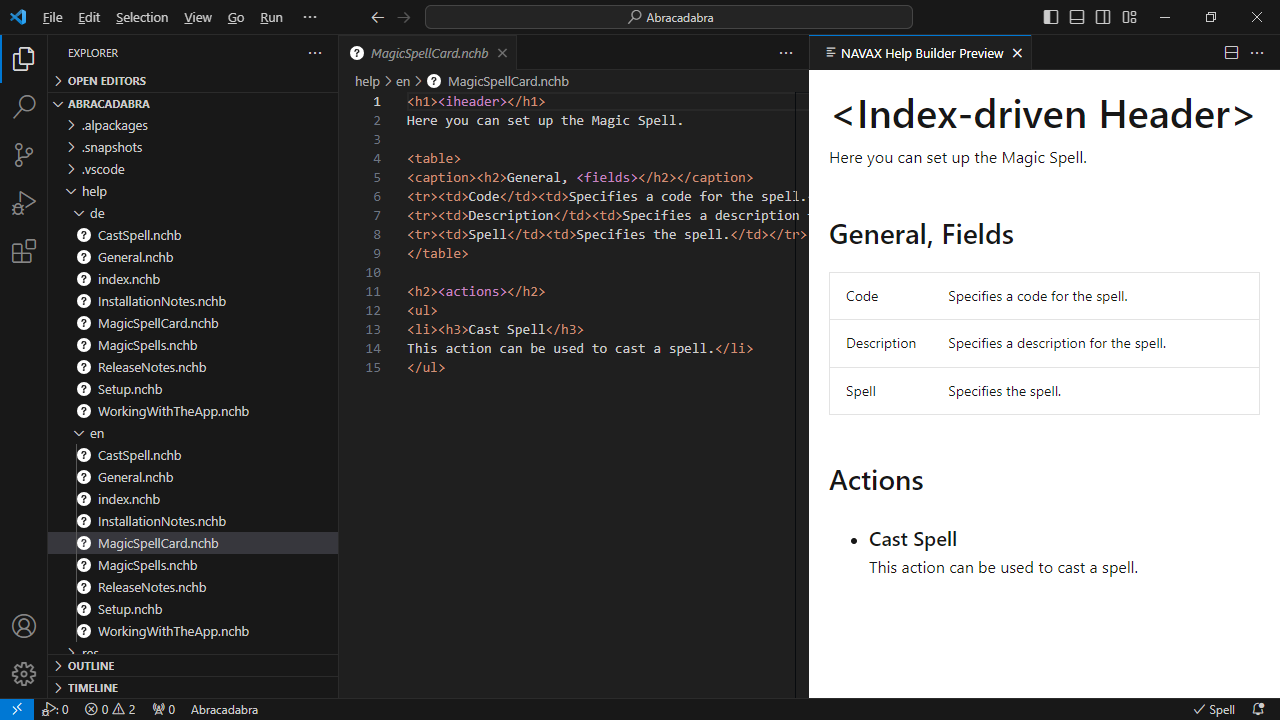
Each help topic starts with a so-called Topic Header. The Topic Header is specified with the <h1> tag. If no <h1> tag is specified, an index-driven topic header is automatically added. Afterwards any text can be written. A line break will later be shown as such.
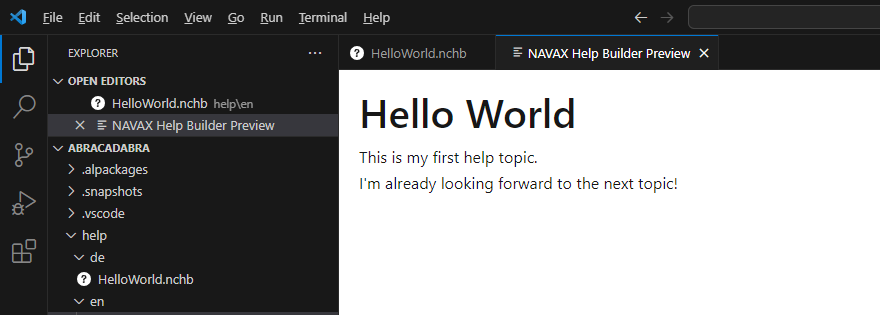
With the NCHB: Preview command of the Help Builder, the later result of the help topic can be displayed directly in Visual Studio Code:
Note
Preview displays a preview where the language-dependent texts are converted to English or to German depending on the folder.
Language-dependent texts are inserted or converted by the Help Builder at the time the help is displayed.
An example of a language-dependent text is the text for a topic link to which the text "For more information, see" or "Weitere Informationen dazu finden Sie unter" is automatically added depending on the language.
Formatting of the help topic
HTML tags are used to format the text. In addition, special tags are available, which are automatically converted by the Help Builder later when the topic is displayed.
For faster creation of the online help, the Help Builder provides Snippets for the most common requirements.
Important
The <h1> tag is specially handled by the Help Builder and should only be used for the Topic Header.
Each <h2> tag is automatically added to the "In this Topic" list.
<h3> tags are added to the "In this Topic" list if they are at the beginning of a new line. So if there is another tag in the line before the tag (e.g. <li><h3>) it will not be added. If a tag should not be added, the following can also be specified: <h3 class="dummy">.
Snippets
The following snippets are available:
Snippet
Code/Result
_New_Topic
Creates an example which can be used as a starting point.
Docs / App / NAVAX Help Builder / Write Help / Basics Create Table of Contents
Every help project needs a table of contents which is created in a separate file named index.nchb.
Unlike normal help topics, the table of contents does not start with a topic header. So there is no <h1> specification. The topic header will be added automatically later by the Help Builder.
In addition, the Help Builder automatically adds various texts and an action for the Manual to the table of contents. This allows the user to print out the entire Help or save it as a PDF.
The table of contents itself consists of a collection of topic links added via the _Index_AddLink snippet.
Example:
<li><link "HelloWorld">Hello World</link></li>
Result:
Note
There should be a link in the index for each topic.
Grouping
Topic links can also be grouped in the table of contents.
Each group (whether main group or subordinate group) starts with a new line and is specified as follows:
<group>group header</group><ul>
Each group must be closed at the end with a new line as follows:
</ul>
Example:
<group>Main Group 1</group><ul>
<li><link "CreateIndex">TopicLinkText1</link></li>
<li><link "CreateIndex">TopicLinkText2</link></li>
</ul>

<group>Main Group 2</group><ul>
<group>Subordinate Group 2.1</group><ul>
<group>Subordinate Group 2.1.1</group><ul>
<li><link "CreateIndex">TopicLinkText1</link></li>
<li><link "CreateIndex">TopicLinkText2</link></li>
<li><link "CreateIndex">TopicLinkText3</link></li>
</ul>
<group>Subordinate Group 2.1.2</group><ul>
<li><link "CreateIndex">TopicLinkText</link></li>
</ul>
</ul>
</ul>
Tip
Empty lines can be used in the index to make the grouping visually clearer. Empty lines in the index are later ignored by the Help Builder.
Links to other help projects
It is also possible to link help topics from other help projects as if they were part of the current help project. To do this, the AppID of the linked help project must be specified in square brackets before the file name of the linked help file.
Example:
The Help Builder automatically adds various texts and an action for the manual to the table of contents.
If additional texts are required, they can be stored in a file named indexNotes.nchb.
The Help Builder then adds the contents of the file to the table of contents as well.
Snippets
The following snippets are available:
Snippet
Code/Result
_New_Index
Creates an example which can be used as a starting point.
Docs / App / NAVAX Help Builder / Write Help / Basics Topic Links & External Links
Topic Links
Note
The following approach is no longer recommended for topic links. Use the index-driven approach instead.
For a better understanding of the index-driven approach, we recommend reading this topic anyway.
Links between the help topics can be added by specifying <link:
<link "nchbFileName">LinkText</link>
The name of the help file (nchbFileName) must be specified in quotes and without the .nchb file extension.
</more> automatically adds a dot to the end of the link.
This can be prevented by using </more+>
External Links
Links to other external sources can be added using the _ExternalLink snippets.
It is also possible to link external sources via standard HTML. In this case however, class="HELP" should be specified in the link so that the formatting matches the rest of the help.
</moreexternal> automatically adds a dot to the end of the link.
This can be prevented by using </moreexternal+>
Docs / App / NAVAX Help Builder / Write Help / Basics Index-driven Approach
Until now, the text to be displayed for topic headers and topic links was always specified directly in the help topic.
So for example:
<h1>Hello World</h1>
or:
<more "HowNCHBWorks">Preparations, How the Help Builder works</more>
The disadvantage of this form of specification is that when changes are made in the structure or the arrangement and grouping of the help topics in the table of contents, all headings and links affected by them must also be updated. Especially with larger online helps, this approach quickly leads to errors and is time consuming.
With the index-driven approach these problems can be avoided as the text displayed is determined by the table of contents. If the structure or the arrangement and grouping of the help topics in the table of contents is changed later, the topic headers and topic links do not need to be changed additionally.
Index-driven Topic Headers
For topic headers, the _iTopic_Header snippet is available.
Instead of specifying the text directly in the topic as before:
<h1>Hello World</h1>
you can simply specify the placeholder <iheader>:
<h1><iheader></h1>
The online help later displays the text specified in the table of contents instead of the placeholder.
Note
In the Preview only the text <Index-driven Header> is displayed.
Index-driven Topic Links
For topic links, the _iTopicLink, _iTopicLink_MoreInfo, _iTopicLink_Short and _iTopicLink_MoreInfo_Short snippets are available.
Instead of specifying the text directly with the link as before:
<more "HowNCHBWorks">Preparations, How the Help Builder works</more>
the i variant no longer needs text:
<imore "HowNCHBWorks">
The online help later displays the text specified in the table of contents.
Note
In the Preview only the text <Index-driven Link> is displayed.
<imore automatically adds a dot to the end of the link.
This can be prevented by using <imore+
Docs / App / NAVAX Help Builder / Write Help / Basics Topic Redirections
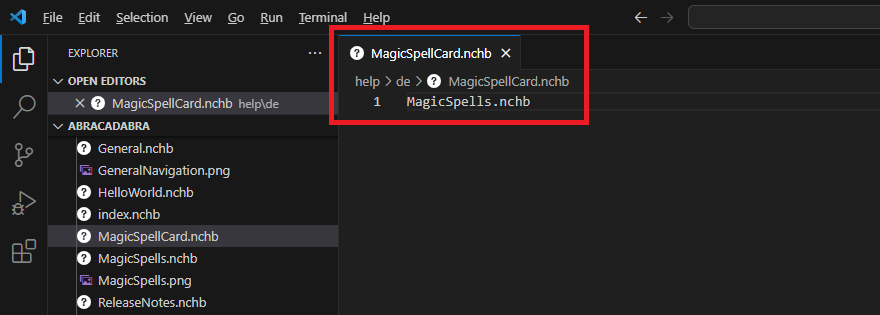
Redirections of help topics can be realized by specifying another help file in the first line of a help file. In order for the Help Builder to recognize the redirection, the file extension .nchb must be specified.
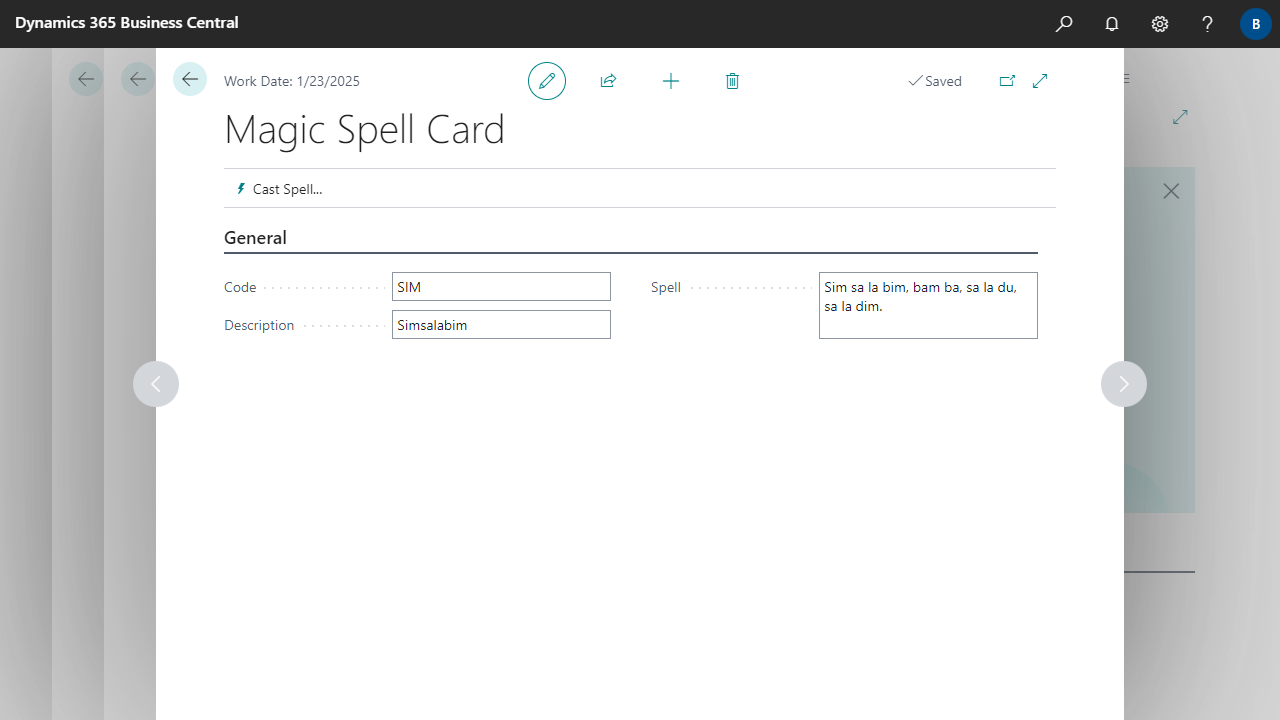
Here, the Magic Spell Card help (ContextSensitiveHelpPage = 'MagicSpellCard') is redirected to the general Magic Spells help (ContextSensitiveHelpPage = 'MagicSpells'). In this case, there should be no help for the Card itself, but the Magic Spells help should be displayed.
If it turns out later that a separate help is necessary for the Card, this can be changed later at any time (without changes to the extension) and all customers have immediate access to the changed/extended help.
Redirects to help topics from other help projects
If a topic from another help project is linked in the table of contents, the AppID of the linked help project must also be specified in square brackets when redirecting to that topic.
Example:
You can also define redirects that leave the current help project and open a different help project instead. This can be useful, for example, if a specific section needs to be described entirely separately in its own help project. To do this, you must specify the AppID of the linked help project in square brackets and three arrows before the filename of the linked help file.
Example:
[>>>NCEX]LicenseManagement.nchb
Note
These help topics (or these .nchb files) should not appear in the table of contents of the current help project or be linked there.
Docs / App / NAVAX Help Builder / Write Help / Basics Create Release Notes
Release Notes can be added using the _ReleaseNotes snippets.
For files named ReleaseNote, the Help Builder automatically adds version details for each version when viewing the page. Version details are only added if the version is specified in a <h2> after the text Version separated by a space. Alternatively, the AppID can also be specified instead of the text "Version".
Example:
Version 22.1.2.0
as of Business Central 22Important Update 2024/01/01
The version details are stored in a database on navax.app. Further details (access data etc.) have to be coordinated with the NAVAX App Team.
If downgrade versions are available for a version, a note is automatically added.
Example:
Note
This version is also available as a downgrade version for Business Central 22, 21 and 20.
Snippets
The following snippets are available:
Snippet
Information/Result
_New_ReleaseNotes
Creates an example which can be used as a starting point.
Note
<releasenotestext>, <upcomingupdates>, <upcomingupdatestext>, <downgradeinfo> and <initialversion> are automatically replaced by text and displayed to the user in German or English.
Result:
Release Notes
Would you like to know what has changed in the extension? Below you'll find an overview of the new features and changes made in the updates.
Version TODO
Initial Version
_ReleaseNotes_AddVersion
Adds a new version.
Note
<improvements>, <modifications> and <corrections> are automatically replaced by text and displayed to the user in German or English.
Due to changes in the Granules, the Business Central license needs to be updated for On-Premises installations.
Docs / App / NAVAX Help Builder / Write Help / Basics Spell Check
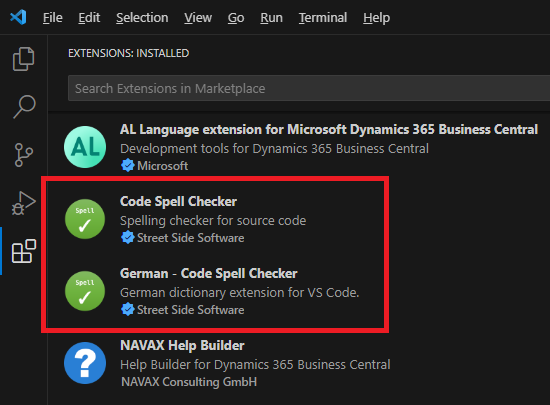
For spell checking the Visual Studio Code Extension Code Spell Checker is recommended.
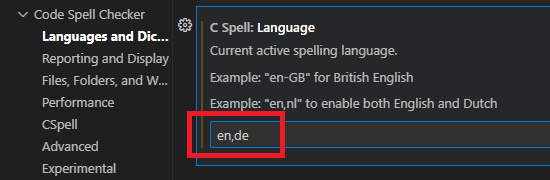
The required languages must be activated in the Settings.
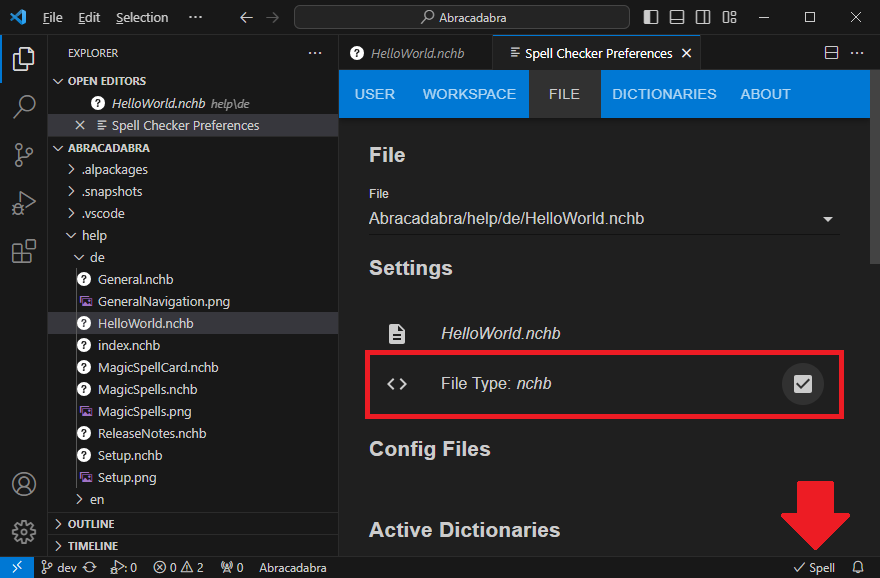
To ensure that the spell check is performed automatically for all help topic files (file extension .nchb), first open/create a help topic file and then click on Spell in the Status Bar. This opens the Spell Checker Preferences window. Activate the spell check for all nchb files in the Settings area.
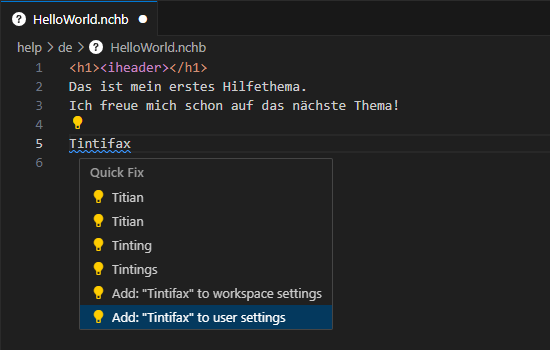
Unknown words can be added to the spell check dictionary.
Docs / App / NAVAX Help Builder / Write Help / Suggest Help Text Suggest Help Text from AL File
Via the Suggest Help Text from AL File Command a help topic can be generated from an AL object (page, pageextension, report oder xmlport). The help text will be suggested based on the object structure and the tooltips, which can then be used as a starting point for the help topic.
Note
The Help Builder requires that the individual help files for each language are grouped together in one folder (2 characters, lower case).
Suggest Help Text from AL File determines the help text based on the folder where the help file is located.
In the folder 'de', for example, the language layers 'DEU', 'DEA' and 'DES' are considered, in the folder 'fr' the language layers 'FRA', 'FRB', 'FRC' and 'FRS' are considered.
If no corresponding language layer is found in the objects, the default text (normally English) of the captions and tooltips is suggested.
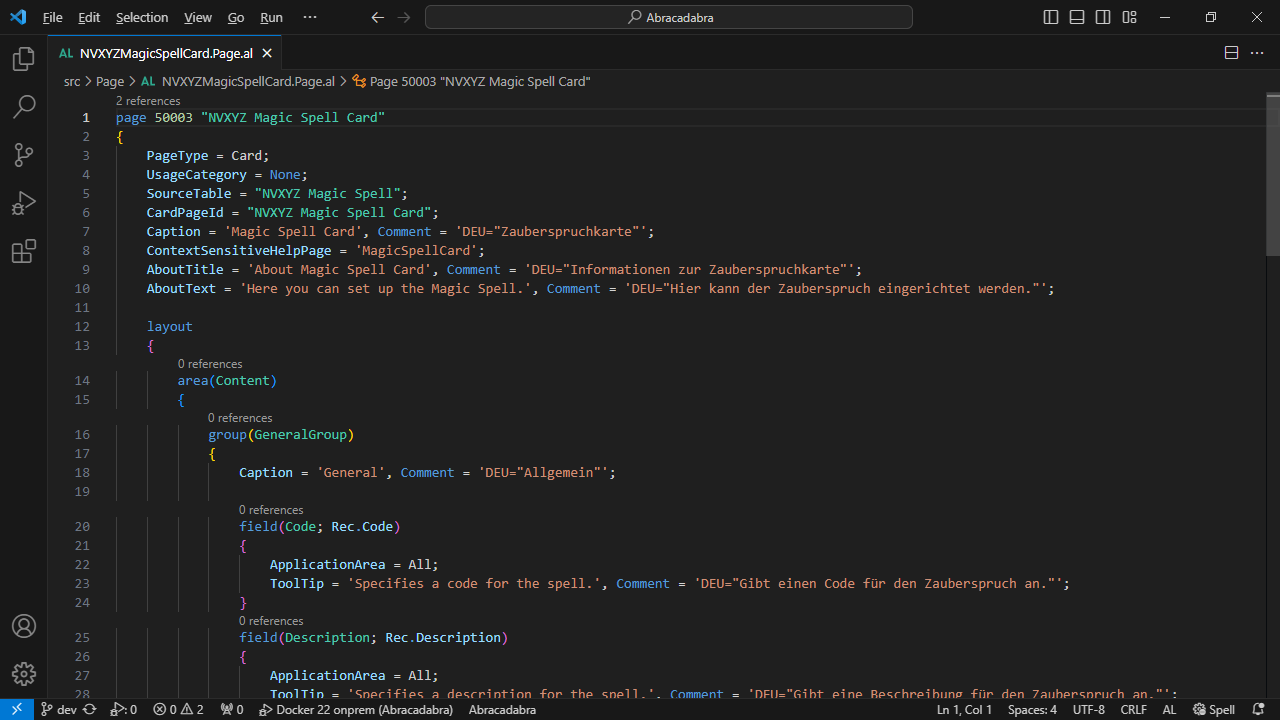
So that the help texts can be determined in the respective language, the language layers with the translated texts must be specified as Comment in the AL objects:
The specification starts with the 3-digit language layer code followed by an =" Example: DEU="
After that the translated text is given. Further " characters in the text are allowed.
At the end, the text is concluded with another ". Example: DEU="Das ist ein besonders "sinnvoller" Text."
If multiple language layers are specified, they are separated by a comma.
Example:
Tip
The NAVAX Help Builder Extension provides Snippets for AL that make it easier to specify the additional language layers as comments in the AL objects.
Suggest Help Text
Create a new .nchb file or open an existing .nchb file.
Position the cursor in the editor at the position where you want to insert the text.
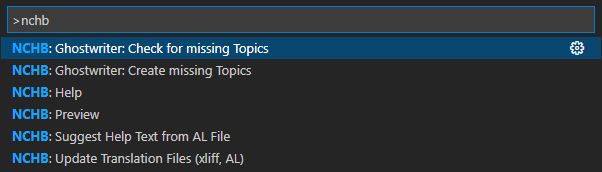
Call the NCHB: Suggest Help Text from AL File Help Builder command via Ctrl+Shift+P or via F1.
Select the AL file and click on Open so that the help text is suggested.
Note
For the fields of a page, an attempt is made to get the field captions of the SourceTable from the .xlf files.
Exception: If a different caption is specified in the page.
If no caption could be determined, the caption of the field is inserted with TODO_ and the field must be revised manually.
Example of a suggestion:
Update Translation Files (xliff, AL)
Via this command the xliff files in the translation folder of an AL Extension can be created or updated. The command is comparable to the command AL: Generate Xliff files (AL Tools) of the extension AL Language Tools.
Note
Using the AL Language Tools extension is not recommended as there are some errors and the formatting is not 100% like Microsoft formatting.
In order for the xliff files to be created or updated in the respective language, the language layers with the translated texts must be specified as Comment in the AL objects.
Damit die aktuellen Sprachlayer auch in der Source-xliff Datei aktualisiert sind, muss vor dem Ausführen des Commands die AL Extension kompiliert werden Ctrl+Shift+B.
The command can also be deactivated or blocked for an app. To do this, a file with the following name must be created in the root directory: NCHB_BLOCK_UPDATE_TRANSLATION_FILES
When the command is executed, details of the updated xliff files are displayed in the panel under OUTPUT in the NCHB group:
Docs / App / NAVAX Help Builder / Write Help / Suggest Help Text Ghostwriter
With the NCHB Ghostwriter, a suggestion for a complete online help or for newly added AL objects can be created within a very short time.
There are 2 independent commands available for the ghostwriter: Check for missing Topics and Create missing Topics.
The behavior of the ghost writer can be set in the Visual Studio Code Settings.
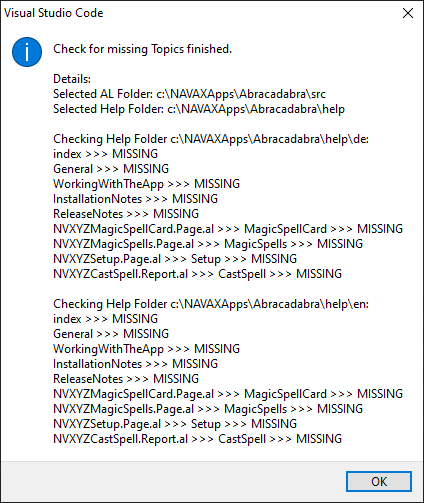
Check for missing Topics
This command checks whether for all AL objects (page, pageextension, report or xmlport) of a folder corresponding nchb files exist in a help folder.
So nothing is changed or created here.
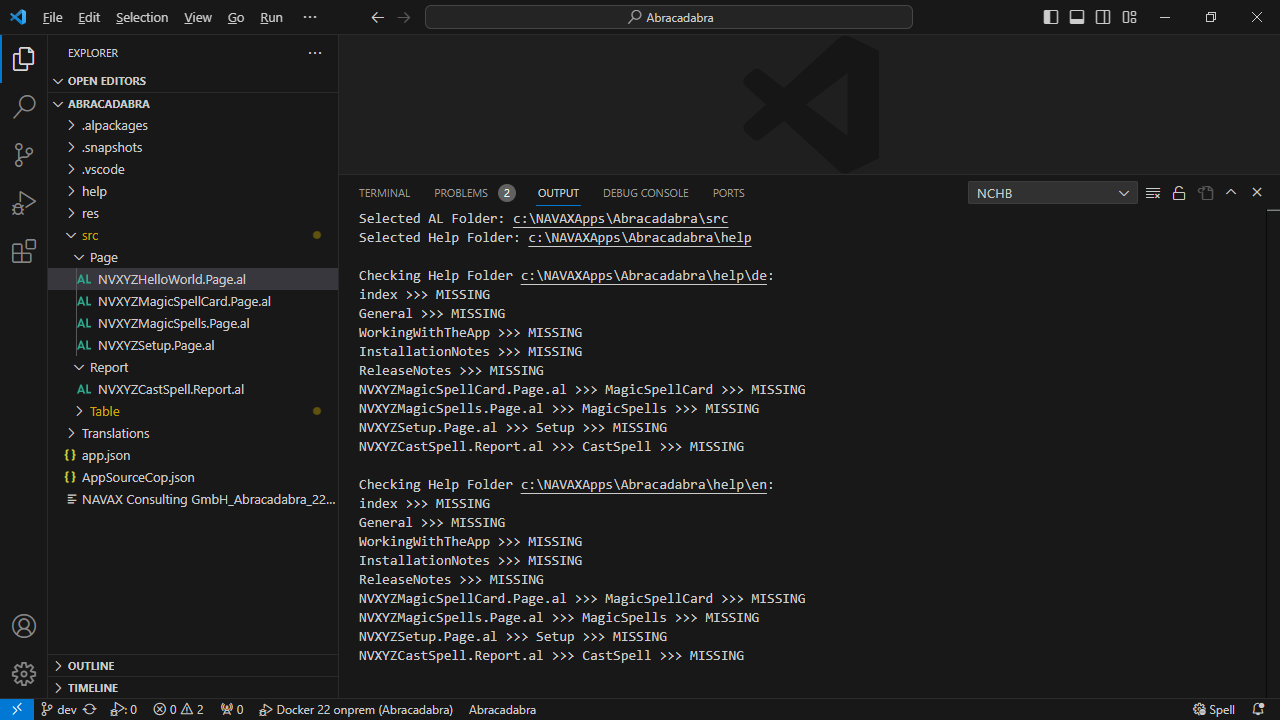
By default, the AL objects are searched for in the "src" folder (and its subfolder) of the AL extension.
If no "src" folder exists or if 'Ghostwriter: Manual Folder Selections AL' is enabled in the Visual Studio Code Settings, the folder must be selected manually.
For the help files "help" is used as folder by default.
If there is no "help" folder or if 'Ghostwriter: Manual Folder Selections Help' is enabled in the Visual Studio Code Settings, the folder must be selected manually.
Note
For the Ghostwriter commands to produce results, the "help" folder must contain the subfolders (2-digit, e.g. 'de', 'en') for the desired languages.
After the command has been executed, the result is displayed as a modal Visual Studio code message, which can also be copied with Ctrl+C.
In addition, the result is also displayed in the Panel under OUTPUT in the NCHB group.
In this example, it was first checked whether topics such as "Index", "General", "Working with the App", etc. exist. Whether and which topics are to be considered here can be set in the Visual Studio Code Settings.
After that, 4 AL objects were found, which could be relevant for the help. A ContextSensitiveHelpPage is defined in all objects, but no corresponding nchb files were found in the help folder.
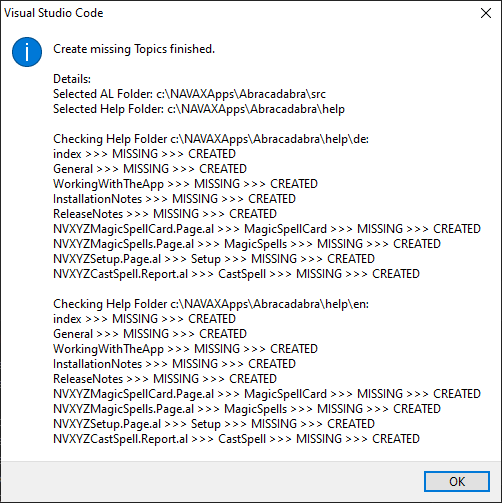
Create missing Topics
This command creates for all AL objects of a folder corresponding nchb files in a help folder if these do not exist there yet. The same rules and settings apply as for the Check for missing Topics command.
Note
Again:
For the Ghostwriter commands to produce results, the "help" folder must contain the subfolders (2-digit, e.g. 'de', 'en') for the desired languages. So the command does not create subfolders for the languages by itself.
After the command has been executed, the result is displayed as a modal Visual Studio code message (and additionally in the Panel under OUTPUT in the NCHB group), which can also be copied with Ctrl+C.
What is suggested?
Whether and which topics should be considered in addition to the AL objects can be set in the Visual Studio Code Settings.
The help text for an AL object is suggested exactly as the Suggest Help Text from AL File command would suggest. Exception: Visual Studio Code Settings 'Ghostwriter: Only Todo And Path' is activated. In this case, only the text 'TODO' followed by the path of the AL object is suggested.
For more information, see Write Help, Suggest Help Text, Suggest Help Text from AL File.
Example of a suggestion:
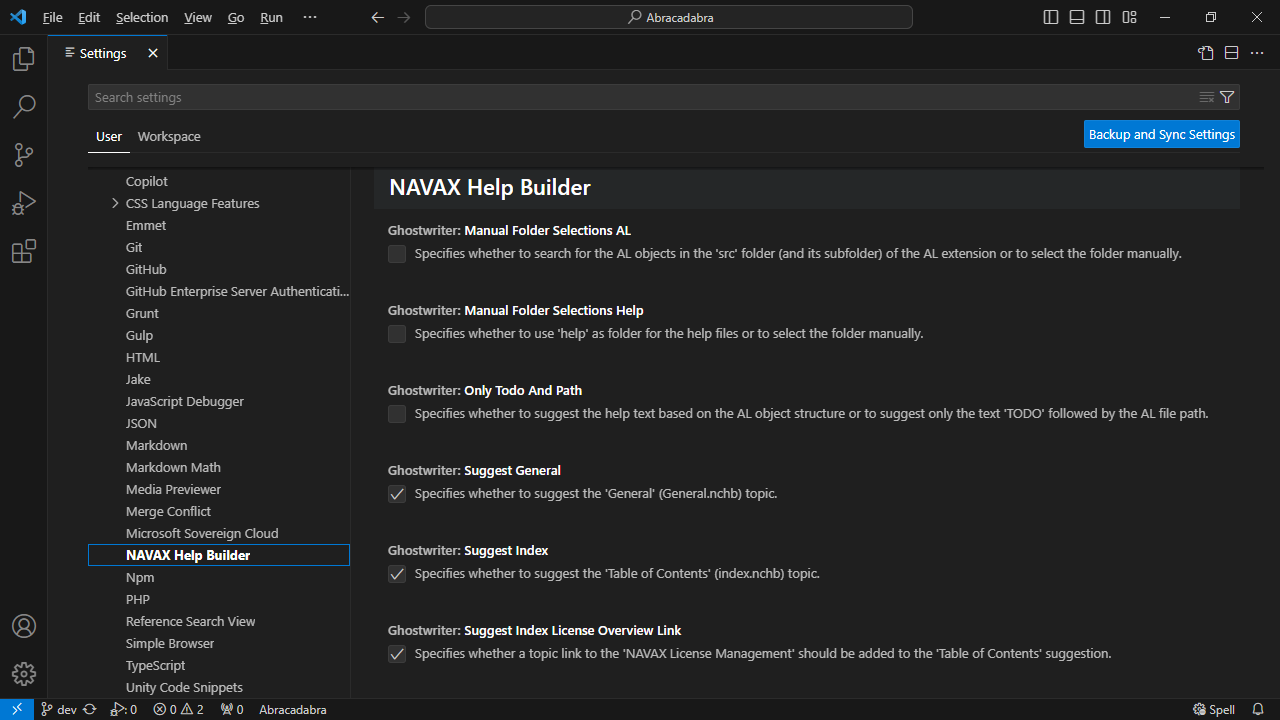
Visual Studio Code Settings
The behavior of the ghostwriter and the topics to be suggested can be defined via various parameters in the Visual Studio Code Settings (File > Preferences > Settings) in the Extensions, NAVX Help Builder section.
Setting
Information
Manual Folder Selections AL
Specifies whether to search for the AL objects in the "src" folder (and its subfolder) of the AL extension or to select the folder manually.
Manual Folder Selections Help
Specifies whether to use "help" as folder for the help files or to select the folder manually.
Only Todo And Path
Specifies whether to suggest the help text based on the AL object structure or to suggest only the text 'TODO' followed by the AL file path.
Suggest General
Specifies whether to suggest the General (General.nchb) topic.
This setting does not affect the Table of Contents suggestion.
Here the description from the app.json is suggested, followed by a section for Navigation.
Afterwards a section for Permission Sets is suggested. If Permission Sets exist as AL objects, they will be considered here.
If 'Suggest Installation Notes' is enabled, an additional topic link to the Installation Notes is added.
Suggest Index
Specifies whether to suggest the Table of Contents (index.nchb) topic.
Here, depending on the other settings, a suggestion for the Table of Contents is made.
Different section such as 'Setup', 'Tasks', 'Reports and Analysis' and so on are created.
At the end of the suggestion, the topics suggested from the AL objects are added in the 'TODO' section.
These must then be moved manually to the various sections.
Note
Each time topics are created or added from AL objects via the Ghostwriter, they are added to the 'TODO' section at the end of the Table of Contents.
Suggest Index License Overview Link
Specifies whether a topic link to the NAVAX License Management should be added to the Table of Contents suggestion.
Suggest Installation Notes
Specifies whether to suggest the Installation Notes (InstallationNotes.nchb topic.
This setting also affects the Table of Contents suggestion.
Here the dependencies from the app.json are suggested, followed by a section for On-Premises.
After that a section for External Addresses is suggested. If the NAVAX Extension Base is found as a dependency, the necessary information for it is added.
Suggest Release Notes
Specifies whether to suggest the Release Notes (ReleaseNotes.nchb topic.
This setting does not affect the Table of Contents suggestion.
Here everything is suggested for a Initial Version version. The version no. is suggested from the app.json.
Suggest Release Notes Build Overview Link
Specifies whether a link to the Build Overview in DevOps should be added to the Release Notes suggestion.
Suggest Working With The App
Specifies whether to suggest the Working with the App (WorkingWithTheApp.nchb) topic.
This setting also affects the Table of Contents suggestion.
Here only the Topic Header followed by the text 'TODO' is suggested.
Docs / App / NAVAX Help Builder / Write Help / Extended Notes
Notes can be added using the _Note snippets.
Snippets
The following snippets are available:
Snippet
Code/Result
_Note
<note>
TODO_NoteText
</note>
Result:
Note
TODO_NoteText
_Note_Tip
<tip>
TODO_TipText
</tip>
Result:
Tip
TODO_TipText
_Note_Important
<important>
TODO_ImportantText
</important>
Result:
Important
TODO_ImportantText
_Note_Caution
<caution>
TODO_CautionText
</caution>
Ergebnis:
Caution
TODO_CautionText
_Note_Warning
<warning>
TODO_WarningText
</warning>
Result:
Warning
TODO_WarningText
Docs / App / NAVAX Help Builder / Write Help / Extended Lists
Bulleted lists can be added using the snippet _List.
Numbered lists can be created using the snippet _List_Numbered or by specifying <ol> instead of <ul>.
New list entries can be added with _List_AddEntry.
<table>
<caption><h3>TODO_OptionalTableCaption</h3>
A checkmark ( <checkmark> ) in the <b>TODO_ColumnHeader</b> column indicates TODO.
Ein Häkchen ( <checkmark> ) in der Spalte <b>TODO_ColumnHeader</b> zeigt an, TODO.</caption>
<tr><th> </th><th class="mark">TODO_ColumnHeader</th><th> </th></tr>
<tr><td>TODO_Content1</td><td class="mark"><checkmark></td><td>TODO_Content2</td></tr>
<tr><td>TODO_Content1</td><td class="mark"><xmark></td><td>TODO_Content2</td></tr>
</table>
Result:
TODO_OptionalTableCaption
A checkmark ( ) in the TODO_ColumnHeader column indicates TODO.
Ein Häkchen ( ) in der Spalte TODO_ColumnHeader zeigt an, TODO.
TODO_ColumnHeader
TODO_Content1
TODO_Content2
TODO_Content1
-
TODO_Content2
_CheckmarkTable_AddRow
<tr><td>TODO_Content1</td><td class="mark">TODO <checkmark> or <xmark></td><td>TODO_Content2</td></tr>
Docs / App / NAVAX Help Builder / Write Help / Extended Images
Images can be added using the _Image snippet.
<image "TODO_FileName.png?v=1.0">
Tip
?v=1.0 after the .png file extension:
The value should be increased during an update (e.g. to v=1.1) so that users of the online help do not see the old image, which may still be present in their browser cache, after an image has been updated and subsequently uploaded.
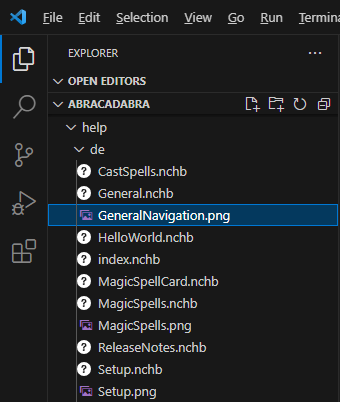
In order to be able to customize the images language-wise, they should be saved in the same folder as the help file. It is recommended to use the same name for the image file as for the help file (if necessary with consecutive numbering or additional name).
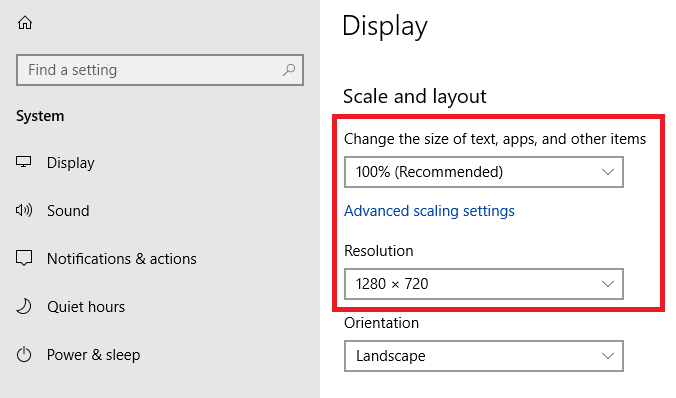
Recommended display settings for screenshots:
100% scaling and a resolution of 1280x720 (AppSource specification from Microsoft).
Tip
You should hide the taskbar and favorites bar while taking screenshots.
Browser windows should be maximized (default shortcut key: F11).
With the _Image_DarkMode snippet you can add images, where you can additionally specify an alternative image for the Dark Mode of the browser. Depending on the browser settings either the normal image or the image for the dark mode is displayed.
Docs / App / NAVAX Help Builder / Write Help / Extended Animated Images (GIF)
If animated images are inserted (file extension .gif), basically the same things must be observed as for normal Images.
Animated images can be added using the _Image_Animated snippet.
Instead of the .png file the corresponding .gif file must be specified.
<image "TODO_AnimatedFileName.gif?v=1.0">
A recommended tool for the creation of .gif files is for example ScreenToGif.
For more information, see www.screentogif.com
Docs / App / NAVAX Help Builder / Write Help / Extended Videos
Videos can be linked either indirectly via navax.app or directly (not recommended).
Example indirect link:
A direct link to the video has some disadvantages.
If the video is updated, or if a newer video is uploaded to youtube, the link must be updated in all places.
If the video is linked in the AL Code (e.g. Assisted Setup), the link can only be changed with a new release.
To avoid these problems, videos should instead be linked indirectly via navax.app with the AppID and a so-called VideoID.
Indirect video links can be added using the _Video_16x9 (16x9 format) and _Video_4x3 (4x3 format) snippets.
The current video link is stored in a database on navax.app.
This also ensures that the videos in the application (e.g. Assisted Setup) match the videos in the online help.
Further details (access data etc.) have to be coordinated with the NAVAX App Team.
Tip
The VideoID can also be used or specified in AL Code (e.g. in Assisted Setup).
[EventSubscriber(ObjectType::Codeunit, Codeunit::"Assisted Setup", 'OnRegister', '', true, true)]
local procedure NVXYZ_AssistedSetup_OnRegister()
var
    AssistedSetup: Codeunit "Assisted Setup";
    AssistedSetupGroup: Enum "Assisted Setup Group";
    VideoCategory: Enum "Video Category";
    AppInfo: ModuleInfo;
    CurrentGlobalLanguage: Integer;
    AssistantNameTxt: Label 'Abracadabra Setup', Comment = 'DEU="Abracadabra-Einrichtung"';
    DescriptionTxt: Label 'Set up the general settings and defaults for Abracadabra.', Comment = 'DEU="Richten Sie die allgemeinen Einstellungen und Vorgaben für Abracadabra ein."';
    LanguageTxt: Label 'en', Comment = 'DEU="de"';
begin
    NavApp.GetCurrentModuleInfo(AppInfo);
    CurrentGlobalLanguage := GlobalLanguage();
    AssistedSetup.Add(
        AppInfo.Id(),
        Page::"NVXYZ Setup",
        AssistantNameTxt,
        AssistedSetupGroup::GettingStarted,
        'https://www.navax.app/video.php?AppID=NVXYZ&VideoID=Setup&L=' + LanguageTxt,
        VideoCategory::GettingStarted,
        'https://www.navax.app/contextSensitiveHelpUrl.php?AppID=NVXYZ&ObjID=Setup&L=' + LanguageTxt,
        DescriptionTxt);
    GlobalLanguage(Language.GetDefaultApplicationLanguageId());
    AssistedSetup.AddTranslation(Page::"NVXYZ Setup", Language.GetDefaultApplicationLanguageId(), AssistantNameTxt);
    GlobalLanguage(CurrentGlobalLanguage);
end;
Snippets
The following snippets are available:
Snippet
Code/Result
_Video_16x9
<video16x9 "TODO_VideoID"></video16x9>
Result:
_Video_4x3
<video4x3 "TODO_VideoID"></video4x3>
Result:
Docs / App / NAVAX Help Builder / Write Help / Extended Page Breaks
When printing the help or when creating a PDF, a page break is inserted for each help topic.
If page breaks are needed within the help topic for better structuring, they can be added via the _PageBreak snippet.
Snippets
The following snippets are available:
Snippet
Code
_PageBreak
<pagebreak>
Docs / App / NAVAX Help Builder / Write Help / Extended Display Screen/Print
With <span class="hideonprint"> or <span class="hideonscreen"> elements can be displayed either only on the screen or only when printing.
Example:
Docs / App / NAVAX Help Builder / Write Help / Extended Source Code
Source Code can be added using the _SourceCode snippets.
A syntax highlighter can be enabled in the <code> tag by specifying the language with class="language-xxx".
The highlighter is available for the following languages.
Docs / App / NAVAX Help Builder / Upload Help Upload Help to navax.app
In order for the help to be available online, the help project must be uploaded to navax.app.
Further details (access data etc.) have to be coordinated with the NAVAX App Team.
Would you like to know what has changed in the extension? Below you'll find an overview of the new features and changes made in the updates.
The latest version can be downloaded here:
nchb-3.1.0.vsix
Version 3.1.0
as of Business Central 3 2025/04/25
Improvements
The snippets have been revised.
Modifications
Some help texts have been updated.
Version 3.0.3
2024/09/02
Improvements
The Update Translation Files (xliff, AL) command can now be deactivated or blocked for an app. To do this, a file with the following name must be created in the root directory: NCHB_BLOCK_UPDATE_TRANSLATION_FILES
Version 3.0.2
2024/03/27
Corrections
An incorrect granule ID was suggested for the NCEX in the Installation Notes.
The NCHB Help Builder extension has been renamed to NAVAX Help Builder.
Improvements
The online help has been revised.
Version 2.0.8
2023/10/04
Modifications
Since display problems repeatedly occurred when the Release Notes were printed, they have been revised.
From now on, the release notes are created in a separate structure provided by the Help Builder. The old format is still valid, but it is recommended to use the new format from now on. The command Convert old Release Notes can be used to convert the old release notes to the new format.
The links in the index were incorrectly created with a file extension (.nchb) by the Ghostwriter.
Version 2.0.7
2023/04/22
Improvements
Added a Search bar to the online help.
It is now possible to create topic headers and topic links where the displayed text is determined by the table of contents. If the structure or the arrangement and grouping of the help topics in the table of contents is changed later, the topic headers and topic links do not need to be changed additionally.
For more information, see Write Help, Basics, Index-driven Approach.
Tables can now also be created with a checkmark column ( ).
For more information, see Write Help, Extended, Tables.
Version 2.0.6
2023/03/23
Corrections
The texts for the placeholders <fields>, <factboxes>, <actions> and <options> were not displayed in the Preview.
Version 2.0.5
2023/03/16
Improvements
The Preview for Notes has been improved.
The texts for the placeholders <installationnotestext>, <ncexupdateinfo> and <licupdateinfo> are now converted and displayed in the Preview.
The Permission Sets are now suggested by the Ghostwriter as a table.
Version 2.0.3
2022/08/25
Modifications
Stylesheet update. Release Notes are now displayed in the preview without a table border.
Version 2.0.2
2022/07/22
Improvements
The command Suggest Help Text from AL File can now be used to suggest a help text for reportextensions.
Version 2.0.1
2022/07/14
Modifications
Stylesheet update.
Version 2.0.0
2022/07/06
Improvements
The Command Update Translation Files (xliff, AL) has been added.
Via this command the xliff files in the translation folder of an AL Extension can be created or updated.
The command is comparable to the command AL: Generate Xliff files (AL Tools) of the extension AL Language Tools.
Note
Using the AL Language Tools extension is not recommended as there are some errors and the formatting is not 100% like Microsoft formatting.
The Suggest DE Help Text from AL File command has been removed.
Suggest Help Text from AL File now determines the help text based on the folder where the help file is located.
In addition, Snippets for AL have been added, which make it easier to specify the additional language layers as comments in the AL objects.
For more information, see Write Help, Suggest Help Text, Suggest Help Text from AL File.
The commands Check for missing Help Topics and Create missing Help Topics have been completely revised.
Both commands are now part of the newly added NCHB Ghostwriter.
With the NCHB Ghostwriter, a suggestion for a complete online help or for newly added AL objects can be created within a very short time.
For more information, see Write Help, Suggest Help Text, Ghostwriter.
The Preview DE command has been removed.
Preview now displays a preview where the language-dependent texts are converted to English or to German depending on the folder.
Check for missing Help Topics
Checks if for all AL objects of a selected folder a corresponding nchb file exists in a selected help folder.
Create missing Help Topics
Creates for all AL objects of a selected folder (source) a corresponding nchb file in a selected help folder (target) if it does not exist already.
.nchb files now have an icon. The NCHB Icon Theme has been removed.
The snippets for images have been changed. ?v=1.0 is now added after the .png file extension.
For more information, see Write Help, Extended, Images.
The suggestion for the General topic in the _New_Index snippet has been changed.
The <bcv> tag added with NCHB 1.0.2 has been removed again and the version details are now added automatically.
The snippets for creating release notes have been revised.
For more information, see Write Help, Basics, Create Release Notes.
Version 1.0.5
2021/05/13
Improvements
</more> and </moreexternal> automatically adds a dot to the end of the link.
This can now be prevented by using </more+> or </moreexternal+>.
For more information, see Write Help, Basics, Topic Links & External Links.
Version 1.0.4
2021/04/20
Improvements
It is now also possible to link help topics from other help projects as if they were part of the current help project.
For more information, see Write Help, Basics, Topic Links & External Links.
The <bcv> tag can now be used in the release notes to specify the Business Central version from which the extension is available.
For more information, see Write Help, Basics, Create Release Notes.
Version 1.0.1
2020/12/01
Improvements
Added snippet for images where you can additionally specify an alternative image for the dark mode of the browser.
For more information, see Write Help, Extended, Images.


 When calling the online help (e.g. from Business Central), the corresponding help topic is first searched in the folder of the requested language (parameter L).
If no language is specified in the call, the search is performed using the language set in the browser.
If the help topic is not available in the language, the folders of the other languages are searched, if available.
If the help topic cannot be found here either, the table of contents of the help project is displayed.
Example for the call https://www.navax.app/contextSensitiveHelpUrl.php?AppID=NVXYZ&L=de&ObjID=HelloWorld:
When calling the online help (e.g. from Business Central), the corresponding help topic is first searched in the folder of the requested language (parameter L).
If no language is specified in the call, the search is performed using the language set in the browser.
If the help topic is not available in the language, the folders of the other languages are searched, if available.
If the help topic cannot be found here either, the table of contents of the help project is displayed.
Example for the call https://www.navax.app/contextSensitiveHelpUrl.php?AppID=NVXYZ&L=de&ObjID=HelloWorld:
 Each page is prepared by the Help Builder before being displayed. Among other things, actions such as Feedback and Print are added to the page.
Settings like the feedback email address are configured on the server by the NAVAX App Team for the help project.
In addition, the Help Builder automatically adds an action for the Manual to the table of contents. This allows the user to print out the entire Help or save it as a PDF.
Each page is prepared by the Help Builder before being displayed. Among other things, actions such as Feedback and Print are added to the page.
Settings like the feedback email address are configured on the server by the NAVAX App Team for the help project.
In addition, the Help Builder automatically adds an action for the Manual to the table of contents. This allows the user to print out the entire Help or save it as a PDF.
 If the same help topic is to be called from different pages, topic redirections should be used. Although it is possible to specify the same name in the ContextSensitiveHelpPage property in all pages, but it is not recommended.
The advantage of topic redirections is that they are resolved on the server and thus independent of the extension. If it later turns out that the pages needs different help, this can be changed later at any time (without changing the extension) and all customers have immediate access to the changed/extended help.
For more information, see Write Help, Basics, Topic Redirections.
If the same help topic is to be called from different pages, topic redirections should be used. Although it is possible to specify the same name in the ContextSensitiveHelpPage property in all pages, but it is not recommended.
The advantage of topic redirections is that they are resolved on the server and thus independent of the extension. If it later turns out that the pages needs different help, this can be changed later at any time (without changing the extension) and all customers have immediate access to the changed/extended help.
For more information, see Write Help, Basics, Topic Redirections.
 After the installation, Visual Studio Code must either be restarted or a reload window must be performed.
 The help should be written in Visual Studio Code. It is also possible to write the help with another tool, but then no supporting functions are available.
For more information, see Preparations, Set up Visual Studio Code.
Each help topic is stored in a separate file with the file extension .nchb. The file is basically a normal text file.
It is important that the file is created as a UTF-8 file (with or without BOM) so that special characters are displayed correctly later. The default encoding of Visual Studio Code is UTF-8 without BOM. In the status bar in the lower right corner you will see the label UTF-8. if not, click it to open the action bar and select Save with Encoding. You can now select a new encoding for the file.
The help should be written in Visual Studio Code. It is also possible to write the help with another tool, but then no supporting functions are available.
For more information, see Preparations, Set up Visual Studio Code.
Each help topic is stored in a separate file with the file extension .nchb. The file is basically a normal text file.
It is important that the file is created as a UTF-8 file (with or without BOM) so that special characters are displayed correctly later. The default encoding of Visual Studio Code is UTF-8 without BOM. In the status bar in the lower right corner you will see the label UTF-8. if not, click it to open the action bar and select Save with Encoding. You can now select a new encoding for the file.
 With the NCHB: Preview command of the Help Builder, the later result of the help topic can be displayed directly in Visual Studio Code:


 Here, the Magic Spell Card help (ContextSensitiveHelpPage = 'MagicSpellCard') is redirected to the general Magic Spells help (ContextSensitiveHelpPage = 'MagicSpells'). In this case, there should be no help for the Card itself, but the Magic Spells help should be displayed.
If it turns out later that a separate help is necessary for the Card, this can be changed later at any time (without changes to the extension) and all customers have immediate access to the changed/extended help.
Here, the Magic Spell Card help (ContextSensitiveHelpPage = 'MagicSpellCard') is redirected to the general Magic Spells help (ContextSensitiveHelpPage = 'MagicSpells'). In this case, there should be no help for the Card itself, but the Magic Spells help should be displayed.
If it turns out later that a separate help is necessary for the Card, this can be changed later at any time (without changes to the extension) and all customers have immediate access to the changed/extended help.
 The required languages must be activated in the Settings.
 To ensure that the spell check is performed automatically for all help topic files (file extension .nchb), first open/create a help topic file and then click on Spell in the Status Bar. This opens the Spell Checker Preferences window. Activate the spell check for all nchb files in the Settings area.
 Unknown words can be added to the spell check dictionary.
 In addition, the result is also displayed in the Panel under OUTPUT in the NCHB group.
 In this example, it was first checked whether topics such as "Index", "General", "Working with the App", etc. exist. Whether and which topics are to be considered here can be set in the Visual Studio Code Settings.
After that, 4 AL objects were found, which could be relevant for the help. A ContextSensitiveHelpPage is defined in all objects, but no corresponding nchb files were found in the help folder.
In this example, it was first checked whether topics such as "Index", "General", "Working with the App", etc. exist. Whether and which topics are to be considered here can be set in the Visual Studio Code Settings.
After that, 4 AL objects were found, which could be relevant for the help. A ContextSensitiveHelpPage is defined in all objects, but no corresponding nchb files were found in the help folder.
 Recommended display settings for screenshots:
100% scaling and a resolution of 1280x720 (AppSource specification from Microsoft).
Recommended display settings for screenshots:
100% scaling and a resolution of 1280x720 (AppSource specification from Microsoft).
 ).
For more information, see Write Help, Extended, Tables.
).
For more information, see Write Help, Extended, Tables.

